I have decided to start a weekly segment on getting to know items in your home. I got some emails and comments about my post yesterday, regarding some tips for your dishwasher, and I thought it would be great to start a little segment explaining frugal tips for caring for your appliances. If you have an appliance or item in your home that you would like to be featured, or you have a question about an item in your home that you would like to know more about, please email me at
[email protected] and I will try and hunt for all those answers for you. Consider it a Frugal Momma question and answer column and ask away! I am not an expert in anything so take my advice with a grain of salt!
I don’t know what I would do without my dishwasher! There is an urban legend out there that says that washing dishes by hand is cheaper than washing them in the dishwasher. You actually waste less water by using your dishwasher, which makes the dishwasher a great addition to a frugal homeowner’s house.
First, there is no exact science to loading a dishwasher, but there are a few guidelines. Heavy duty stuff (pots, pans, plates, & utensils) go on bottom & delicate items and glassware go on top. Place everything in the upper rack
facedown and put everything on the lower rack aimed towards the center. Silverware should have forks and spoons alternating, otherwise you will get spoons stuck together and they will need to be rewashed.
The important things to know to keep your costs low for running a dishwasher are pretty simple and straightforward. First, it is not economical to
pre-rinse your dishes, especially with the newer models that they have out now for dishwashers. If you have an older dishwasher, like me, a quick
pre-rinse with cold water only is the most efficient way to get your dishes clean.
Secondly, try and run the most cost-effective cycle on your dishwasher. Try the shorter cycle first and see if your dishes come out clean. If you need to still run the full cycle, don’t run the drying cycle and allow the dishes to air dry. It is more cost-effective and there is less chance of spotting on your glassware.
It is also important to read the manual for your dishwasher to see the recommended amount of
dishwashing detergent you should use. The manufacturer will have the best suggestion for the amount of detergent you should use. Are your dishes looking a little gritty? Do you have a nasty residue on your glasses? The remedy to that problem is decreasing the amount of
dishwashing detergent. If you don’t have the guidelines handy, you can always look them up on the manufacturer’s website or you can do your own test run to see how much you actually need to get those dishes clean.
If your glasses are looking spotty then you might need to add something to your dishwasher to make it perform better. I fill our rinse agent dispenser with white vinegar. Vinegar is great for removing spots on dishes and it leaves everything squeaky clean. Just fill the rinse aid dispenser as you would with the commercial stuff and stand back in amazement. You won’t believe how much better your dishwasher will perform with just this simple household solution.
I noticed that our dishwasher was looking pretty bad on the interior and I found the quickest way to get your dishwasher looking like new again is just running an empty cycle and filling the detergent cup with a drinking mix with citrus in it. You can use any citrus drink mix and fill it just as you would with your regular detergent. Any drink mix will do- lemonade, Tang, Crystal Lite, or any other drink mix with the citrus ingredient in it. We had a drink mix that the kids just
didn’t like and that ended up going in the dishwasher instead. Doing this once a month will help keep your dishwasher looking like new.
Stubborn spots on the
dishwashing door are also bothersome. If running a cycle of citrus drink powder
doesn’t do the trick, you can try using other products on the door to get rid of the stains. Tomato-based stains will just have to fade with time, but you can sprinkle a little baking soda on your door and let it set for awhile. Take a soft dishtowel and add a little water to make a paste. Then rub the heck out of it and see if that removes the stain. The baking soda paste is also great for
countertops or for burnt on gunk on your dishes.
There is a feature on dishwashers that I have never used, and only after writing this article would I even be aware that it even exists. The feature is the Rinse & Hold feature. This is a great feature for those dishes that you just absolutely cannot picture leaving in the sink until the dishwasher is run in the evening. Instead of washing a few dishes, you can run the Rinse and Hold cycle and have the dishwasher rinse them off for you. But how frugal is this feature? According to Consumer Reports, using this feature only takes two gallons of water compared with four gallons for a typical hand-washing. The energy needed to heat the water though, makes this a less than frugal feature so only use this feature when absolutely necessary. It is much more energy efficient to run your dishwasher with a full load.
Finally, you can make your own
dishwashing detergent for a fraction of the cost. All you need to make
dishwashing detergent is Borax (at our local store a box of this runs about $3.99), baking soda (cheapest at your wholesale club store) and regular old salt. Mix one cup Borax, one cup baking soda (you can also substitute this with washing soda, but most people don't have this on hand) and 1/4 cup salt. Add a tablespoon of this to your detergent dispenser and run it through a normal cycle. With vinegar added as a rinse aid, the dishes will be clean & spot free.
These blog entries will be added as articles to our Organize section of the site, for quick reference.
Up next week, Amelia's question on making your own cleaners! I can't wait to talk about this one!
Don't forget to submit those questions. I hope that this will be a fabulous addition to the blog!
Labels: Ask Frugal Momma, Cleaning, Cleaning Recipes, Frugal, Homemaking, Organizing

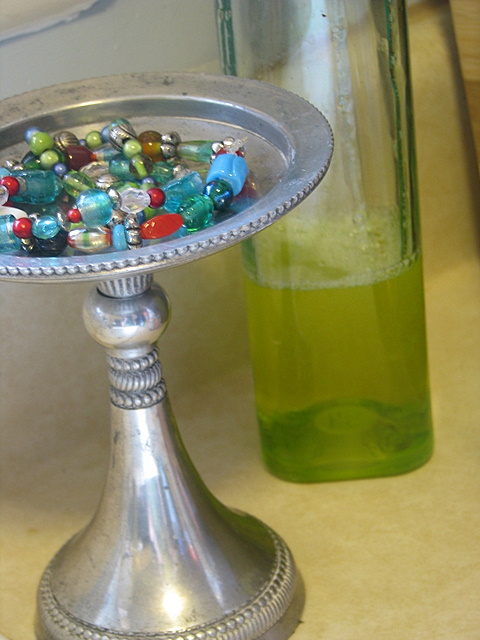 I like to keep a little dish by my sink to put my jewelry in while I am doing the dishes. I also love to thrift shop so I put my love for thrift and my little dish together and came up with this cute little idea.
 Subscribe to this blog