Archive for the ‘Desserts’ Category

DIY Snack Station

Monday, August 15th, 2016

diy-snack-station

This post has been sponsored by Jack Link’s in partnership with Ahalogy. All thoughts and opinions are my own.

When I became a mom, I began to realize the beauty in one-handed snacks. When my babies were small, I had a hard time holding a baby and feeding myself so I created a basket of one-handed snacks that would keep me fueled throughout the day.

Now that my kids are older, you would think that I would have loads more time to care for myself.  I have found though that although my children aren’t necessarily as demanding as they were, their activity schedule certainly is. I am still struggling to keep myself fueled as we run from activity to activity.

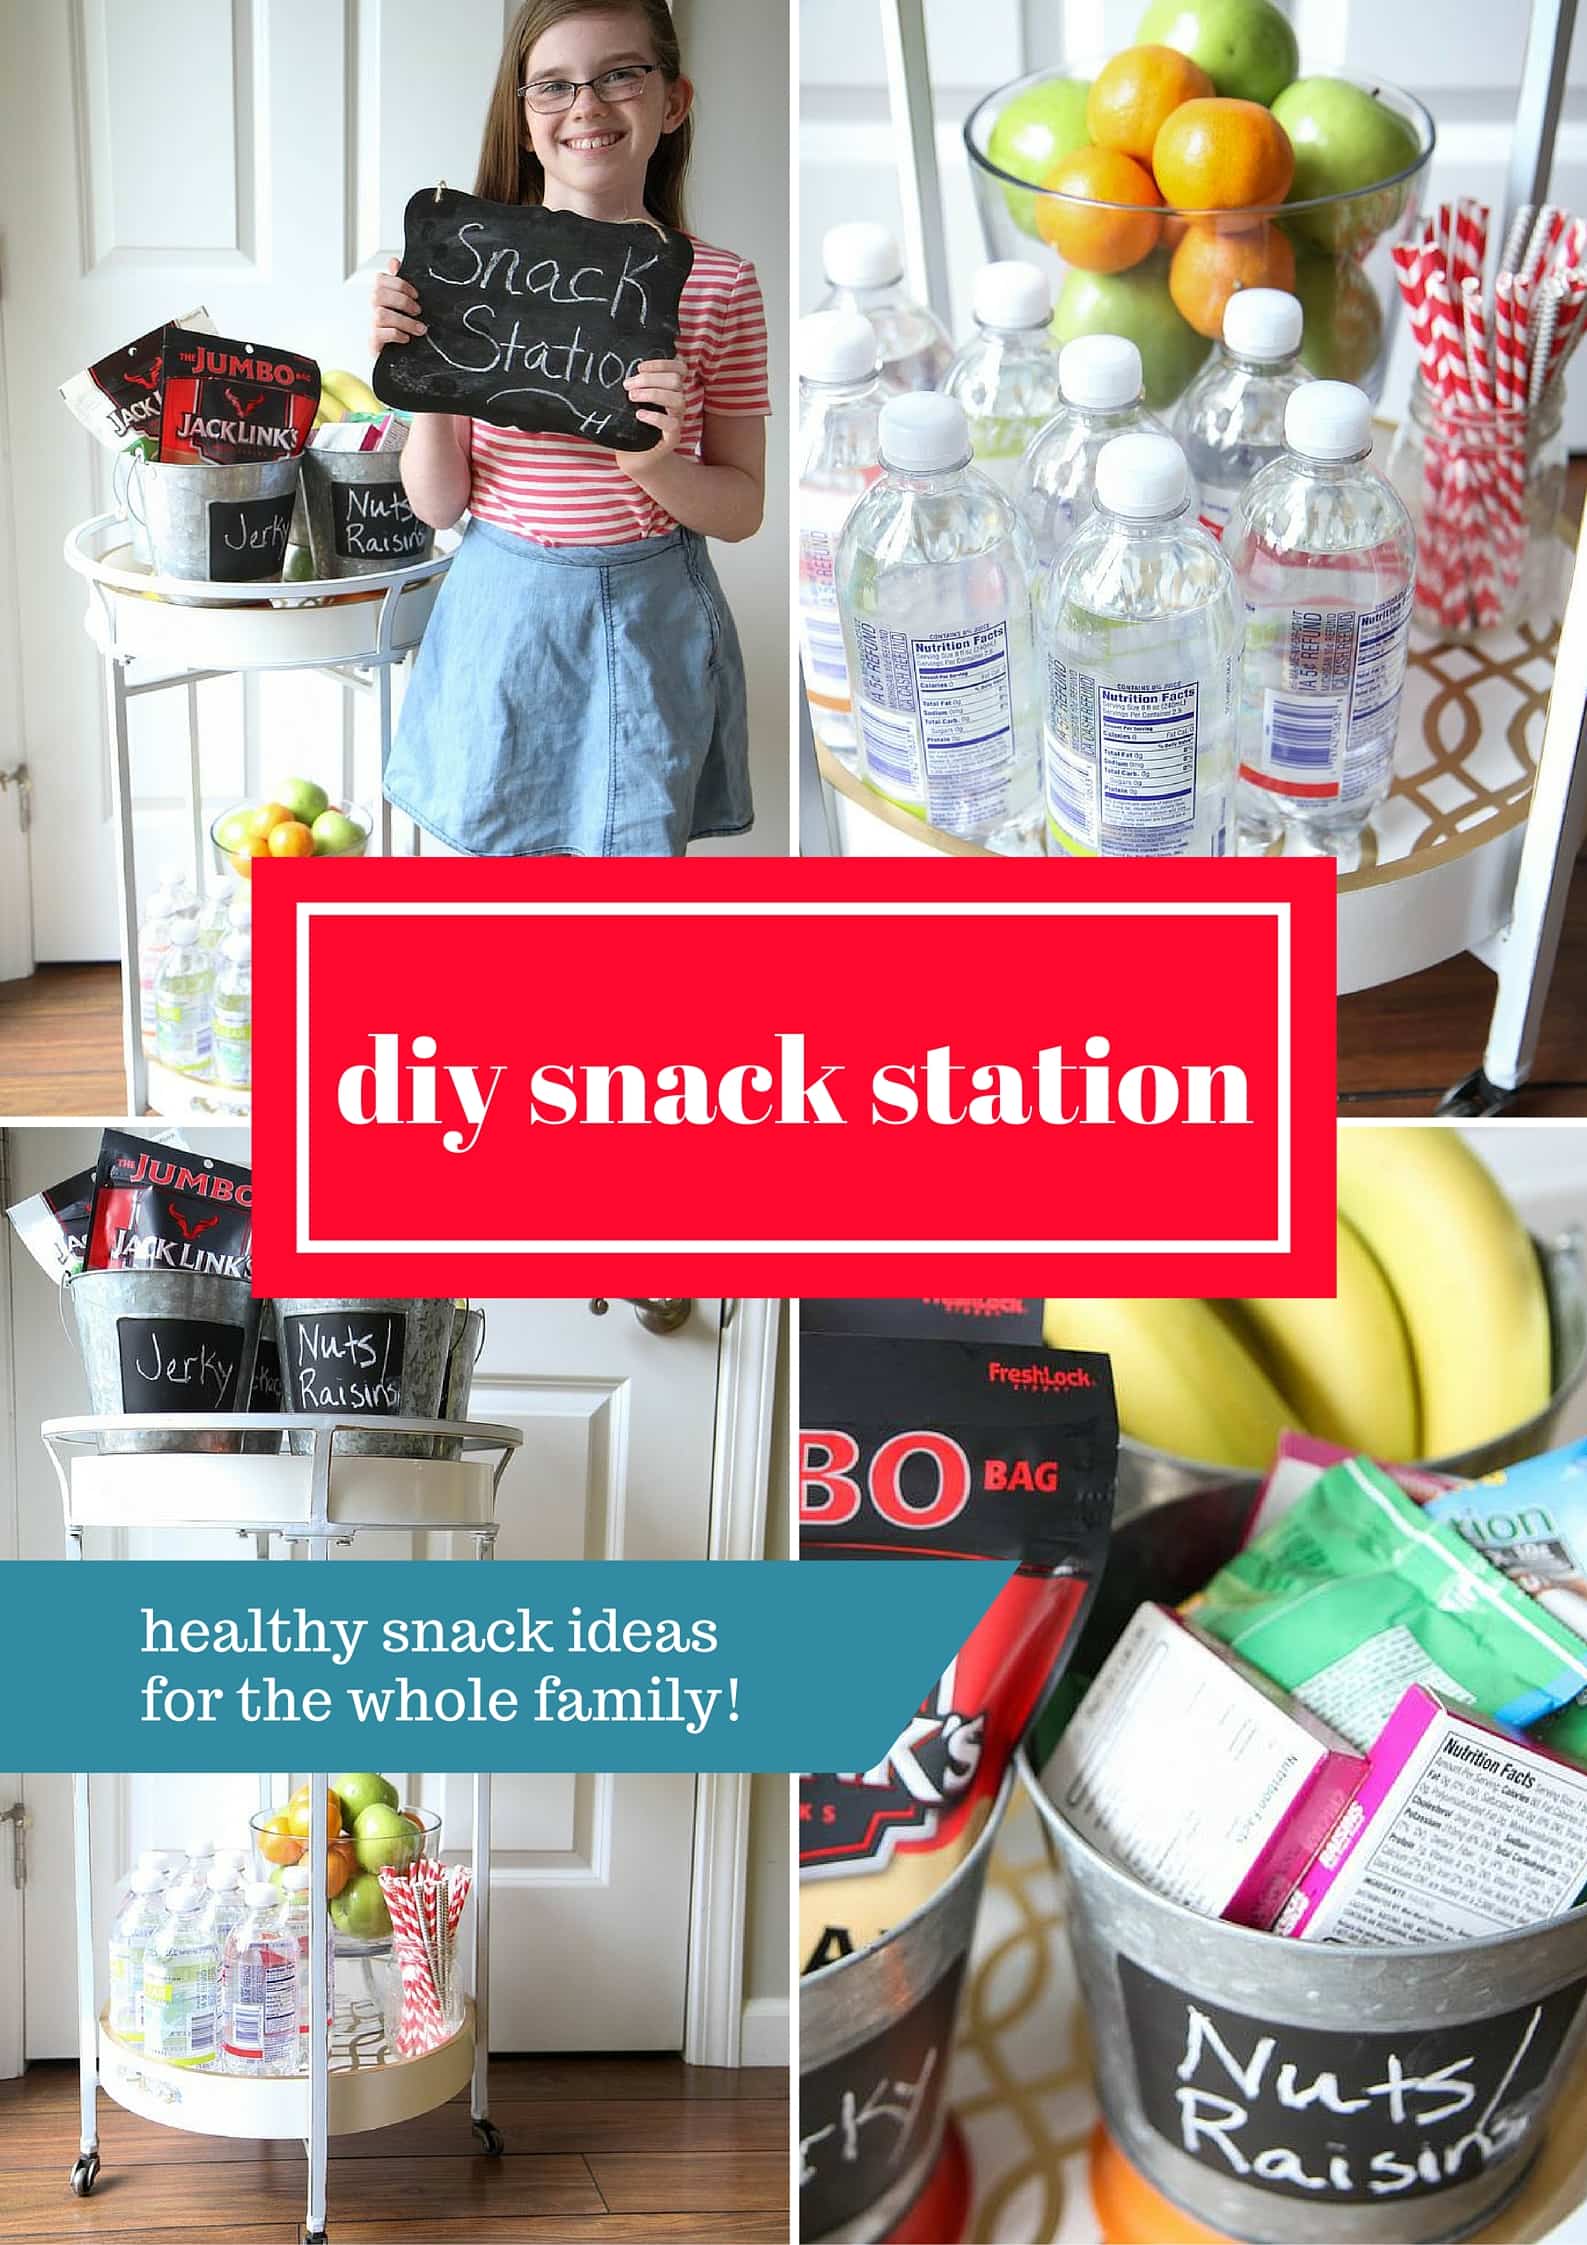
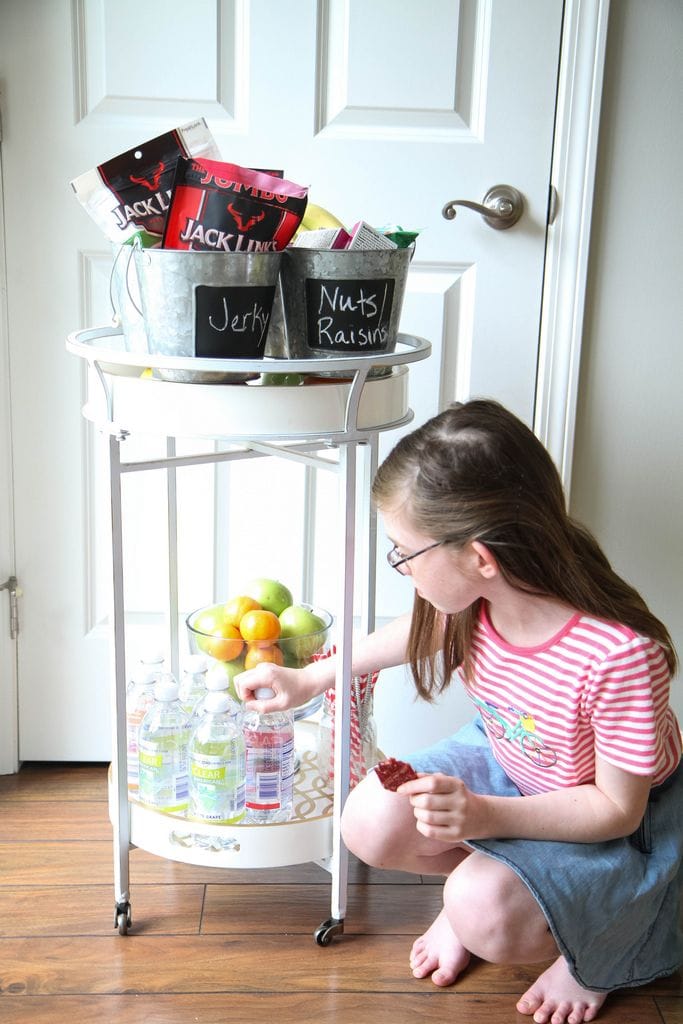
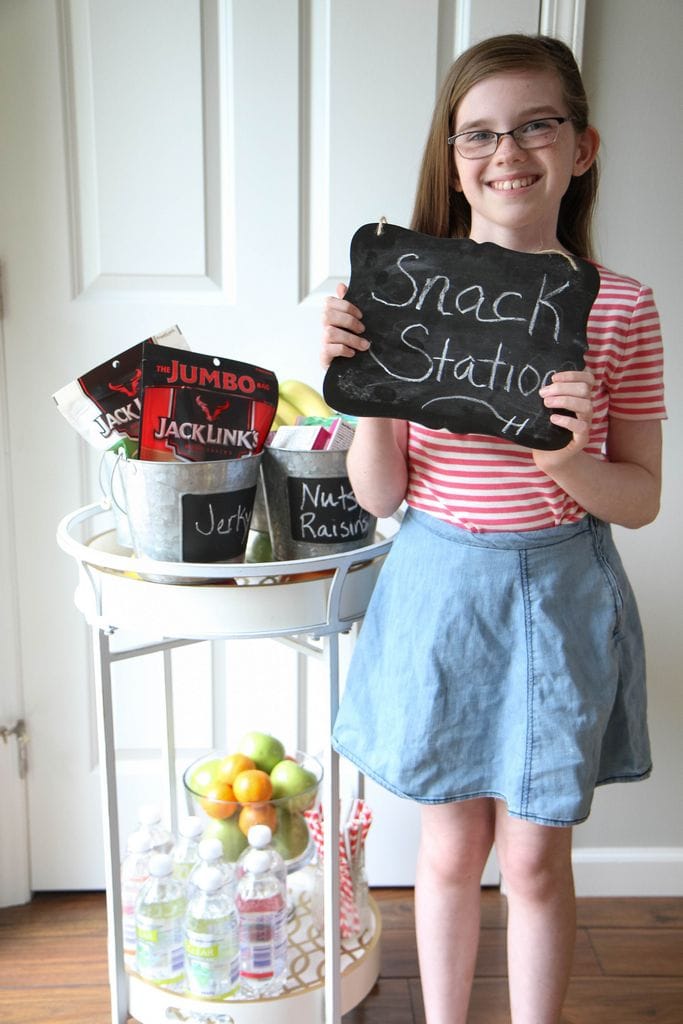
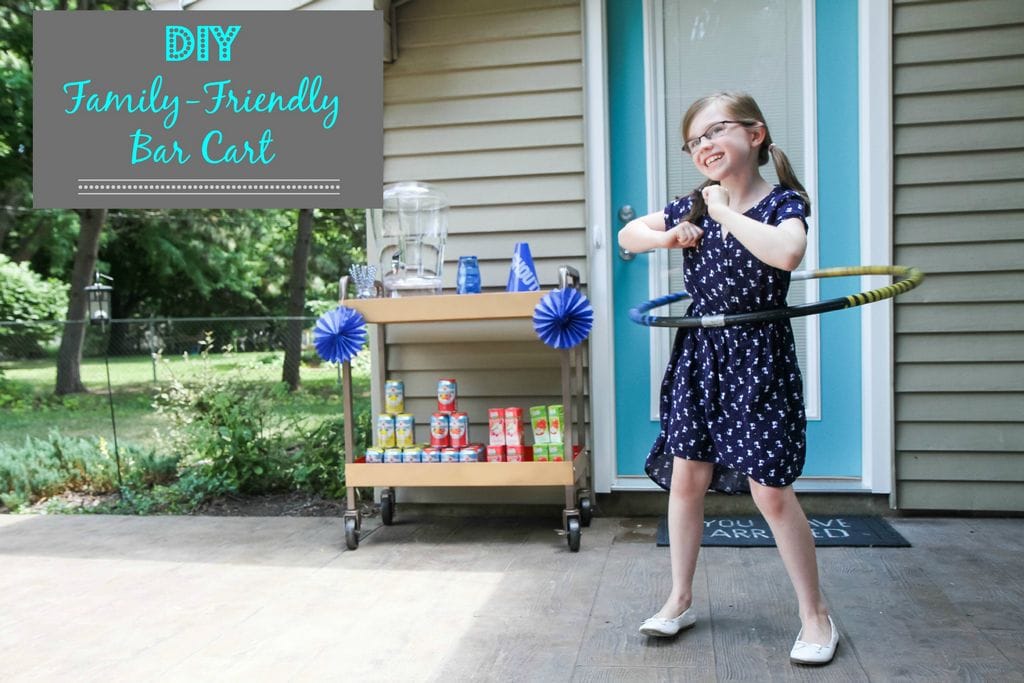
If you struggle with keeping yourself AND your kids fueled, I wanted to share with you a fun snack station we created to encourage ALL of us to grab healthy snacks more regularly. This diy snack station was made with a basic small bar cart and is fully stocked for our whole family.

DIY Snack Station Tutorial

diy-after-school-snack-station-6

diy-after-school-snack-station-3


diy-after-school-snack-station-14

diy-after-school-snack-station-12

diy-after-school-snack-station-11

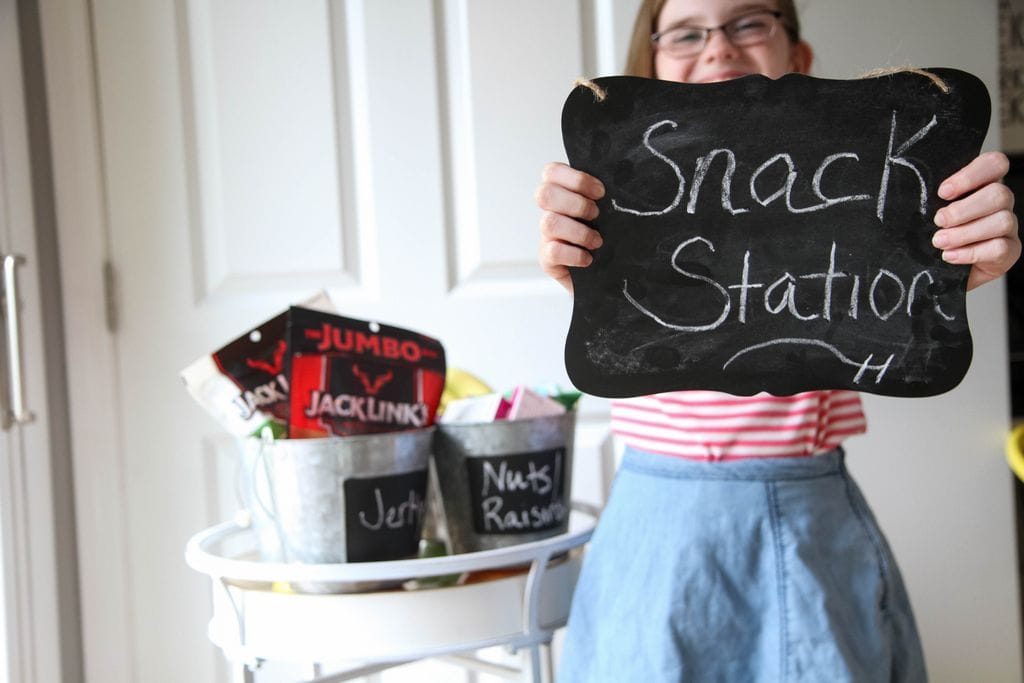
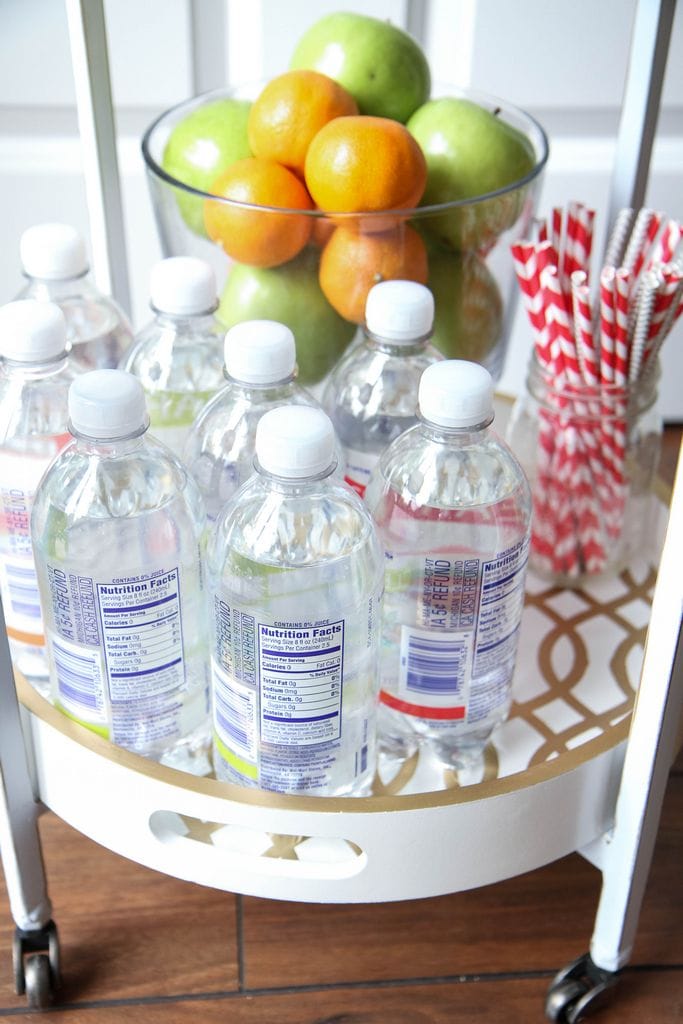
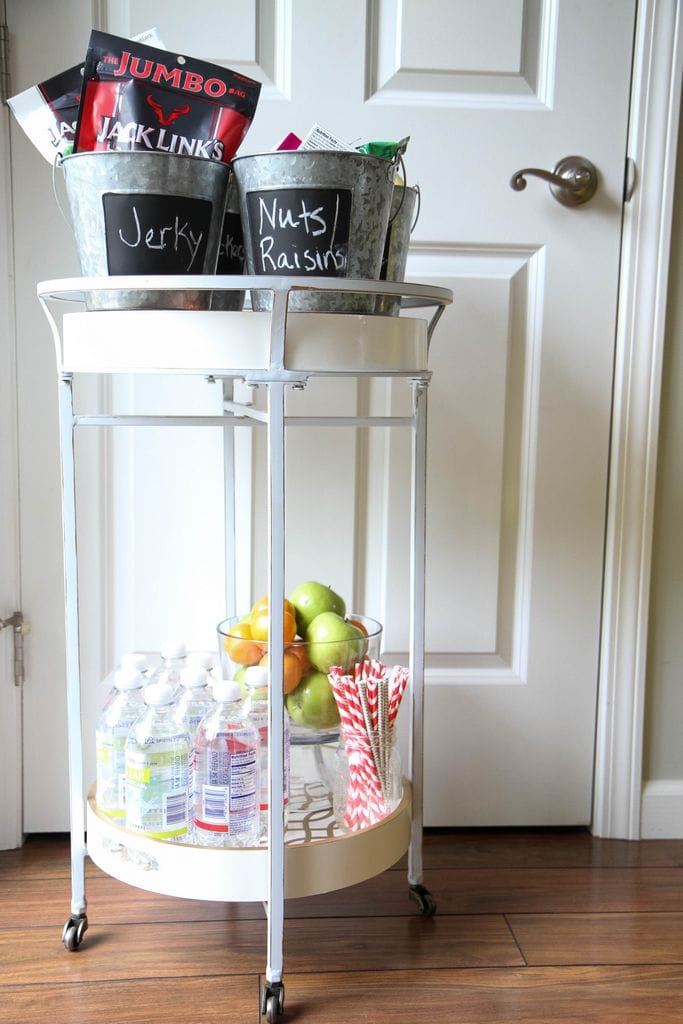
I headed to my local superstore to gather up four metal pails that had chalkboard labels on front for our little diy snack station and found this sweet little bar cart on summer clearance for 75% off. This is the perfect time to stock up on this summer entertaining accessory and keep it on budget for your family.

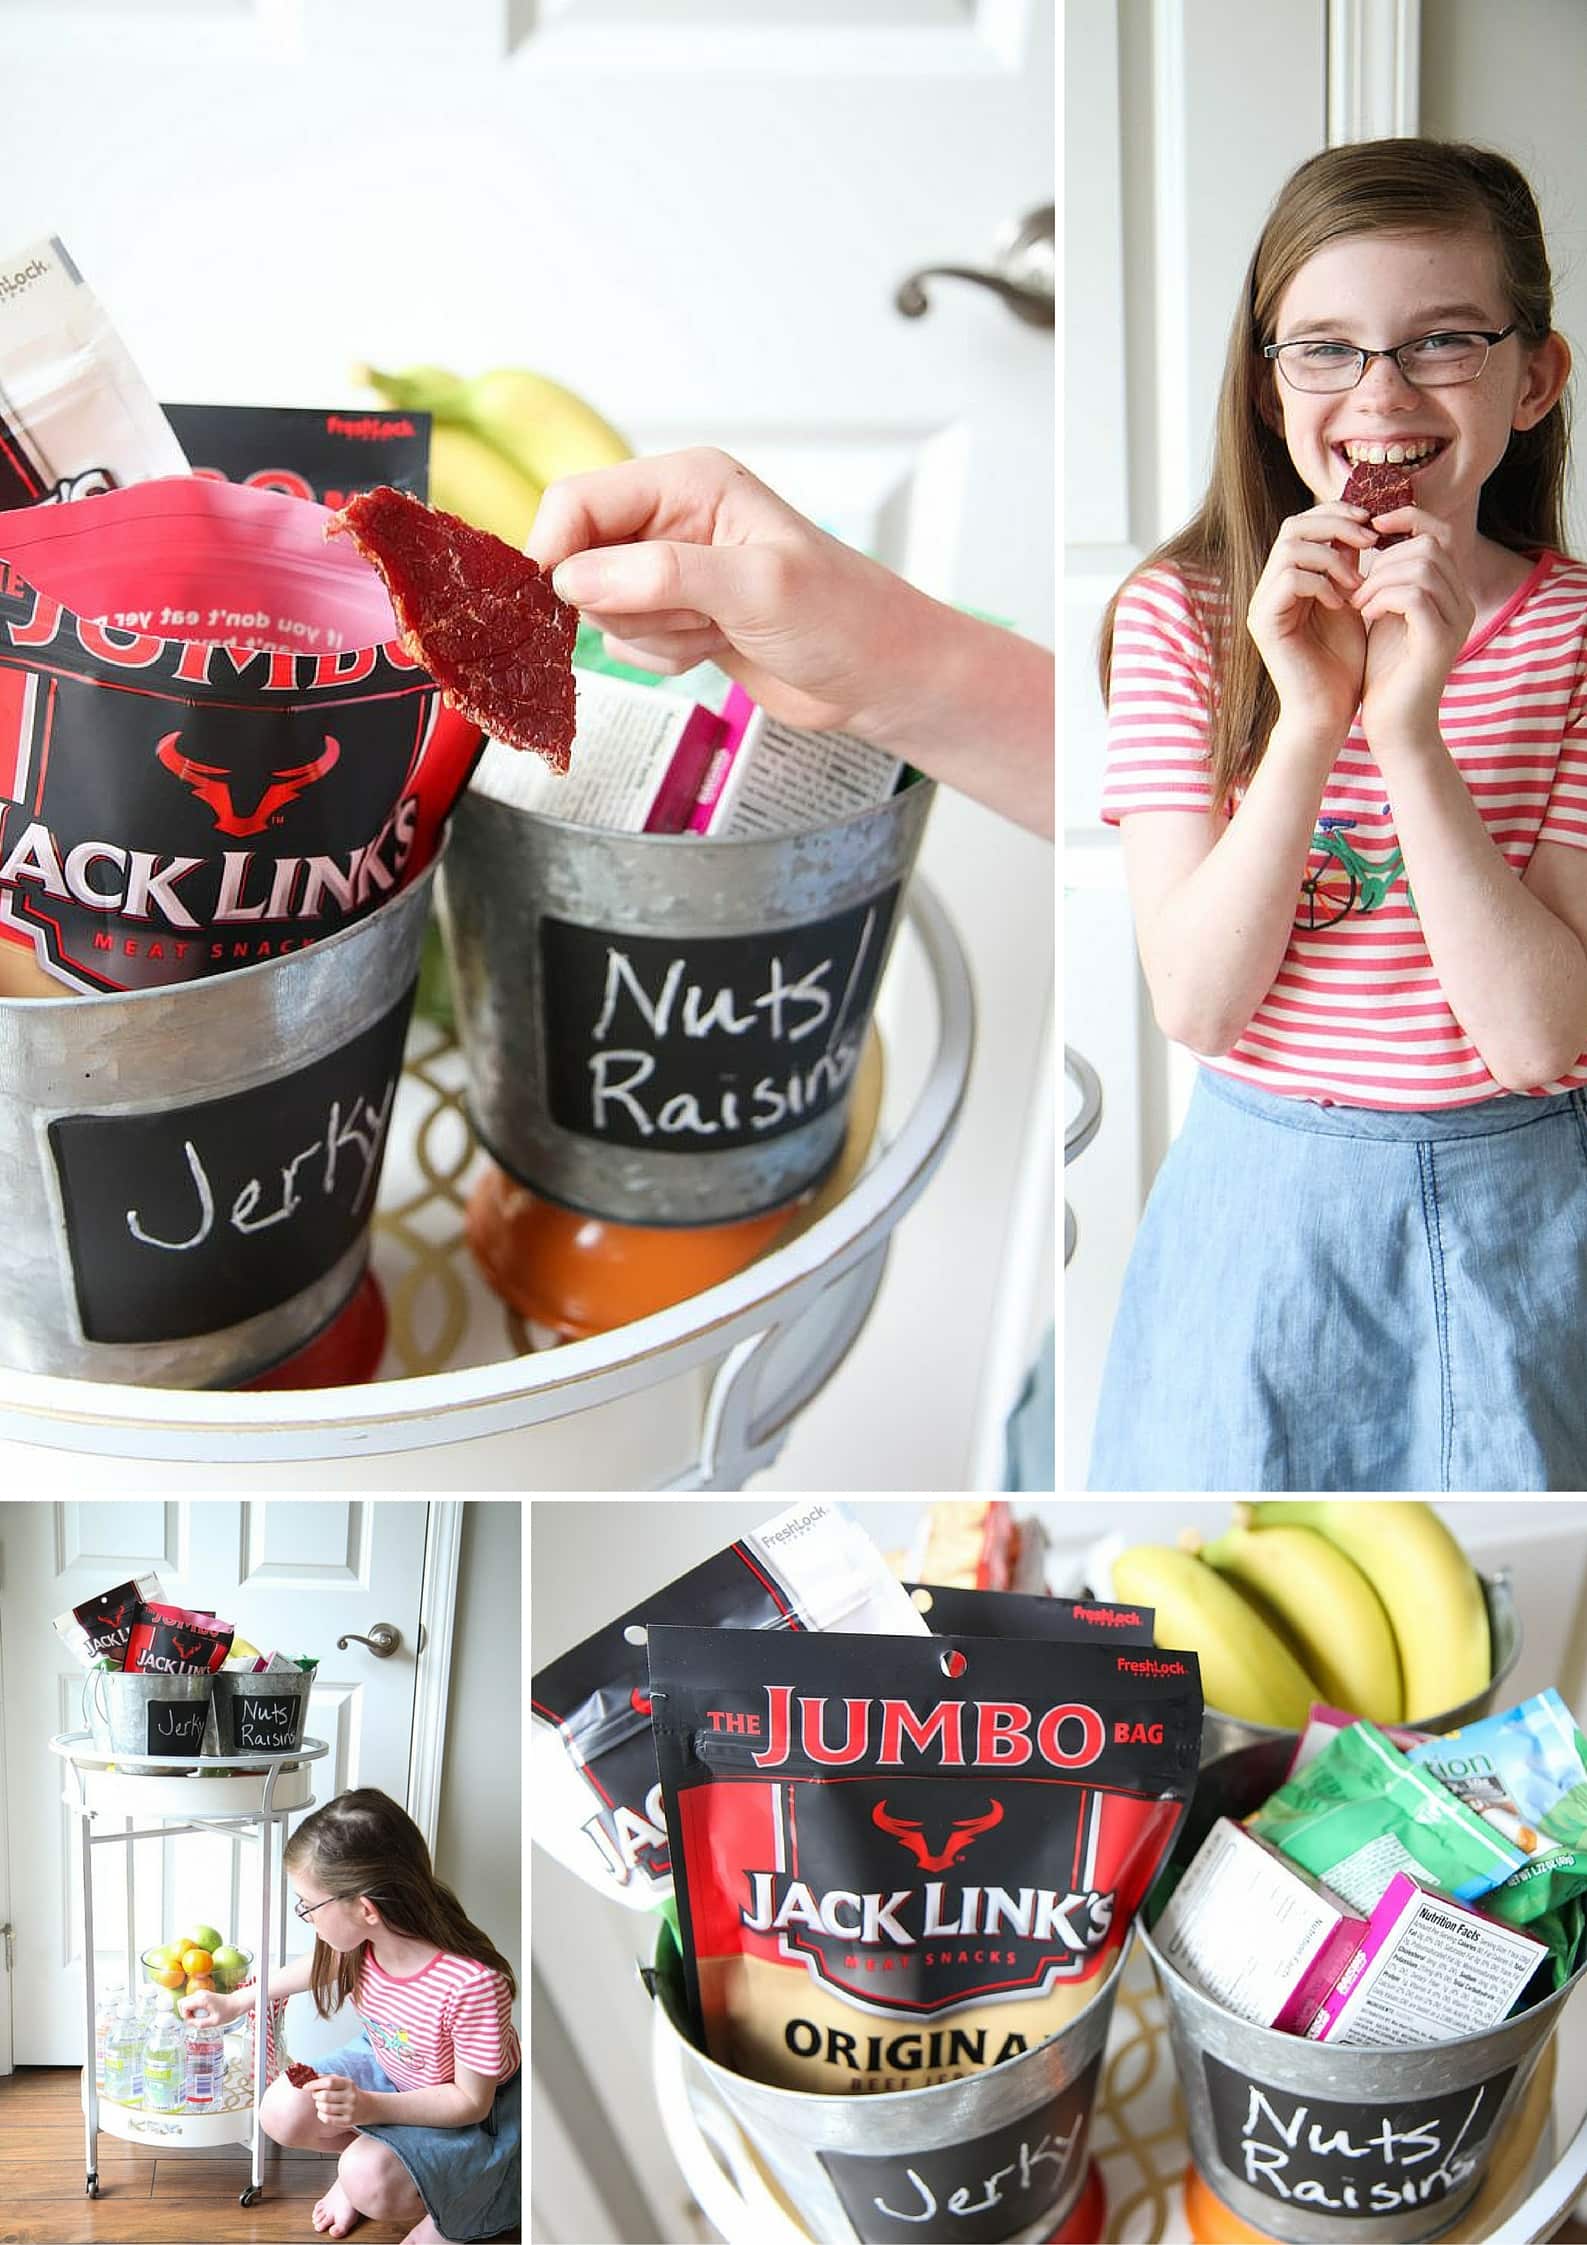
We then headed on over to Kroger  (check out the store locator to find one near you!) to grab some healthy options for our snack cart. The beauty in the chalkboard labeling is that you can switch snacks based on what’s in season, what’s on sale, or what you are craving that week. Have your kids be in charge of the labeling to work on mastering their spelling!

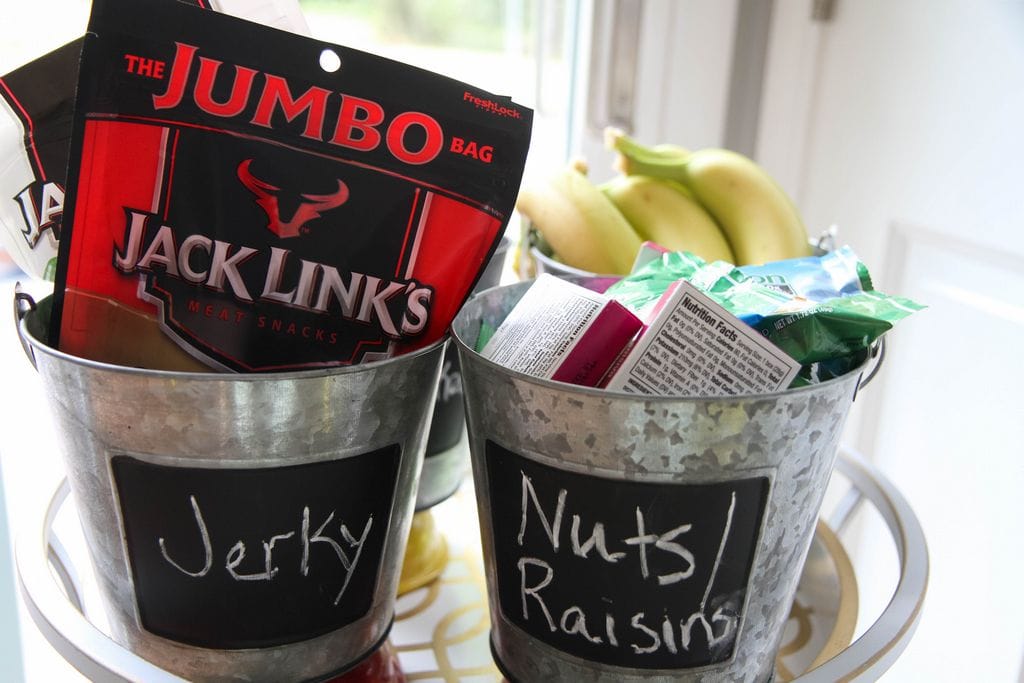
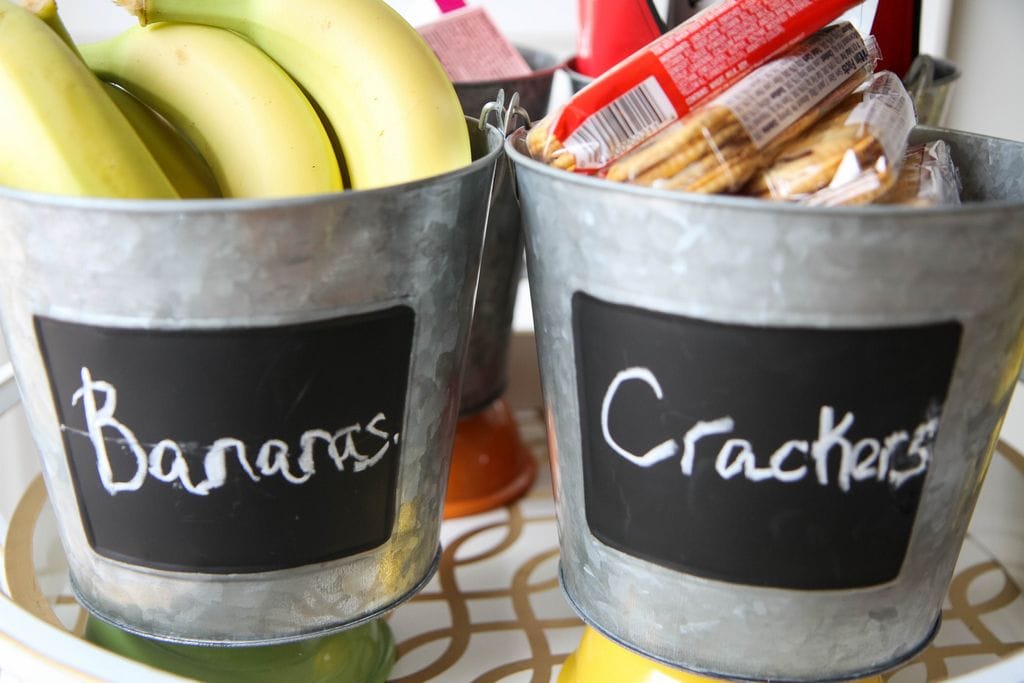
Our four pails had bananas (separated for easy grabbing), raisins/nut mixes, Jack Link’s in a few varieties, and crackers with peanut butter. On the bottom tier, I added apples and oranges, a variety of flavored waters, and some fun straws for sipping.

diy-snack-station (2)

Snacks with lots of protein are my favorite because they stop the HANGRY from coming on.

Tell me that you know a little about hangry moments too please! I need to know I’m not alone in this!

As someone who fights low blood sugar (as do my children), I have found that protein keeps me from fighting those sugar highs and lows.

Beef jerky can be a great protein-filled option and Jack Link’s is protein-packed with a whopping 12 grams of protein.  I like that you don’t have to be limited to just one flavor because it comes in tons of varieties. From the soy and ginger combo in Teriyaki, to a layer of coarse pepper in their Peppered option, to the smoky mesquite flavoring of their Original turkey, to the bold and savory offerings of their Jack Link’s Original. We are big fans of these options for keeping the hangry at bay.

diy-after-school-snack-station-12

For a sweet and savory combo, pair your jerky with fresh fruit for a balanced snack. Bananas always offer a good bang for your buck, apples can be sliced for eating on-the-go, and easy-to-peel clementine’s are always a big favorite in our house. Be sure to look for fruit that is on season for the most affordable (and freshest) options.

We are also really big fans of flavored waters in our house. It makes drinking water a little bit more fun.

A pretty papered straw doesn’t hurt either. What can I say? I am a blogger and paper straws are kind of a requirement over here.

diy-after-school-snack-station

diy-after-school-snack-station-4

We hope this post inspires you to create a snack station for your own family! We are thankful to have one at our house as we head back to the grind of school and activities. It is so nice to know that one-handed snacks are on hand for life’s busy moments!

This post has been sponsored by Jack Link’s in partnership with Ahalogy. All thoughts and opinions are my own.

Mini Star Cakes (Star Darlings Book Giveaway!!)

Monday, May 16th, 2016

3-ingredient mini star cakes from MomAdvice.com

This post is sponsored by Disney Press. Thank you for supporting the companies that support this site! 

I am raising a big fan of the Star Darlings series and we are so excited to giveaway an amazing prize pack today for a tween girl in your life. Today’s craft is to show you how to make a mini star cakes that you can prepare out of just 3 items from the grocery store. These cakes are easy enough that your kid can put these together and impressive enough to share with your friends.

Emily’s fangirl status of the Star Darlings series is truly legit because the #1 gift she wants to share with her friends are these books. They also are the books she has been taking to school each day to read during her reading free time. Is it just me or do you struggle with finding tween books that you can really get behind? These books are positive and minus the sass. I am all about girl power and positivity so I am thrilled that these have been such a hit in our house. I am also so happy she is sharing the same message with her friends.

As you may recall, we shared a really fun dreamcatcher we made together in honor of the first six books! Today we are sharing an easy craft your daughter can do together after she has read the books. Did you know that books 6-9 are out on store shelves now? Yay!

Star Darlings Book Series

Not only have the next four books hit the shelves, but they also released  Star Darlings Collection Volume #1 which is a brand new bind up book that includes the first three books in the Star Darlings series. You can learn lots more about the Star Darlings series on their webpage. They have also expanded their line to include a doll series and even an app to continue the positive messaging for tween girls.  Cassie Comes Through, Piper’s Perfect Dream, Astra’s Mixed Up Mission, & Tessa’s Lost & Found are the new books keeping my daugher up late at night reading.

In honor of these sweet books, Emily & I have created an easy 3-ingredient star cake.

3-ingredient mini star cakes from MomAdvice.com


Supplies Needed

1 frozen prepared pound cake

2 tubs of frosting (you should only need one, but we offer the advice of two for heavy pourers- wink, wink!)

Food Coloring

Sprinkles (optional)

Star Cookie Cutter

3-ingredient mini star cakes from MomAdvice.com

Directions for Mini Star Cakes

1. Allow your pound cake to thaw for a few minutes and then, using a serrated knife, trim the top to level the cake. Slice the cake in half lengthwise. (I did this for my daughter, but she was able to do the rest on her own).

2. Using a cookie cutter, carefully cut out your star shapes and place them on a cooling rack with a cookie sheet underneath to catch the frosting avalanche.

3. Divide your icing into two microwave safe bowls and tint to your desired colors. Place the frosting in the microwave for 10 seconds. Stir the frosting and then place back in the microwave for another 10 seconds (or until the icing looks pourable).

4. Pour icing over the stars and finish with sprinkles. Allow these to harden and then eat your masterpiece.

3-ingredient-star-cakes-16

3-ingredient-star-cakes-18

3-ingredient mini star cakes from MomAdvice.com

3-ingredient mini star cakes from MomAdvice.com

Star Darlings Giveaway

Check Out This Giveaway!

One (1) winner will receive:

Star Darlings Collection Volume 1 (includes Books #1-3)

Star Darlings Books #4-9

Star Darlings Wish Board;

Plus a set of five (5) Star Darlings 10.5” dolls!

Follow the widget below to enter to win! Best of luck!

a Rafflecopter giveaway

3-ingredient mini star cakes from MomAdvice.com

This post is sponsored by Disney Press. Thank you for supporting the companies that support this site! 

Pin It

DIY Airheads Crown Cake Topper

Tuesday, November 17th, 2015

DIY Airheads Crown Cake Topper from MomAdvice.com

This post is sponsored by Airheads. Thank you for supporting the companies that support us! 

Are you a skilled decorator of cakes? I wish I was, but I am not!  I have never been good with fondant decorating and have always found the flavor lacking. Thankfully, there is a delicious substitute lurking in the candy aisle that you can mold & shape into whatever your heart’s desire is. Did you know Airheads candy can add that decorative touch to your cake decorating in just a few easy steps?

Today’s tutorial shows you how to transform Airheads into the perfect crown cake topper in just 5 easy steps. Wouldn’t this be a great princess cake? The best part is that, unlike fondant, it tastes sweet and delicious and will be a crown worth fighting for when those slices are dished up. For those with food allergies, it is also peanut and gluten-free! Yay!

DIY Airheads Crown Cake Topper from MomAdvice.com

Supplies Needed:

Airheads (I used Blue Raspberry, Cherry, & White Mystery for my crown)

Mini cookie cutters- metal or plastic, I used a heart with a jagged edging

Parchment Paper

Fondant Roller

Cake (we picked ours up in the bakery section of our supermarket)

DIY Airheads Crown Cake Topper from MomAdvice.com

Directions

  1. Pull out 3 cherry Airheads and line them up in one long line, slightly overlapping the edges. Place these between two sheets of parchment paper and roll with a fondant roller to smooth out your seams. Don’t worry if it isn’t perfect because we will be adding a dot detail to camouflage any flaws on the crown. Set aside.

DIY Airheads Crown Cake Topper from MomAdvice.com

  1. Microwave a white mystery Airheads for 3-5 seconds and then roll them out between two sheets of parchment paper. Using a mini heart shaped cookie cutter, press the cookie cutter firmly into the white mystery Airheads and pull up. Push the heart shape out gently and then place it upside down (with your heart tip pointing up) to create your crown points. Do this all the way around, layering one heart between two hearts as pictured. Feel free to microwave and re-roll the Airheads to get as many hearts as you can out of each one.  Press these firmly into the crown and continue layering until you get to the end.

DIY Airheads Crown Cake Topper from MomAdvice.com

  1. Bring one end of the crown, to the other to create your shape. Using your fingers, gently rub the seam in a bit to create a smooth finish. Set your crown aside.

DIY Airheads Crown Cake Topper from MomAdvice.com

  1. Grab your Blue Raspberry Airheads and pull off small sections of the candy and roll between your hands until you have created a dot shape. Take the dot and press firmly into the crown, spacing it as evenly as possible to add a decorative detail to finish.

DIY Airheads Crown Cake Topper from MomAdvice.com


  1. Place the crown in the refrigerator until it is time for your cake so it can harden up a bit and to help it keep its shape. Once it is cake time, remove from the fridge and rest it on the top of your cake. How easy is that?

Airheads-Crown-Cake-Topper-18

DIY Airheads Crown Cake Topper from MomAdvice.com

Airheads-Crown-Cake-Topper

DIY Airheads Crown Cake Topper from MomAdvice.com

 For more fun ideas on how to craft with Airheads visit and follow them on Pinterest. To learn more about Airheads candy visit their website and follow them on Facebook, Twitter, Instagram, and YouTube!

This post is sponsored by Airheads. Thank you for supporting the companies that support us! 

Pin It

Smart Pool Snack Ideas

Tuesday, July 21st, 2015

Smart Pool Snack Ideas from MomAdvice.com

If you live at the pool like we do in the summer, you won’t want to miss today’s post over on the Wild Oats blog. After years of pool days, we have learned a few things about the best snacks to pack and we are sharing them on the blog today.

Whether you love sweet or salty, there is a snack for you on today’s list! I can’t wait to hear what your winning pool snack combination is!

Head on over to the Wild Oats blog to get the scoop on the best snack ideas for the pool!

Pin It

MINIONS Backyard Bash & Easy Cupcake Minion Tutorial

Tuesday, July 7th, 2015

MINIONS Backyard Bash & Easy Cupcake Minion Tutorial from MomAdvice.com #MinionsParty

*This post is sponsored by Universal Pictures. Thank you for supporting the companies that support this site!

We have had so much fun preparing and hosting our MINIONS Backyard Bash in honor of the film’s launch on July 10th! Today we want to show you how we decorated for our party, the fun goodie bags we got to share with our friends, and an easy cupcake minion you can create for your very own party (no decorating skills required!).

In the new film, you get to go back to where the story of the Minions all began! Starting as single-celled yellow organisms, the Minions evolve through the ages, perpetually serving the most despicable of masters. Continuously unsuccessful at keeping these masters-from T. rex to Napoleon-the Minions find themselves without someone to serve and fall into a terrible depression. Kevin, Stuart, and Bob decide to seek a new boss to follow and decide to make a journey to find their new master. This is where they meet their new potential master, Scarlet Overkill (voiced by Sandra Bullock- yay!), the world’s first-ever female super-villain.   They travel from Antarctica to 1960s New York City, ending in London. It is here that they must face their biggest challenge to date: saving all of Minionkind…from annihilation.

We can’t wait to see this family-friendly film together and were selected to help throw a party in honor of this film’s launch. #luckyducks

MINIONS Backyard Bash & Easy Cupcake Minion Tutorial from MomAdvice.com #MinionsParty

We got an incredible package in the mail that included all the party supplies we would need to execute our backyard bash as well as fantastic party favors that included adorable beach towels, beach balls, and PlayDoh sets for all of our guests.

The only thing we really needed was Mother Nature to cooperate with our plans.

Unfortunately, it has rained for two straight weeks in Indiana so we had to move this party indoors and enjoy the fun inside instead!

Thanks, Indiana!

MINIONS Backyard Bash & Easy Cupcake Minion Tutorial from MomAdvice.com #MinionsParty

MINIONS Backyard Bash & Easy Cupcake Minion Tutorial from MomAdvice.com #MinionsParty

MINIONS Backyard Bash & Easy Cupcake Minion Tutorial from MomAdvice.com #MinionsParty

MINIONS Backyard Bash & Easy Cupcake Minion Tutorial from MomAdvice.com #MinionsParty

MINIONS Backyard Bash & Easy Cupcake Minion Tutorial from MomAdvice.com #MinionsParty

MINIONS Backyard Bash & Easy Cupcake Minion Tutorial from MomAdvice.com #MinionsParty

We weren’t going to let a little rain ruin our party though! We outfitted our table in blue and yellow to go with our theme. I let my kids do the decorating while I prepared our snacks.  The goggles, of course take center stage in this set-up. We secured a set of adorable goggles to each of the chairs with a little washi tape for each person to take home. Our centerpiece was also adorned with goggles and we even stapled some together to make a goggle banner over our table.

Lemonade, popcorn, and cupcakes were served for a little rainy day magic together.

MINIONS Backyard Bash & Easy Cupcake Minion Tutorial from MomAdvice.com #MinionsParty

The Minions are a hit with kids of all ages so we invited our friends and cousins to join us for the afternoon. We loved sharing our Cupcake Minion with them and everyone can’t wait to catch the movie this summer!

MINIONS Backyard Bash & Easy Cupcake Minion Tutorial from MomAdvice.com #MinionsParty

In honor of the film, I’d love to show you how to create this cupcake minion for your party table!  Before we begin, I want to encourage you to make this as easy on yourself as possible! If you want to make this party treat REALLY fast, call your local bakery and ask for two dozen white cupcakes with the frosting on the side. This is what we did to save some time and our local grocer only charged $14.99. 

Supplies Needed

Two Dozen White Cupcakes

Frosting, tint half of it yellow and then other half blue (I recommend these Wilton food colorings to achieve this bold shade)

1 canning jar ring

Black licorice (if you aren’t a fan of black licorice, we tried a new chocolate Twizzler variety that worked perfectly)

1 Hershey Kiss

Scissors

Cookie Sheet

MINIONS Backyard Bash & Easy Cupcake Minion Tutorial from MomAdvice.com #MinionsParty

1. Tint over half your frosting in yellow and the other portion in blue. Set one cupcake aside for your eye.

MINIONS Backyard Bash & Easy Cupcake Minion Tutorial from MomAdvice.com #MinionsParty

2. Ice as I have shown here (15 Yellow, 4 Blue, 4 Half Yellow & Half Blue, 1 Left Without Icing!!). You can pipe the icing on, if you prefer a more polished look, or you can just spread the icing on with an icing spatula, as we have shown here.

3. Cut your black licorice up in random smaller pieces and apply to the top of your Minion head to create the hair.

MINIONS Backyard Bash & Easy Cupcake Minion Tutorial from MomAdvice.com #MinionsParty

4. Trim the top off of your cupcake to expose the white cake of your cupcake for the eye (pardon our picture, we decided to do that one last minute!). Make sure to not trim it too deep, so that your canning ring will fit around on the outside of it. Place your canning ring around the cupcake top to create your goggle.

5. Invert a Hershey Kiss into the center for your eye. Place the cupcake on top of your other cupcakes in the center. Finish by tucking two pieces of licorice underneath the eye to create the glasses. Trim the licorice to fit across the cupcakes on the end. Finish by bending your licorice into a smiley face! How easy was that?

MINIONS Backyard Bash & Easy Cupcake Minion Tutorial from MomAdvice.com #MinionsParty

MINIONS Backyard Bash & Easy Cupcake Minion Tutorial from MomAdvice.com #MinionsParty

We hope these ideas inspired you for a MINION’S Backyard Bash of your own! Remember to catch the film on July 10th! We can’t wait to hear what you think about it!

Get connected with the film!

Follow on Twitter, Instagram, Pinterest, Google+

Like ‘MINIONS’ on Facebook

Visit the Official Site

Minions-Poster1


Check out the trailer below and enjoy a fun movie night out with the whole family this month! Yay!

*This post is sponsored by Universal Pictures. Thank you for supporting the companies that support this site!

Pin It

DIY Outdoor Movie Night

Monday, June 29th, 2015

DIY Outdoor Movie Night - MomAdvice


DIY Outdoor Movie Night from MomAdvice.com


*This post is sponsored by Walmart. Proceeds from this post were donated to Riverbend Cancer Services.  Thank you for supporting the companies that support this site and our community! 

Have you ever wanted to create your own DIY Outdoor Home Theater?

We have had this on our summer bucket list for years and this summer we decided to finally put together our very own DIY outdoor movie night together with our kids and are sharing it with you today!

There is something truly magical about watching a movie together under the stars and I love that you can do this right in the comfort of your very own backyard.

We partnered with Walmart to show you just how easy it is to host an outdoor movie night of your own.

DIY Outdoor Movie Night from MomAdvice.com

Shopping List:  1) Clothespins 2)White Sheets (King or Queen Size) 3) Projector 4) Outdoor Pillows 5) Outdoor Lights 6) Popcorn Buckets

Now that you know what to buy, here are my tips for hosting your own diy outdoor movie night:

DIY Outdoor Movie Night from MomAdvice.com

 An EASY DIY Set-Up

You don’t need a lot to create a great movie set up.

A simple white sheet (we like to double ours up to get the optimum picture)  and some clothespins are exactly what we used to create our set-up.

We simply draped our sheet on our clothesline out back and held it in place with a couple of clothespins.

Anchor the bottom of your sheet with rocks or a brick to hold the sheet in place, particularly on those windy days.

Although there are more expensive screen options that you can purchase, I have found that sheets don’t take up a lot of storage and offer a decent picture for the price.  Make sure to iron out those creases to avoid having ripples on this DIY screen- it’s worth the extra step!

DIY Outdoor Movie Night from MomAdvice.com

DIY Outdoor Movie Night from MomAdvice.com

DIY Outdoor Movie Night from MomAdvice.com

Get a Great Picture (and Sound)

Your biggest investment in your outdoor movies will be your projector although Walmart does offer several affordable choices (check out this budget-friendly option for just $113.88)!

More than likely, you already have the laptop and with the addition of small external speakers, you will have incredible sound.

We have had our projector for years and take it with us on our trips as a back-up plan for rainy days and we use it at home regularly especially in the winter months.

We were always struggling with sound on ours and we had an ah-ha moment and realized that with the right cable, we could hook the sound up to our daughter’s mini guitar amp.

Now we have sound and we didn’t even have to make a speaker purchase.

This goes to show that you can really think out of the box on creating your own DIY theater for a great picture and sound for your movie night.


DIY Outdoor Movie Night from MomAdvice.com

DIY Outdoor Movie Night from MomAdvice.com

Create the Mood

With the humble beginnings of a sheet and some clothespins, I am all about creating a mood.

Consider stringing some outdoor lights up and around your movie screen to really create the movie magic for the night.

I have always found that twinkle lights take everything up a notch when outdoor entertaining and are less than $20 a strand. It’s an affordable luxury for really creating the mood!

Comfy seating keeps your guests in their seat longer (although running around the yard while the movie is playing is totally required!).  

Add some blankets to the ground and some comfy outdoor pillows (I love these from BHG at Walmart).  

Consider also gathering your patio furniture around to keep things cozy for the adults in the crowd!

DIY Outdoor Movie Night from MomAdvice.com

DIY Outdoor Movie Night from MomAdvice.com

DIY Outdoor Movie Night from MomAdvice.com

DIY Outdoor Movie Night from MomAdvice.com

DIY Outdoor Movie Night from MomAdvice.com

DIY Outdoor Movie Night from MomAdvice.com

DIY Outdoor Movie Night from MomAdvice.com

Bring On the Snacks

You can’t watch the movie without POPCORN!

Take your popcorn game up a level and craft up a popcorn bar for your guests. Fill trifle containers with popcorn (don’t forget your scoopers!) and then fill ramekins with candy treats, marshmallows, and other fun mix-ins for you guests.

To make the treat more interactive (while you are waiting for it to get dark), you can have a table for decorating  paper bags with stamps, markers, and decorative scissors for cutting a pretty scalloped edge.

Have kids create their own popcorn bags and fill them with their favorite combination of treats.

For older guests, the party section of the store offers a variety of fun containers you can use for your snacks.

I am also a big fan of the reusable insulated solo cup for outdoor drinks and a perfectly sized popcorn bucket.

We found these in the outdoor section of our store.

For drinks, I am a BIG fan of using an inexpensive outdoor flower box for your soda drinks.

Isn’t this a fun way to bring drinks to the table?

Retro sodas and paper straws are always a hit with my kids.

Center this on your picnic table for easy grabbing!


DIY Outdoor Movie Night from MomAdvice.com

v

DIY Outdoor Movie Night from MomAdvice.com

Here is our movie screen once it was dark.

As you can see, even with a tiny projector, you have a pretty great picture on your sheet.

We found adjusting the bricks to pull out any wrinkling, made a dramatic difference in the projection of our show.

Our first movie night we caught, “Little Rascals!”  

The kids ran around like crazy, catching glimpses between games of hide and seek.

At the end of the night, it ended up just being me and my Dad, sitting side by side in two chairs, finishing out the show together.

We both agreed, that was pretty darn sweet.

There is certainly something so magical about an outdoor movie and we hope we have inspired you for a night of your own!

DIY Outdoor Movie Night from MomAdvice.com

Reservations to our movie theater are highly recommended.

We encourage you to dial our yellow phone to hold your seat!

We would like to say a big thank you to Mallory Dzierla Schoenle of Copycat-Design for sharing her talent with the Riverbend Cancer Services.

We purchased her beautiful donation of this handmade lemonade stand to help support the cause and transformed it into a popcorn stand for the evening festivities.

Mallory is a big giver in our community and as a DIY girl myself, I can see the labor of love that goes into each of her projects.

You can check out her Facebook page or her website for more information about her beautiful pieces! 


DIY Outdoor Movie Night - MomAdvice

For more fun summer activities, check out this page of great ideas! Have you ever hosted an outdoor movie night? Please share your tricks and tips here for a fun night with the family!

DIY Outdoor Movie Night - MomAdvice


Pin It

4th of July Flag Fruit Dessert Tray

Thursday, June 18th, 2015

4th of July Flag Fruit Dessert Tray

*This post is sponsored by Walmart. Thank you for supporting the companies that support this site!

One of my favorite celebrations is 4th of July and today I wanted to share with you a fast & easy 4th of July fruit dessert platter you or your kids can make into a flag to celebrate the holiday.  

This is an easy and festive 4th dish and I have to say that this delivers on the red, white, & blue.


4th of July Flag Fruit Dessert Tray

4th of July Flag Fruit Dessert Tray

Since I am gluten-free, I often have to bypass the dessert trays.

As an adult, it is not a big a deal.

As a child, the dessert table is EVERYTHING, especially when it comes to holiday feasting.

I wanted to create this cute tray just for them and I found these glutino gluten-free yogurt covered pretzels are not only a fantastic way to add the white we needed for our stripes, but they also are highly addictive and delicious.

You can certainly make your own white chocolate covered pretzels, if you are feeling ambitious, but these cut down on the time invested in creating our cute tray!


4th of July Flag Fruit Dessert Tray


Flag cupcake picks can be a great way to festively pick up a berry (or ten).

 I found these at a local party supplies store and they are an adorable touch to a festive spread.


4th of July Flag Fruit Dessert Tray


I think the best part about this tray is that it is not only relatively healthy, but it is also a tray that you can confidently create and know it will get eaten.

After a big cookout, light desserts are a wonderful addition to the table for snacking on.

Have too many desserts on your table?

Save this to serve up during the fireworks.

It will be gone before it even gets dark enough to see them!

Check out the instructions below on how many supplies you need to put this tray together!

4th of July Dessert Tray /MomAdvice.com

4th of July Flag Fruit Dessert Tray
 
Prep time:
Total time:
Serves: 8 servings
A fast & festive gluten-free fruit dessert tray your guests will flip for.
Ingredients
  • 2 pints strawberries trimmed, rinsed, and dried
  • 1 pint blueberries, rinsed
  • 2 packages of glutino yogurt-covered pretzels (or white chocolate regular pretzels, if not going gluten-free on this tray)
Instructions
  1. On a 9×13 cookie sheet, place a small clear plastic (or glass) square container of berries to create your blue flag corner.
  2. Now alternate the red berries and white pretzels in stripes until you have filled your tray.


While you are here, these are a few more of my favorite 4th of July ideas on MomAdvice! xo


Cupcake Pick 4th of July Wreath

Make a 4th of July wreath out of cupcake picks (world’s easiest festive touch!)


Celebrating 4th of July Heroes With Your Kids

Teach your kids about the REAL 4th of July Heroes (the reason we all celebrate!)


Diy Family-Friendly Bar Cart

Turn a tool cart into a bar cart for the 4th (adorable girl not included!)


DIY slow Cooker Citronella Candles

Keep the bugs away with DIY Citronella Candles (made in your slow cooker!)


Red, White, & Blueberry Trifle

Make a Red, White, & Blueberry Trifle (another light & easy dessert!)


3-ingredient Watermelon Granita

Wow your guests with this Watermelon Granita (just 3-ingredients!)


Watermelon Coconut Lime Smoothies #recipe via momadvice.com

Or blend up leftover watermelon into this Watermelon Lime & Coconut Ice (I love leftovers!)


Blueberry Sangria Lemonade

Make a festive Blueberry Sangria Lemonade for toasting the holiday (cheers and cheers again!)


Berry Quinoa Parfaits

Leftover berries? Turn them into a protein-packed Berry Quinoa Parfait.


Greek Quinoa Salad

Everyone loves a good salad! Greek Quinoa Salad is yummy and gluten-free (winning!)


Lemony Spinach & Tomato Quinoa Salad

Why have one salad when you can have two? Lemony Spinach & Tomato Quinoa Salad is delicious (even at room temperature!)


Caprese Pasta Salad #recipe via MomAdvice.com

I am all about the caprese so this Pasta Caprese Salad really fits the 4th of July bill! (can be made gluten-free with a pasta substitute)


5-ingredient Caprese Pork Chops

Did someone say caprese? These 5-ingredient Caprese Chops would be delicious on the grill.


The World's Best Steak Marinade

Feeling Fancy? Try the World’s Best Steak Marinade (it makes cheap cuts taste gourmet!)


Restaurant-Style Steak Recipe

Rained out? Restaurant-Worthy Steak on the stove. In your face, rain!


4th of July Dessert Tray from MomAdvice


walmart_mom_disclaimer

Pin It

Mini Cannoli Cream Pastry Cups (For Annie the Movie)

Tuesday, March 17th, 2015

Mini Cannoli Cream Pastry Cups from MomAdvice.com

*This post is sponsored by Walmart. Thank you for supporting the companies that support this site!

It’s no secret that this girl loves musical theater and one of the productions I did in high school was ANNIE.  It was one of my favorite movies growing up and Carol Burnett was someone I hoped to model a theater career after. To say that the musical is special to me would be an understatement.  I think it is important to admit that I had low expectations for the new ANNIE movie.

How could anything ever live up to the original?

Imagine my surprise that this movie was as charming as the first.   This movie really DID deliver, even for an original Annie-lover,  and in honor of the film’s DVD release today, I wanted to share a special treat you can share while watching the movie!

If you haven’t seen the film yet, it really does honor the classic songs that we all love, but adds its own unique spin often involving fun sound effects, hand clapping, and a more hip hop beat to the music. There are original pieces that are worked into the music that really flow seamlessly into the original music and the film has been updated with current themes, while embracing the sweetness and wholesomeness of the original ANNIE.

Mini Cannoli Cream Pastry Cups from MomAdvice.com

In this film, Annie believes that she will be reunited with her parents,  at an Italian restaurant where they left a note on a receipt with the heart-shaped locket that any wears. Each Friday she visits the restaurant that serves the homemade cannoli that the couple shared on that night, waiting and hoping that they will finally come to retrieve her.  As she sits upon the curb, the owner comes out and tells her that they haven’t come and hands her a little to-go box of cannolis to take home. It is a ritual that is repeated in the movie and a truly sweet scene.

Mini Cannoli Cream Pastry Cups from MomAdvice.com

Mini Cannoli Cream Pastry Cups from MomAdvice.com

In honor of this moment in the film, I am sharing a fun recipe that you can make with a prepared pie crust and a homemade cannoli filling that is perfect to share while watching the film together.  This would also make an adorable treat for a birthday party or as a party favor in little to-go boxes tied with butcher twine.

I’d like to say a huge thank you to Bowl of Pho today for providing the to-go box and note to make this pretty photo for my cannoli display.  If you are a local, it’s a must in our town to head there and get a bowl-as-big-as-your-head of chicken noodle soup.

Mini Cannoli Cream Pastry Cups from MomAdvice.com

Walmart is sharing this adorable exclusive DVD set that comes with a mini plush Sandy that would be a perfect little Easter treat to share with your Annie-lover this year. The price on this set is $29.96. Wouldn’t this be the sweetest gift? Sandy even made it out of for show-and-share this week!

I hope you enjoy this sweet treat and can pick up this film! I guarantee that it is one that the whole family will love!

Mini Cannoli Cream Pastry Cups (For Annie the Movie)
Prep time:
Cook time:
Total time:
Serves: 48 servings
A sweet treat to share while watching Annie! These can be made gluten-free with a simple substitution of a gluten-free pie crust!
Ingredients
  • 1 container (15 oz) whole-milk ricotta cheese
  • 1/2 cup powdered sugar
  • 2 tablespoons granulated sugar
  • 1/2 teaspoon vanilla
  • 1 box refrigerated pie crusts, softened as directed on box (you can also substitute with gluten free pie crust)
  • 3 tablespoons turbinado sugar (raw sugar)
  • 1 teaspoon ground cinnamon
  • 1/4 cup miniature semisweet chocolate chips
  • Additional powdered sugar
Instructions
  1. In large bowl, beat all filling ingredients with electric mixer on medium speed until creamy. Place filling in 1-gallon resealable food-storage plastic bag; refrigerate while making cups.
  2. Heat oven to 425°F. On lightly floured work surface, unroll pie crusts. Sprinkle each crust with turbinado sugar and cinnamon. Lightly roll rolling pin over sugar and cinnamon to press into pastry. With 2 1/2- to 3-inch round cutter, cut out pastry rounds. Lightly press each pastry round into ungreased mini muffin cup.
  3. Bake about 10 minutes or until pastry cups are golden brown. Cool completely in pans, about 15 minutes. Remove from muffin cups to cooling racks.
  4. Just before serving, remove filling from refrigerator. Cut 1 bottom corner off bag; pipe scant tablespoon filling into cooled pastry cups. Sprinkle with chocolate chips and powdered sugar. Serve immediately. Store any remaining pastry cups at room temperature and filling in refrigerator.
Source: Pillsbury
walmart_mom_disclaimer


Pin It

Easter Surprise Peeps Cupcakes

Sunday, March 15th, 2015

Easter Surprise Peeps Cupcakes from MomAdvice.com

*This post is sponsored by Walmart. Thank you for supporting the companies that support this site!

Easter is one of my favorite holidays and I love crafting, decorating, and especially the eating for this holiday.  Longtime readers know that I have a love affair with Peeps that have included a wreath made out of Peeps and I have even found a way to make Peep Martinis that taste divine.  Let’s just continue the mad love affair with Peeps and make a hilarious Easter surprise cupcake for your kids!

Supplies:

1 box gluten-free cake yellow cake mix
Water, vegetable oil and eggs called for on cake mix box
1 cup assorted mini candy-coated chocolate candies, jimmies or confetti candy sprinkles
¾ cup sugar
1 teaspoon vanilla extract
¼ cup boiling water
¼ teaspoon cream of tartar
3 unbeaten egg whites
12 Peeps (any color)
Melon Baller

Easter Surprise Peeps Cupcakes from MomAdvice.com


Directions

Heat oven to 350°F (325°F for dark or nonstick pans). Place paper baking cup in each of 12 regular-size muffin tins.

Make cake batter as directed on box. Divide batter evenly among muffin cups (about two-thirds full). Bake as directed on box for cupcakes. Cool in pans 10 minutes; remove from pans to cooling rack. Cool completely, about 30 minutes.

Using melon baller, scoop out center of each cupcake, about 1 inch deep. Fill each with 1 heaping teaspoonful candies.

Mix sugar, cream of tartar, vanilla and egg whites in your stand mixer bowl. Add boiling water. Beat on high until the mixture forms peaks, which should be just about seven minutes. Spoon or pipe frosting on top of the cupcaks and finish with sprinkles and a Peep on top.

Easter Surprise Peeps Cupcakes from MomAdvice.com

Easter Surprise Peeps Cupcakes from MomAdvice.com

easter-surprise-peep-cupcakes-17

Don’t you hate it when your Peeps lay their eggs in your cupcakes? Ha! What a funny surprise for you kids and a fun food craft to do together as a family! I hope you love this idea and remember that you can pick up all the supplies at your local Walmart store! Happy Easter, everyone!

Easter Surprise Peeps Cupcakes
Prep time:
Cook time:
Total time:
Serves: 12
A fun Easter surprise cupcake that you just so happens to be gluten-free. Fill it with your favorite egg candy and top with a marshmallow Peep!
Ingredients
  • 1 box gluten-free cake yellow cake mix
  • Water, vegetable oil and eggs called for on cake mix box
  • 1 cup assorted mini candy-coated chocolate candies, jimmies or confetti candy sprinkles
  • ¾ cup sugar
  • 1 teaspoon vanilla extract
  • ¼ cup boiling water
  • ¼ teaspoon cream of tartar
  • 3 unbeaten egg whites
  • 12 Peeps (any color)
  • Melon Baller
Instructions
  1. Heat oven to 350°F (325°F for dark or nonstick pans). Place paper baking cup in each of 12 regular-size muffin tins.
  2. Make cake batter as directed on box. Divide batter evenly among muffin cups (about two-thirds full). Bake as directed on box for cupcakes. Cool in pans 10 minutes; remove from pans to cooling rack. Cool completely, about 30 minutes.
  3. Using melon baller, scoop out center of each cupcake, about 1 inch deep. Fill each with 1 heaping teaspoonful candies.
  4. Mix sugar, cream of tartar, vanilla and egg whites in your stand mixer bowl. Add boiling water. Beat on high until the mixture forms peaks, which should be just about seven minutes. Spoon or pipe frosting on top of the cupcakes and finish with sprinkles and a Peep on top.
Recipe adapted from tablespoon
walmart_mom_disclaimer
Pin It

Galette des Rois: Kings’ Cake

Tuesday, January 27th, 2015

From our food contributor, Shaina Olmanson.

Galette des Rois King's Cake recipe | MomAdvice.com
A recipe for the Northern French frangipane tart version of Kings’ Cake. Often eaten at Epiphany in January, Kings’ Cake is also closely associated with pre-Lenten festivities surrounding Carnival/Mardi Gras.

We spent our holidays with family, bundling up and piling in the car again and again, a jumble of hats and mittens and frosty noses hidden underneath. We carried silver trays piled high with cookies, slow cookers filled with simmering produce, and stacks of Christmas cards to be hand delivered to doorsteps up and down the state. In the end, all the family members had their fill of children laughing and squealing in delight over even the smallest of festivities. With five family holiday meals, one groom’s dinner, and one New Year’s Eve wedding behind us, we all but collapsed on the couch at home. Just in time for school to start up.

Galette des Rois King's Cake recipe | MomAdvice.com
With all the running, we didn’t seem to get time to do what we do best as a family, so on Epiphany, we huddled around our kitchen together, rolling dough, mixing fillings, slicing and chopping, and getting back to what makes us tick.

Sitting down around the table piled high with roast, brussels sprouts, salads, and with a timely cake waiting on the sidelines for dessert, it finally felt like we were starting a new year, just as it should begin, with us coming together and doing the things that keep us together like family dinners around the table. I do believe we started a new Epiphany tradition for us. We’ll see you here next year. Same date. Same place. Same tart.

I hid an almond in my galette des rois, rather than a small trinket or la fève. Tradition says you cut this tart into the number of people present plus one, the remaining slice being reserved for God, the Virgin Mary, or the poor. The one who has the trinket in their slice of tart becomes king or queen for the day…or they are responsible for bringing the tart next year. Either or. Regardless, I’ll be on the lookout for small trinkets to bake inside for my kids to find next year.

Galette des Rois King's Cake recipe | MomAdvice.com

Galette des Rois: Kings’ Cake
Recipe Type: dessert
Author: Shaina Olmanson
Prep time: 25 mins
Cook time: 35 mins
Total time: 1 hour
Serves: 8-10 servings
Ingredients
  • 1 cup almond flour
  • 1/2 cup granulated sugar
  • 2 tablespoons arrowroot powder
  • 1/8 teaspoon salt
  • 7 tablespoons butter, softened
  • 1 large egg
  • 2 tablespoons cognac
  • 2 sheets puff pastry (or 1 recipe [url href=”http://blog.bobsredmill.com/gluten-free/step-by-step-gluten-free-puff-pastry/” target=”_blank”]gluten-free puff pastry[/url])
  • 2-3 tablespoons apricot jam
  • 1 whole almond, if desired
  • 1 egg yolk
  • 1 tablespoon cream
Instructions
  1. In a medium mixing bowl, combine the alond flour, sugar, arrowroot flour, and salt. cut in the butter until incorporated. Stir in the egg and cognac. Chill.
  2. Preheat the oven to 375ºF.
  3. Roll the two pastry sheets to 10″ squares. Using a pie plate or other round object, cut 2 10″ circles.
  4. Place one circle on your lined baking sheet. Spread the apricot jam in the center, leaving a 2″ edge. Top with the chilled almond filling. Place the almond in the filling.
  5. Brush water over the edge of the bottom circle. Top with the second pastry circle and pinch along the edge to seal.
  6. To crimp, use your thumb and pointer finger together, pressing the back of a paring knife into the edge to create the crease. Continue around the entire tart.
  7. Whisk together the egg yolk and cream. Brush over the entire tart. Decorate the tart by scoring the tart with a pairing knife to leave an indentation.
  8. Bake for 30-35 minutes, until golden brown. Allow to cool slightly before cutting.
3.2.2925


Pin It