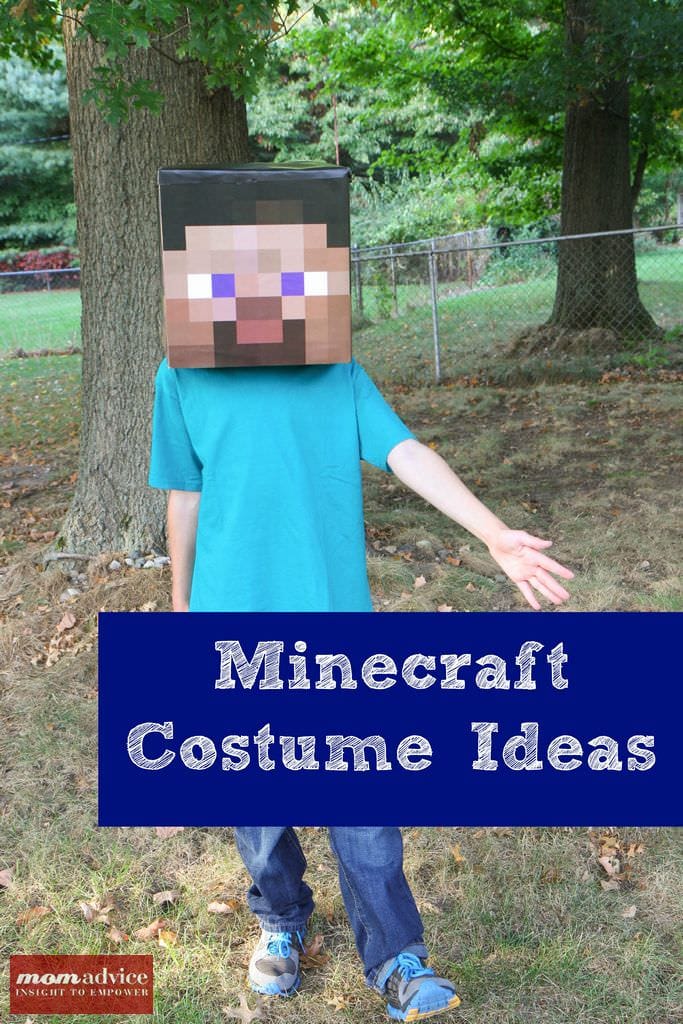
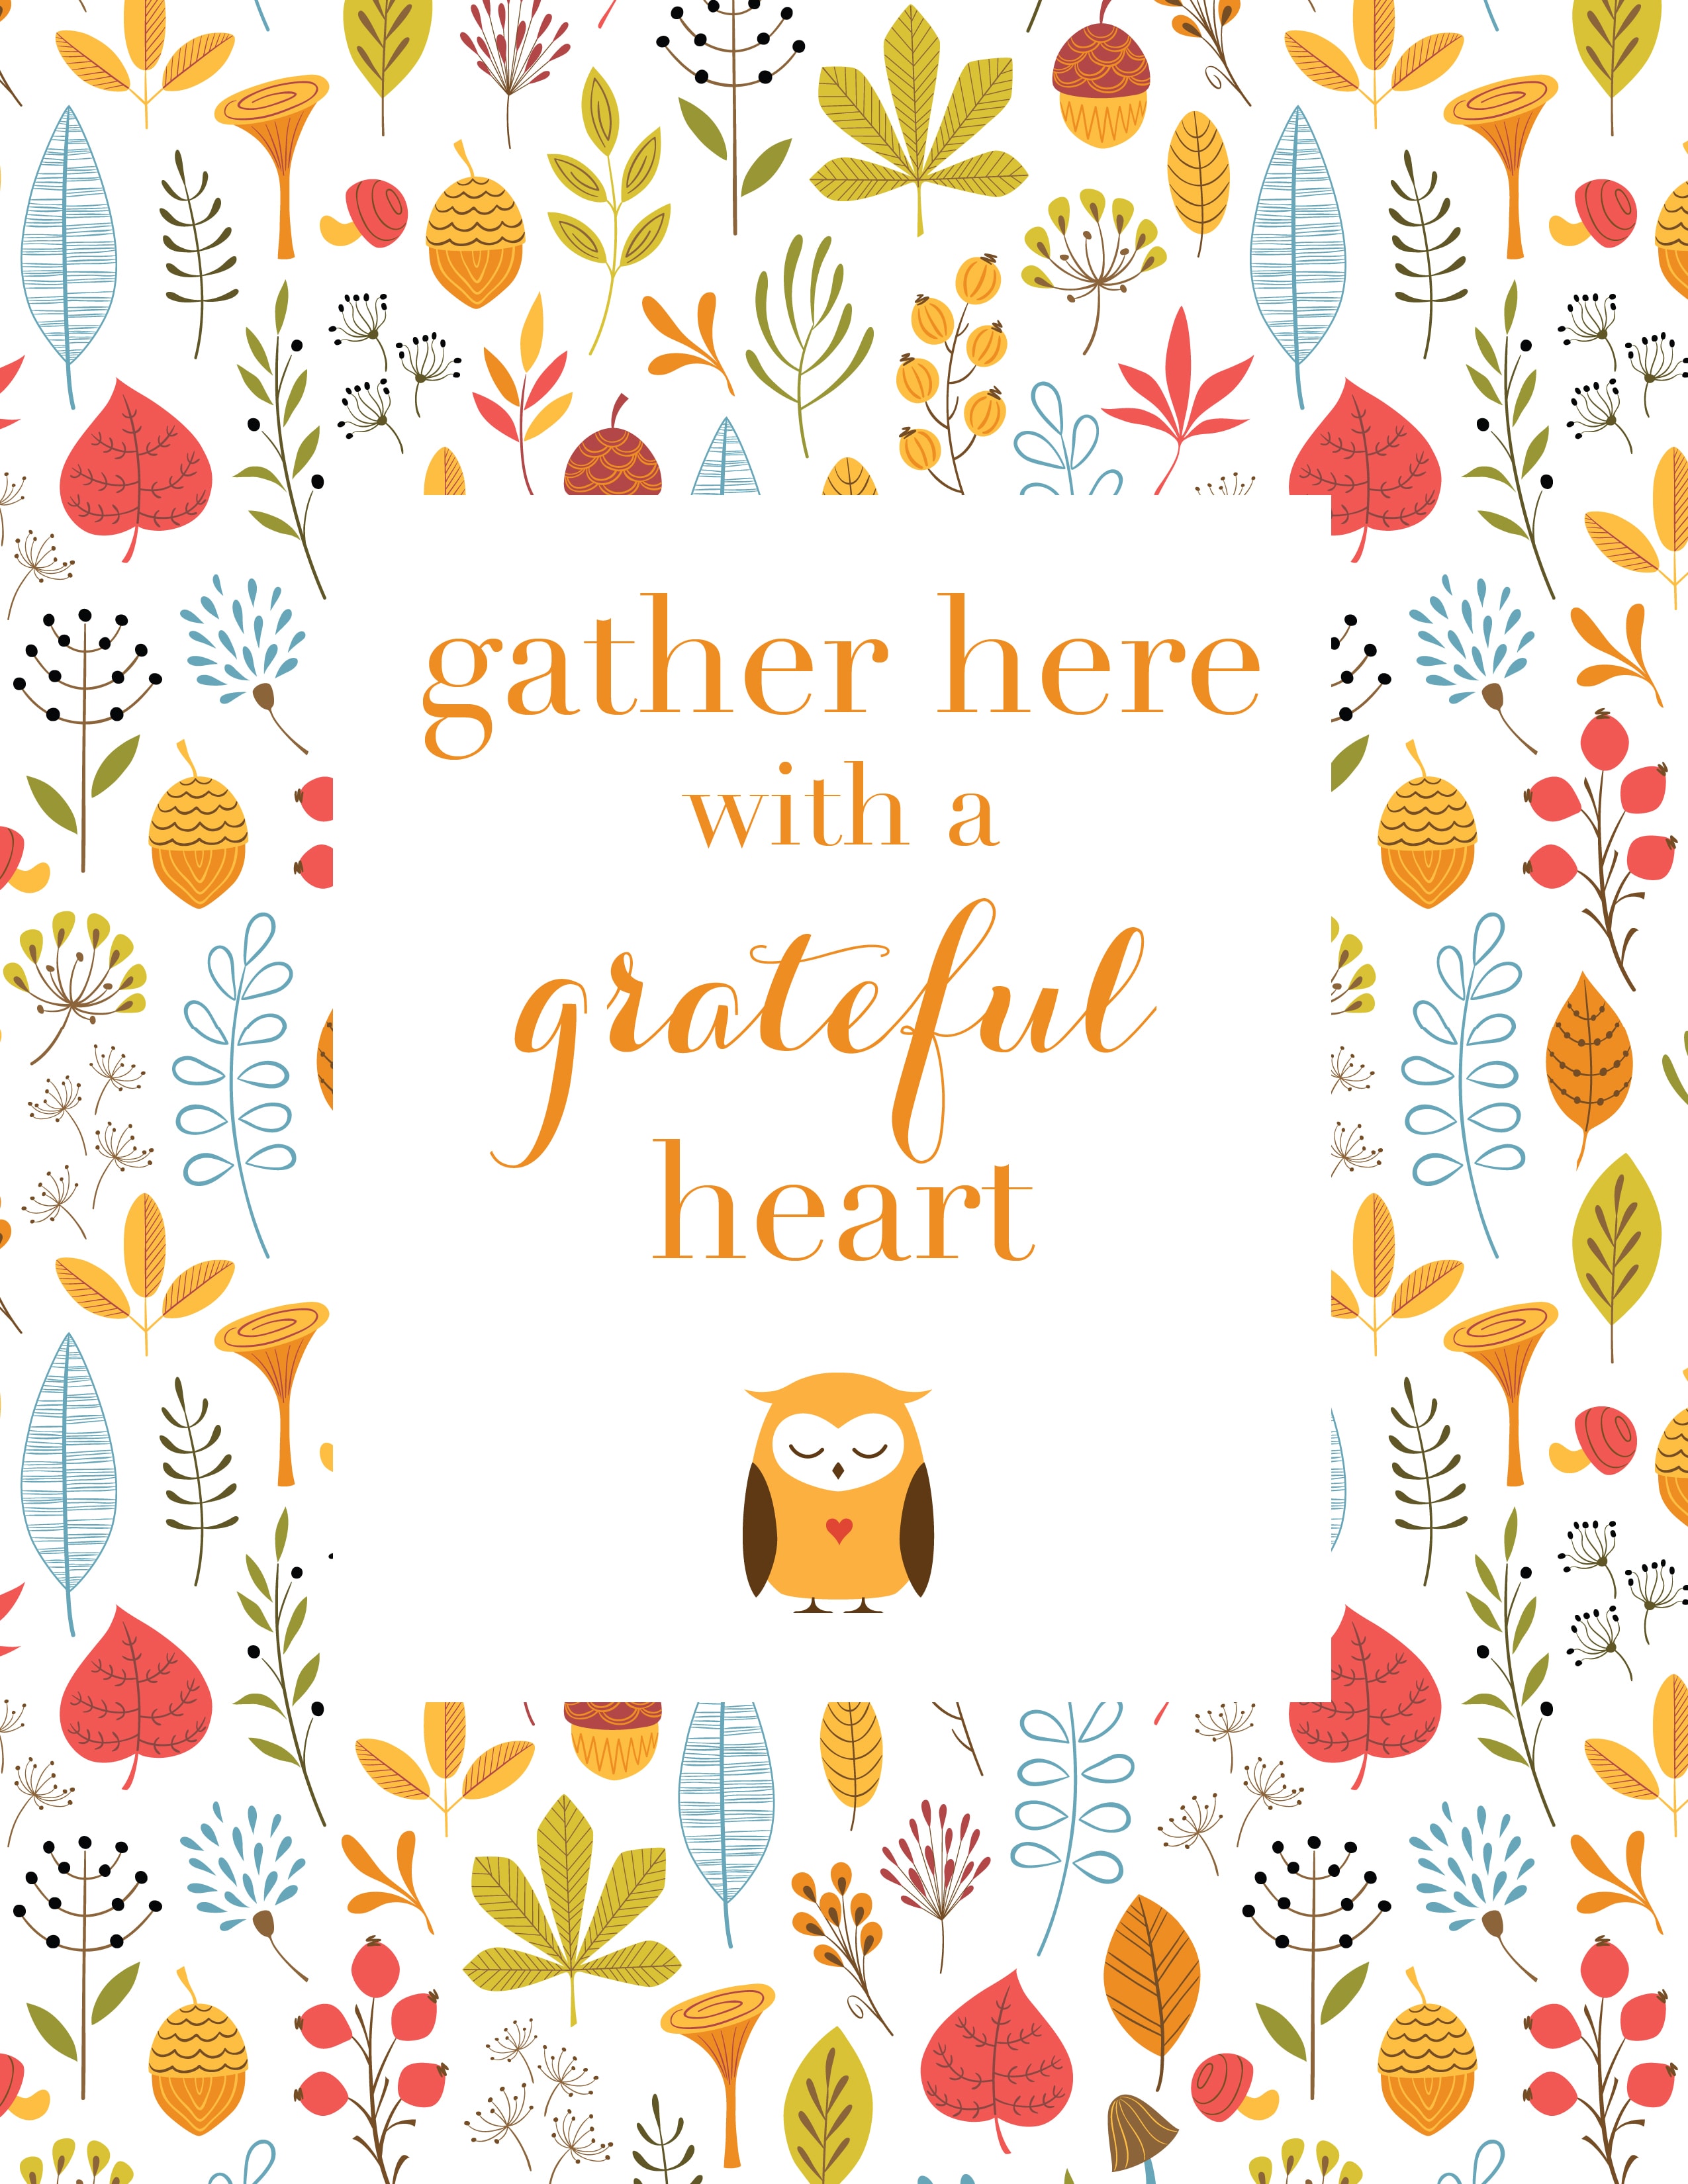
Bring the holidays to your mantle with these simple DIY Christmas trees! This holiday craft is so easy and inexpensive that you can make a few and display them together or give them as gorgeous hostess gifts. Make the DIY holiday yarn trees in Christmas colors or your favorites to add a festive touch to your Christmas decor!
What could be more fun than decorating for the holiday season?
For this month’s holiday decor project, I wanted to share with you a fun DIY project for creating festive yarn trees that you can create to decorate a ledge, table, or mantle in your home.
You will only need a few affordable supplies from your craft shop to create this craft.
Don’t think of these as only a decoration for Christmas.
These are beautiful to display all holiday season long, especially in a nice warm neutral yarn!
1. For each of the smaller trees, you will need approximately 73-75 small pom poms. I am in love with my pom-pom maker for making these and have provided a picture tutorial above, if you would like to use these too. Make sure to give your pom-poms a nice trim, to even up any uneven spots.
2. Once you have made all of your pom-poms, it is time to assemble them to your tree-form. Grab your hot glue gun and apply a dab of glue in the center of the pom-pom (where you have tied the string to gather everything. Apply the pom-poms to the tree, starting at the bottom of the cone and working your way around the tree. Try not to line these up all evenly, but stagger them in each row to make it look more like a real tree!
3. Continue adding pom-poms until you get to the top of the tree, making sure all of the tree-form is completely covered.
4. Make a large pom-pom in a contrasting color and secure it with hot glue, in the center again, and add it to the top of the tree as your star.
5. Finish by giving your tree a trim, especially at the top, to trim all of the yarn down to make it look more like a tree.
6. For an easy yarn-wrapped tree, begin by adding a dab of hot glue to the top of your taller tree-forms. Begin by applying your yarn in a swirled motion at the top. Add one more dab of glue at the top and start wrapping your tree-form all the way around it until you are about a half-inch from the bottom.
7. Add one more dab of glue and then finish adding the yarn until you reach the bottom of the form. Clip the yarn and secure the end with a little hot glue.
8. Decorate this tree-form any way that you would like. If you are not a knitter, there are many varieties of ways you can decorate these yarn trees. You can top with a pom-pom in an alternating color, create a multi-colored pom-pom for topping, braid yarn to create a garland, or create some garland out of a contrasting color.
9. If you are a knitter, knit a 3-stitch i-cord using two 4.0 mm double-pointed needles for a total of 32.5 inches. Using straight pins, secure the i-cord to the top of the tree and then wrap around and around, securing occasionally with pins, until the tree is completely wrapped in garland.
10. Top your tree with a simple knitted bow, if knitting an adornment. Using your 3.75 mm straight needles, cast on ten stitches. Knit the first row, then purl the next row. Repeat this pattern until it measures 6.5 inches in length. Cast the stitches off and then seam them in the center. Using more yarn, simply wrap the center of the bow and then knot the yarn behind. Secure the bow at the top with hot glue.
11. Attach all of the trees to inexpensive dollar-store candlestick holders. If you desire, you can spray paint these in your favorite color or just leave them plain, as I have shown.
I hope you love these little yarn trees as much as I do! It is definitely an inexpensive and fun way to dress up a corner of your home for the holidays!
Do you know the hidden secrets to the perfect cut-out sugar cookies? Put your stand mixer to work and blend up this incredible sugar cookie dough. You will learn how to make rolling and cutting sugar cookies easier. These tricks yield cookies that stay soft- bookmark this perfect cut-out cookie recipe today!
I love, love, love to cook.
Baking bread, whipping up fancy dinners, making stacks of gourmet waffles…those are my favorite thing to do!
Baking cookies?
Total fail.
I don’t know what it is, but making great cookies is not something I am good at.
To be honest, I just don’t think I have the patience for it.
More than that, I haven’t had the time.
I rely on bar cookies, quick breads, and other easy snacks to get us by.
Of all of the fails, cut-out sugar cookies have been the biggest fail for me.
They are misshapen, taste like cardboard, and are far too time-consuming.
I tried so many recipes with the same results and had determined that cut-out cookies were just NOT my thing.
I decided this year though that I would find a good recipe that would look nice and yield a tasty result.
Where do I turn when I don’t have time to run a full-fledged test kitchen out of my home?
The recipe was entirely unique and promised fantastic results.
Crisp cookies, full flavor, and step-by-step tutorials that would be worth eating and sharing.
The Hidden Secrets to Perfect Cut-Out Sugar Cookies
Trick #1: Use a Superfine Sugar
The first step towards a great sugar cookie was to use superfine sugar.
According to the cookbook, superfine sugar gives the cookies a finer crumb and crisper texture.
What is Superfine Sugar?
Superfine sugar s simply granulated sugar that’s been ground more finely. It’s often called for in recipes where a faster dissolving granule is needed.
This ingredient can be purchased at your local grocery store over by the other sugar options.
Don’t want to buy superfine sugar for one recipe?
Yeah, me either!
How Can I Make My Own Superfine Sugar?
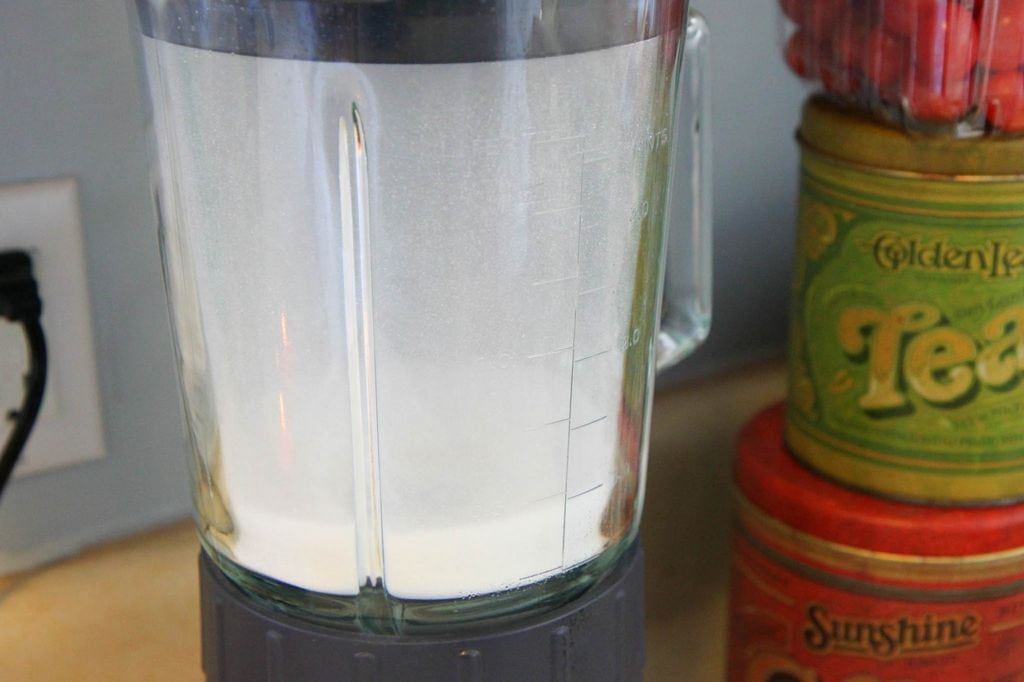
Instead of purchasing a specialty sugar, process one cup of your granulated sugar in a food processor or blender.
Once the sugar is to a fine consistency (approximately 30 seconds), you can measure out 3/4 cup for your recipe.
Easy enough!
You know me, I chose the cheaper option for this recipe and put my blender to work.
Trick #2: The “Reverse Mixing Method
The second step to their perfect cookie was a “reverse” mixing method.
In traditional recipes, we would cream the room temperature butter and sugar together. They took a reverse mixing method approach instead.
With this method, you mix together all of the dry ingredients first and then add butter tablespoon by tablespoon.
The dough mixture is finished with cream cheese, another unusual addition to a cut-out sugar cookie recipe. This ingredient really pulls everything together and makes the dough workable. Once it has pulled together, finish with a little vanilla extract for flavor!
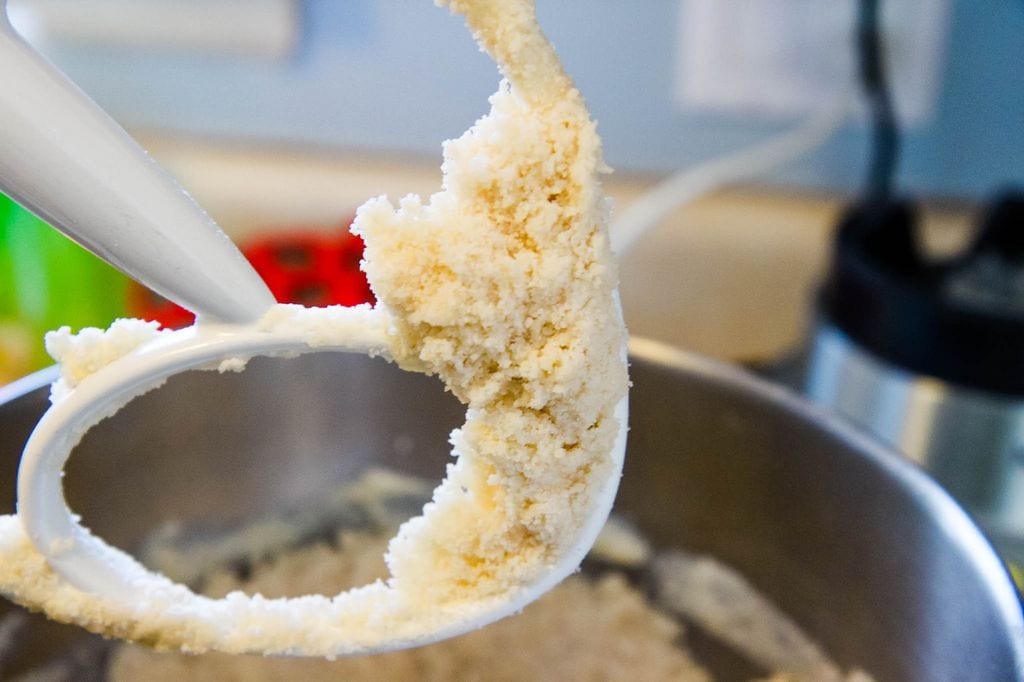
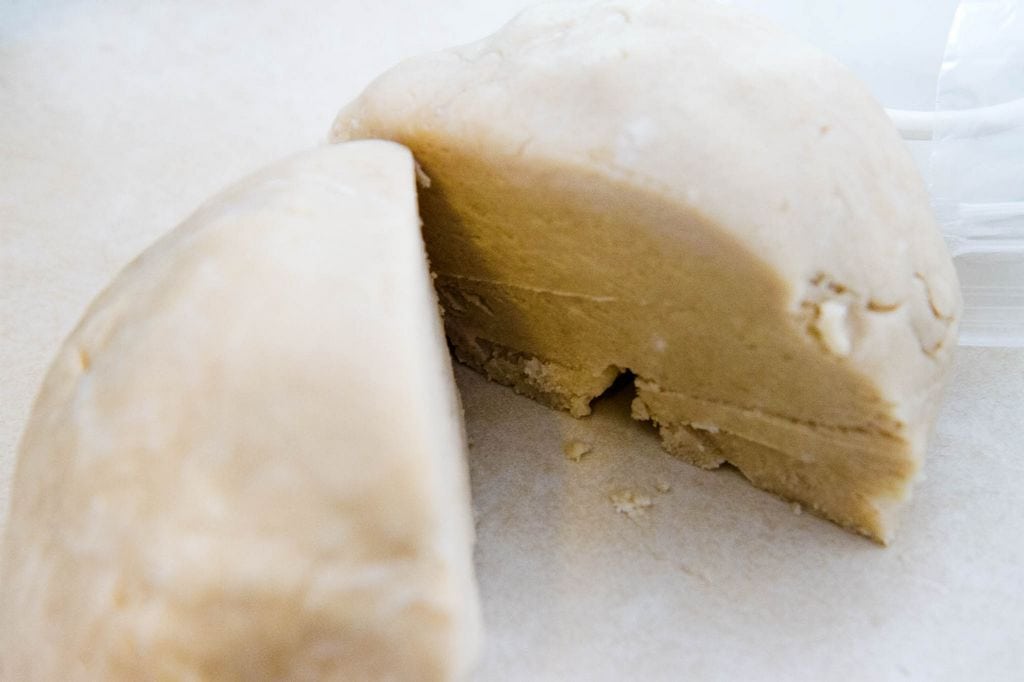
The dough looked like this. It looked crumbly and not very wet. You were instructed to pull the dough together with your hands and form it into a ball. I wasn’t too sure how this was going to work out. It just did not seem sticky enough to me.
The dough looked like this. It looked crumbly and not very wet.
You were instructed to pull the dough together with your hands and form it into a ball.
I wasn’t too sure how this was going to work out. It just did not seem sticky enough to me.
After a couple of minutes of kneading, this is what my dough looked like. I don’t think my dough has ever looked this good.
Trick #3: Chill Your Cut-Out Sugar Cookie Dough
Have you ever had a sugar cookie that looks misshapen?
Chances are that the cook didn’t chill the dough. This look step helps these cut-out cookies to turn out great.
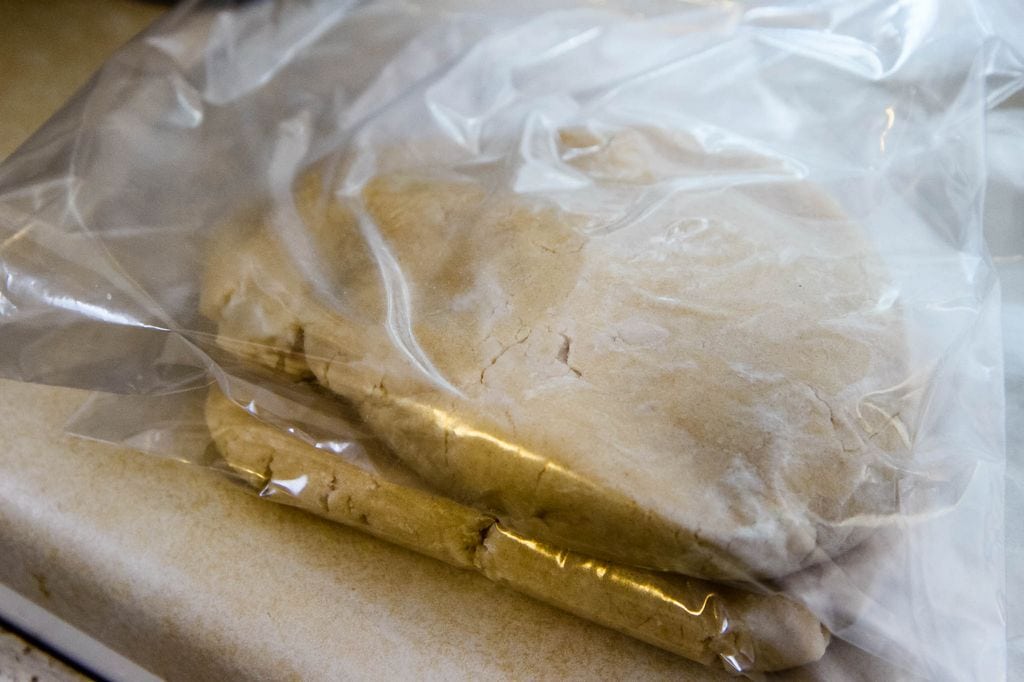
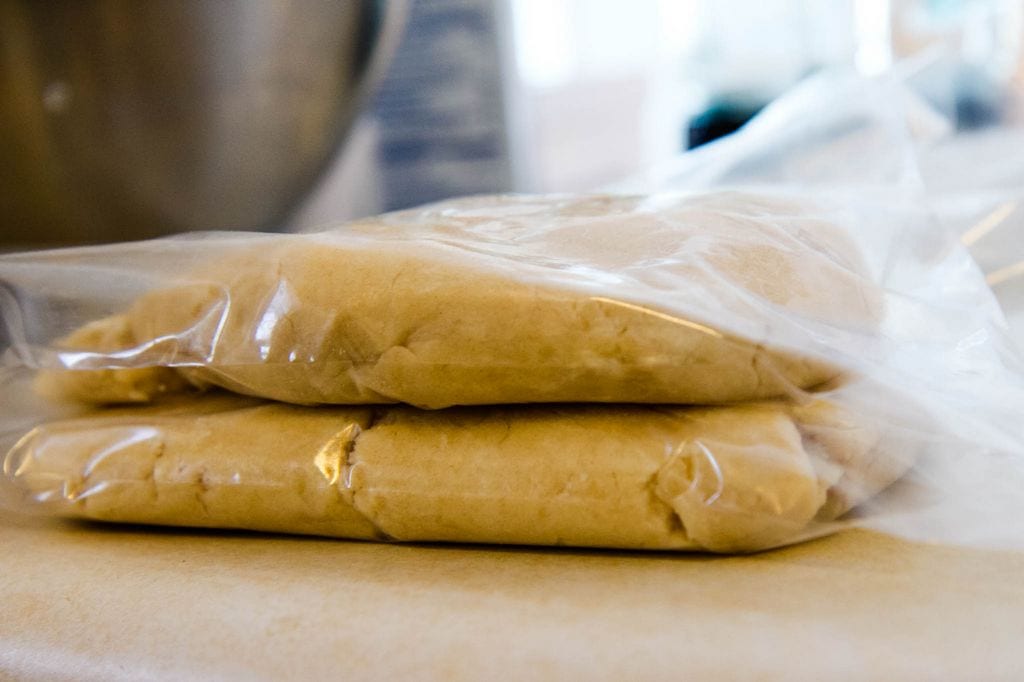
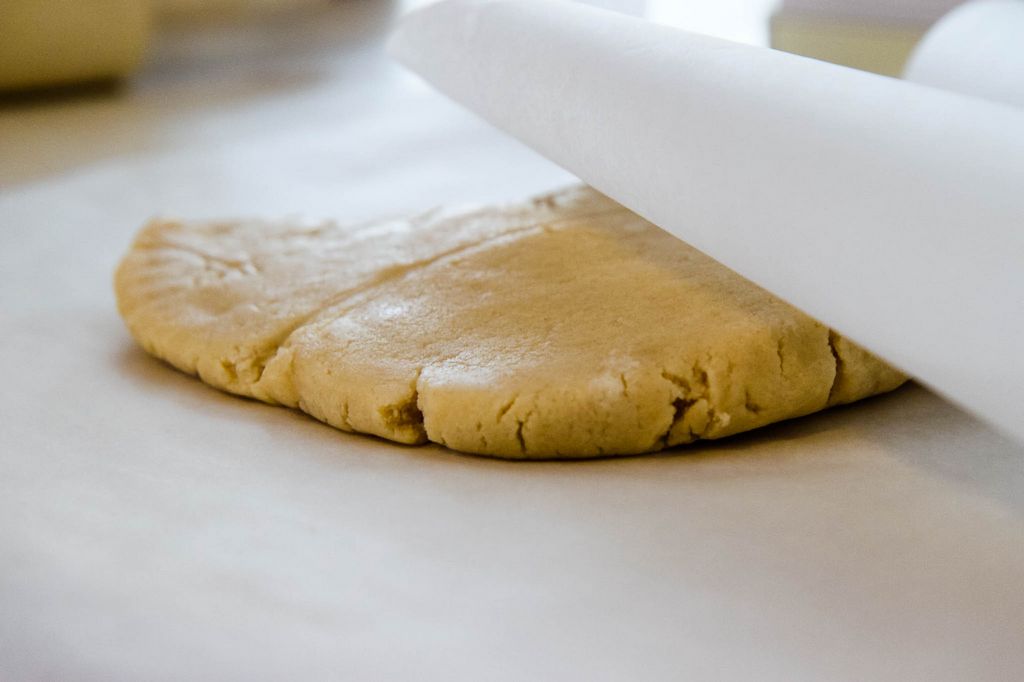
Divide the dough and place them in your refrigerator to chill. It is recommended to flatten them into two 4″ disks, and leave them there for 20-30 minutes.
While the dough is chilling, you can tidy up the kitchen and then get everything else ready to go.
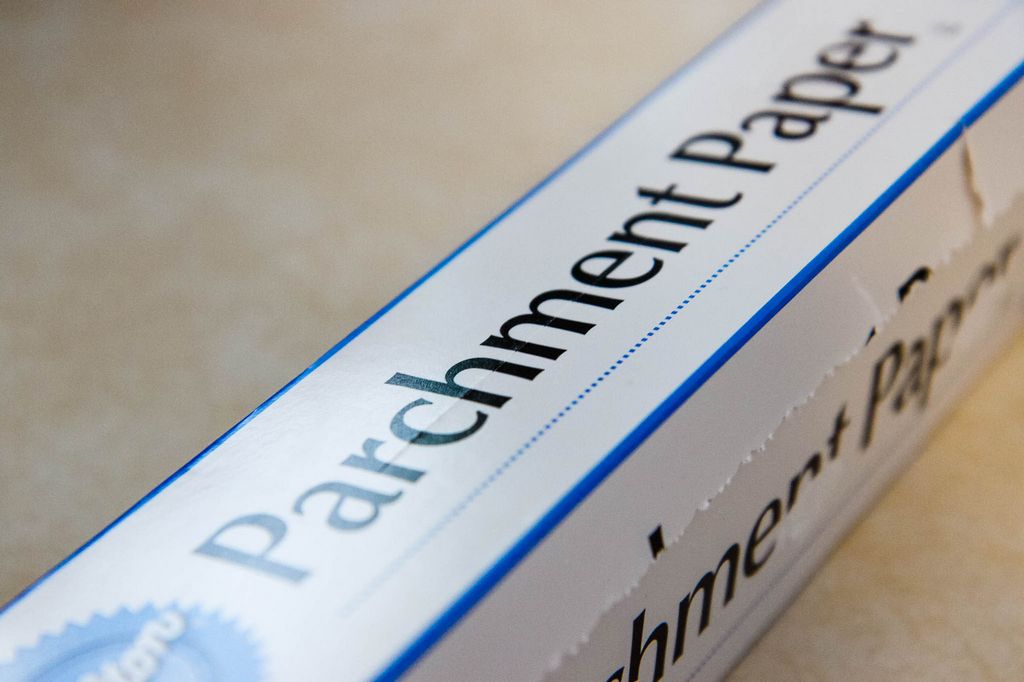
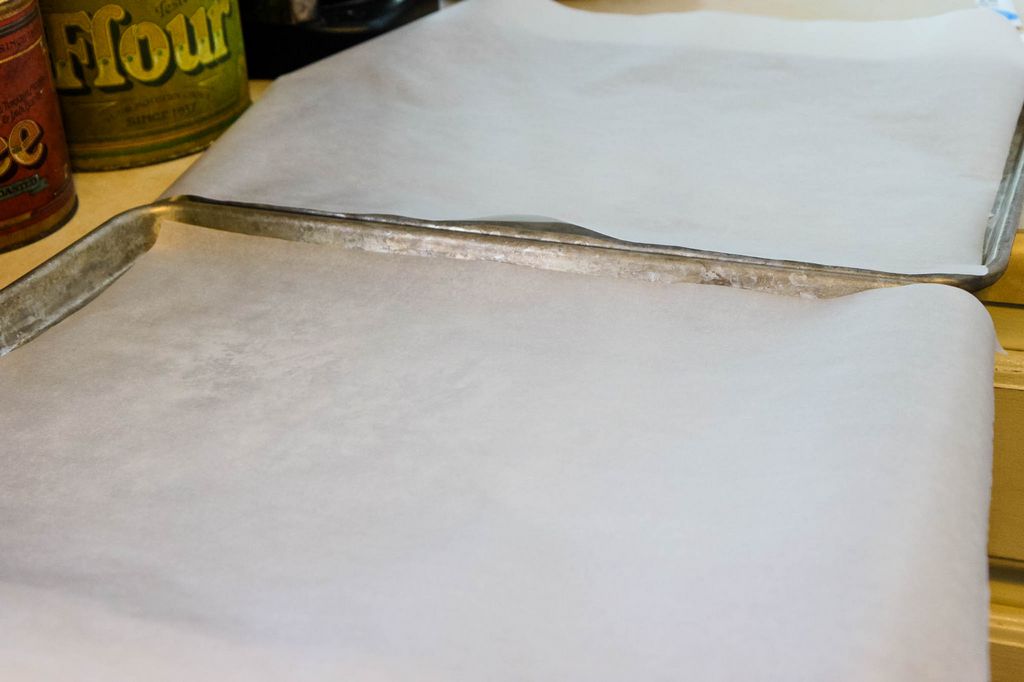
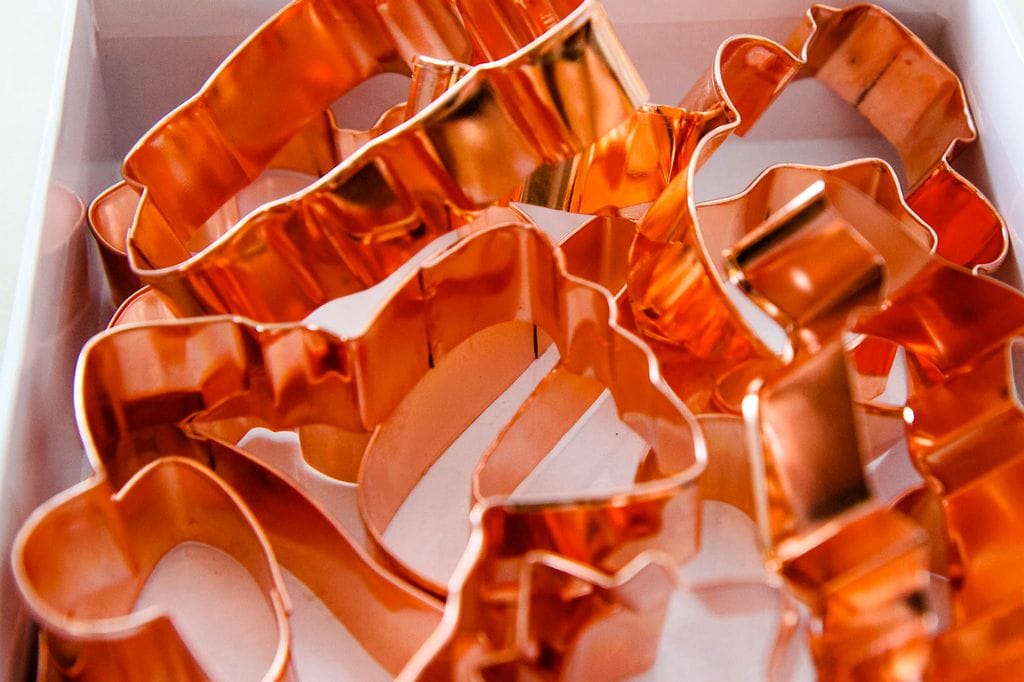
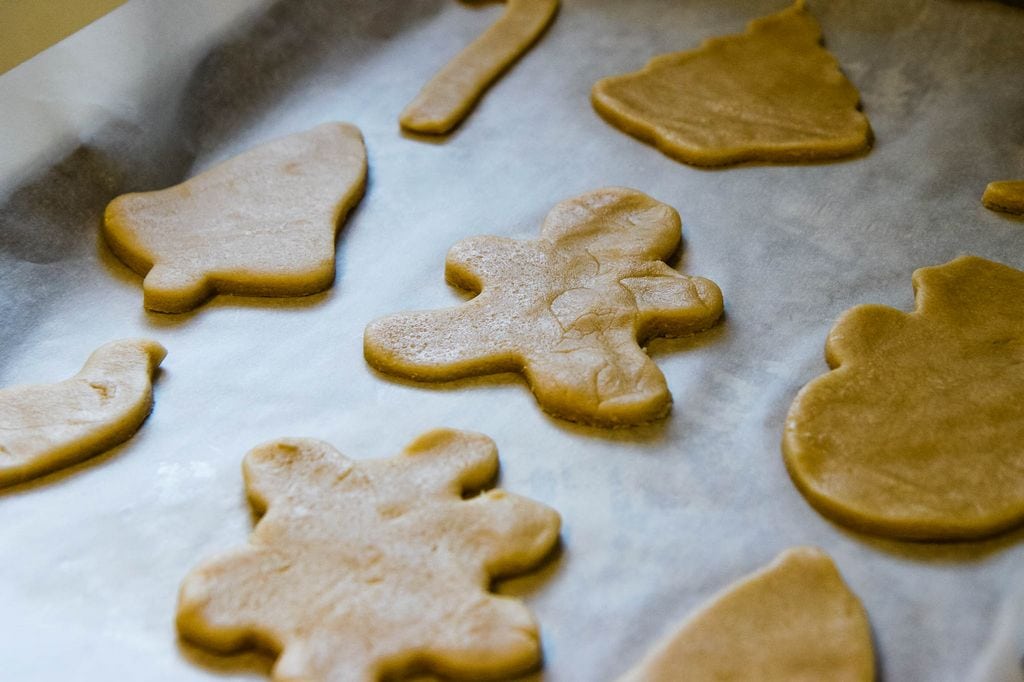
Line your cookie sheets with parchment paper and lay out your cookie cutters.
Next, tear off two additional sheets of parchment paper per dough disk to roll out your cookie dough.
That’s right, no floured counters which will save on clean-up time!
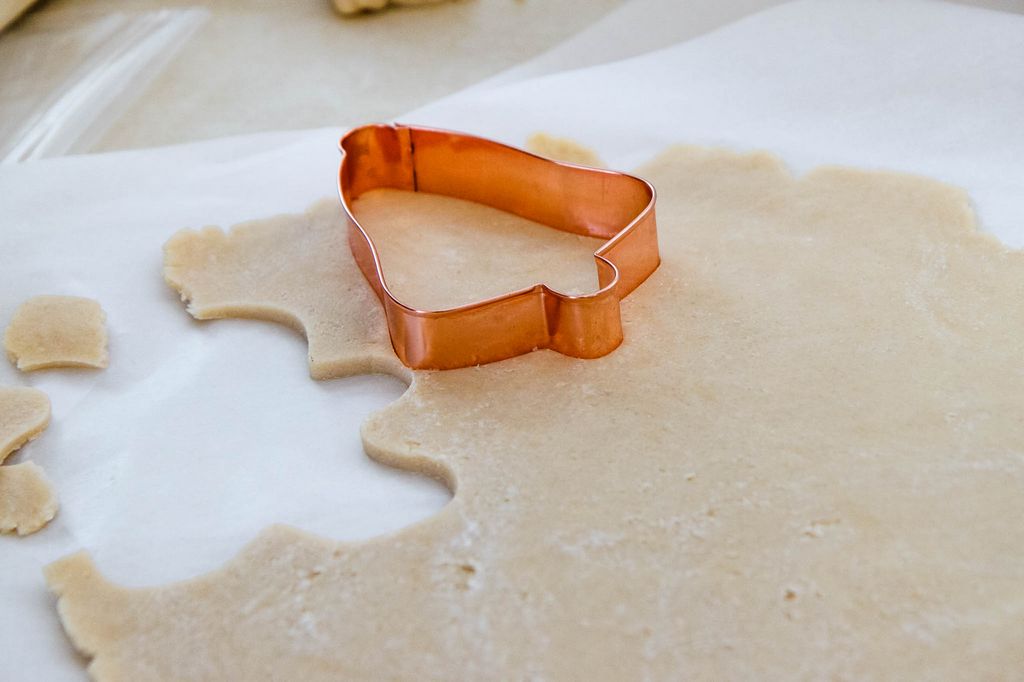
Tip #4: Roll Your Cut-Out Sugar Cookie Dough Between Two Sheets of Parchment Paper
Put your disk between the parchment paper and roll the dough out.
I secured one set of corners between me and the counter to hold the paper in place.
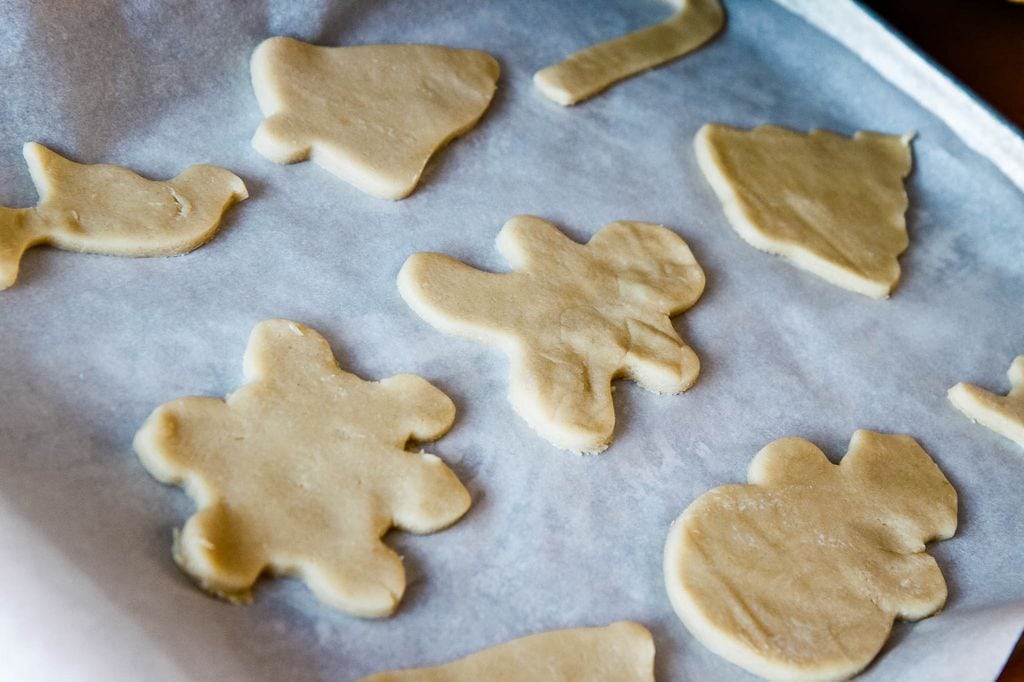
Tip #5: After You Roll Out Your Sugar Cookie Dough, chill it AGAIN!
Now pop the dough back in the refrigerator for ten more minutes or until the dough is firm for cutting.
I know waiting for the dough to chill again feels like a waste of time.
Trust me, you will be glad you did it.
This will yield a cookie with sharp edges and that hold their shape.
I promise that this will be worth the wait.
At this point, I was already patting myself on the back.
Aren’t you glad you weren’t in the kitchen with me for this annoying moment?
The cookies cut out beautifully and were firm enough that I could easily transfer them over to the parchment paper.
How crazy that we won’t be losing snowman feet and arms or the poor wings off of our bird cookies!
I bet you are glad you never saw my past cookies (*ahem*)!
Put your cookie sheets in the oven and watch them through the glass.
Be sure to continue, annoyingly, patting yourself on the back.
Tip #6: Rotate Your Cookie Sheets For Even Heating
Instead of letting one rack stay doughy and one rack get burnt, they have you rotate the cookie sheets halfway through.
What a novel idea!
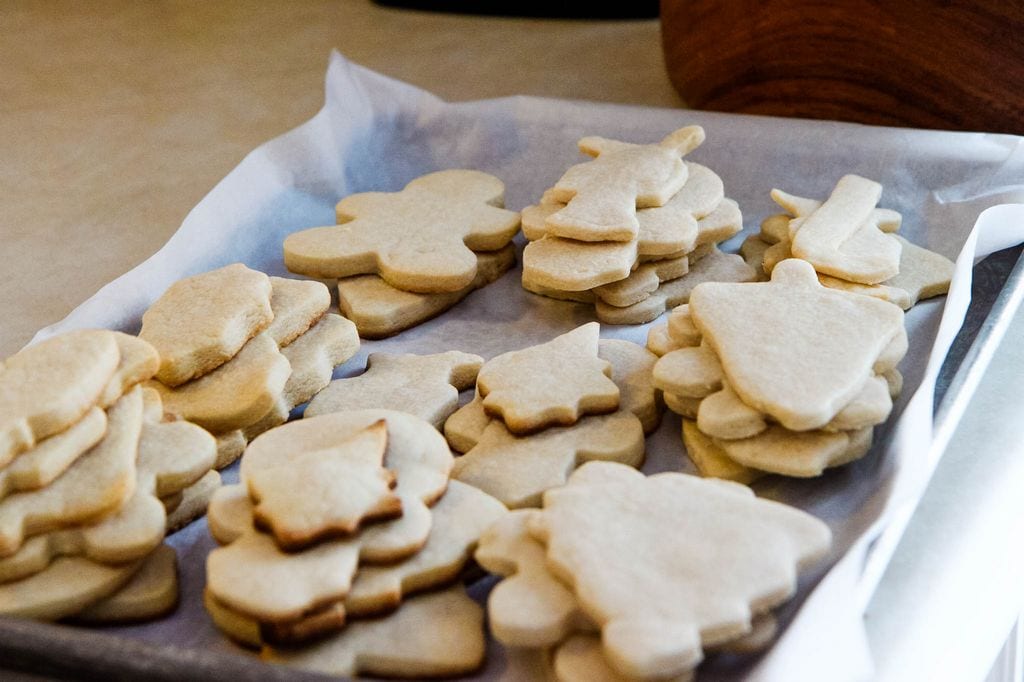
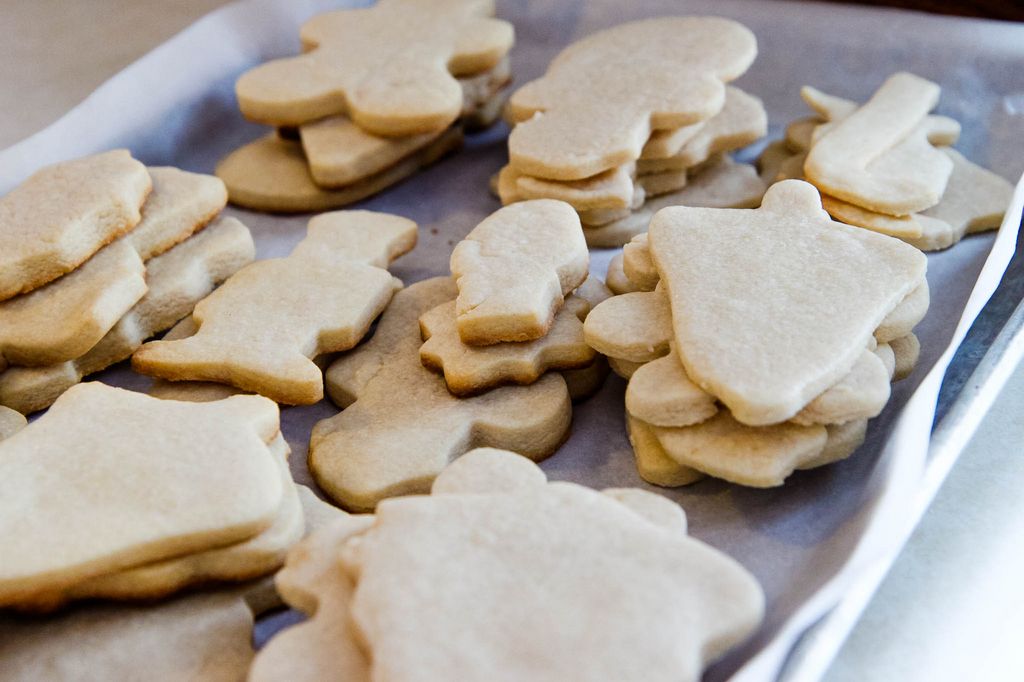
These are my cookies after baking!
I KNOW!
Keep in mind, these cookies remain a pale color so don’t worry that they haven’t cooked long enough. Ten minutes is just the amount of time you need for these cookies to
They didn’t look done to me, but they were so don’t overcook them.
I had one batch that got out in the nick of time after I added two minutes to the cooking time.
They will harden up for you without any additional cooking.
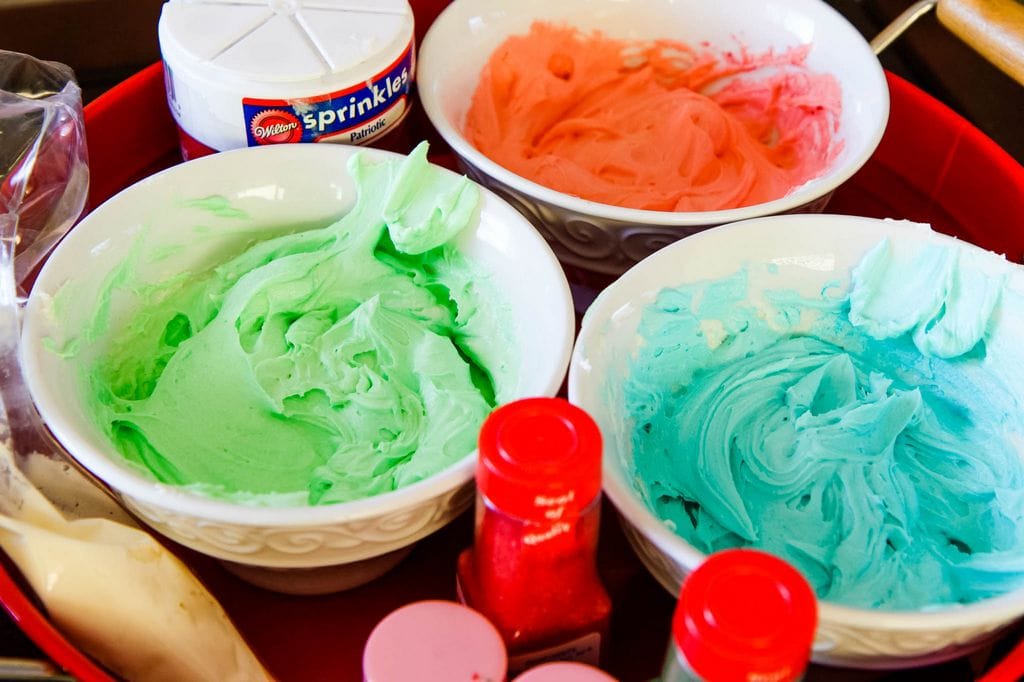
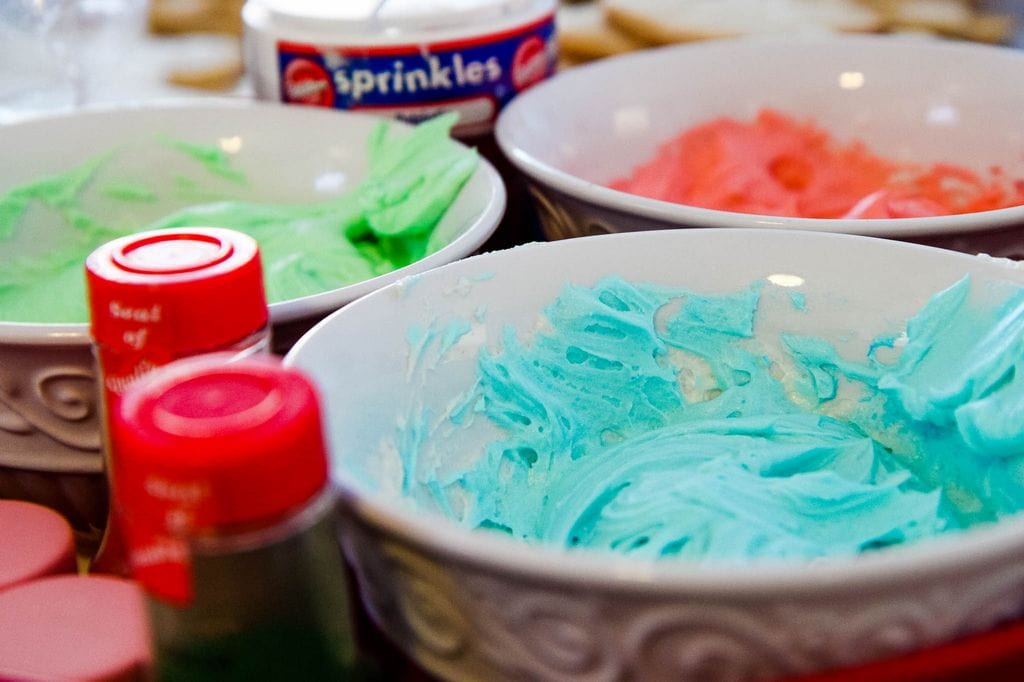
Tip #7: Ice Your Cookies With America’s Test Kitchen Royal Icing (OR NOT)
They recommend decorating with a royal icing glaze.
I am not a fan of how those royal icing recipes turn out.
I stick to a traditional frosting recipe that requires a little more time to harden, but has a thicker tasting frosting.
What If I Want the America’s Test Kitchen Royal Icing Recipe?
Blend together 2 cups (8 ounces) confectioners’ sugar, 3 tablespoons milk, 1 ounce cream cheese, softened, and food coloring to make the America’s Test Kitchen Glaze.
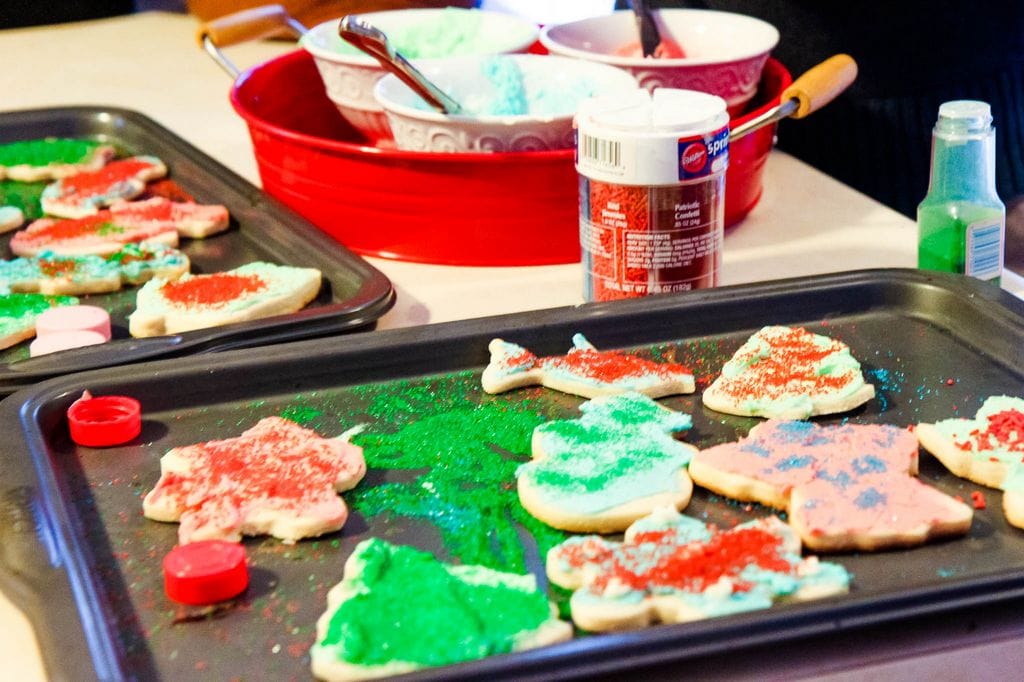
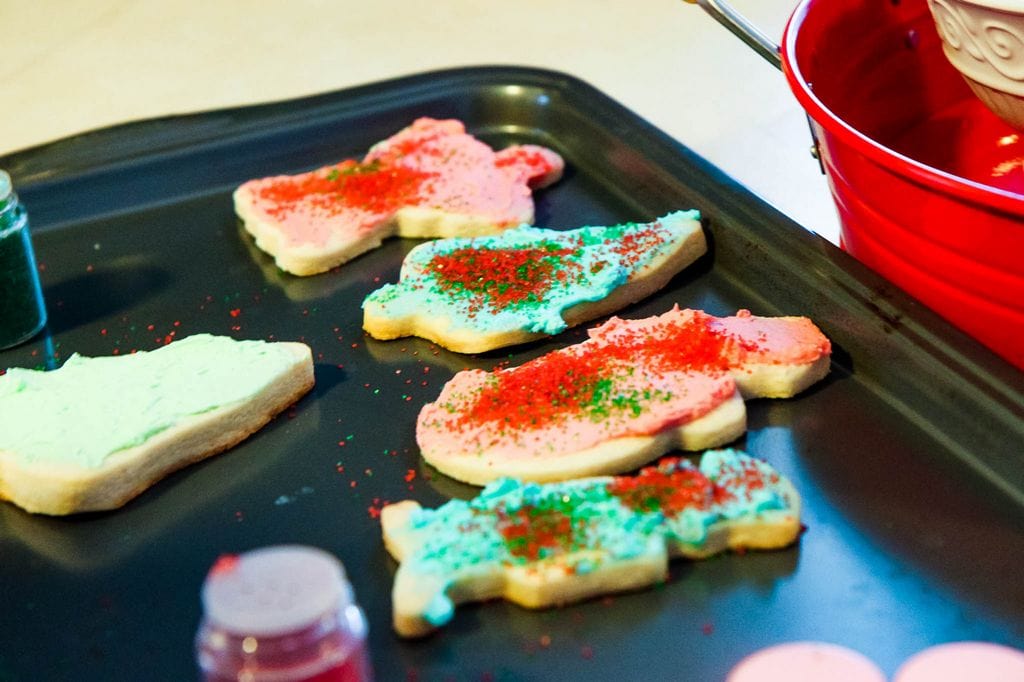
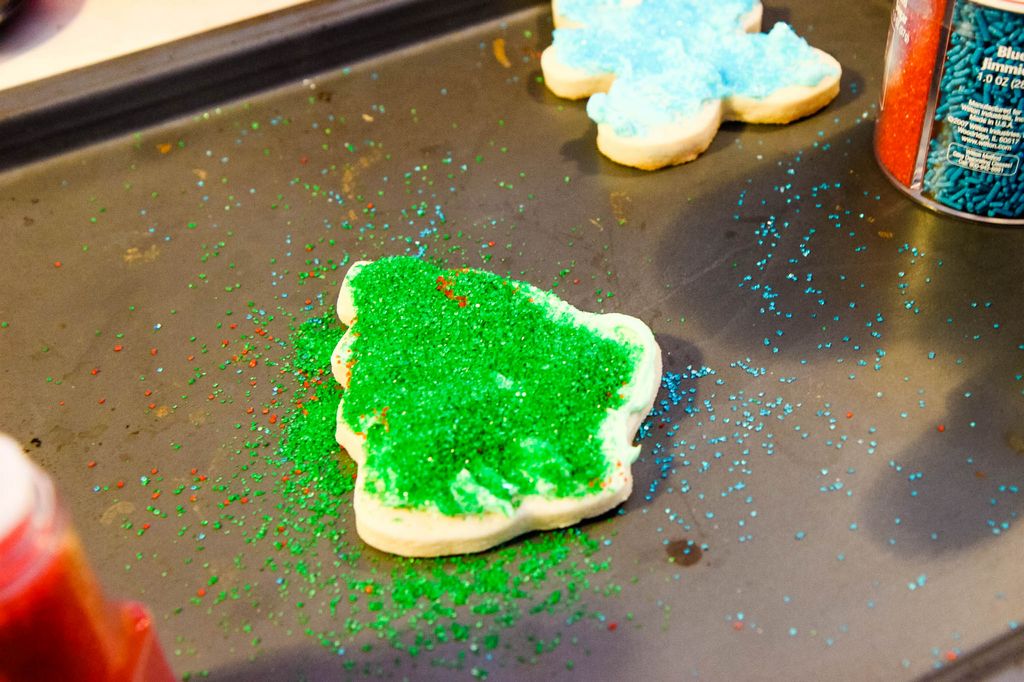
Since our cookie sheets were lined with parchment paper, I reused these sheets for decorating.
This caught any runaway sprinkles or the sprinkle dumping that seems to occur every year (see above for examples).
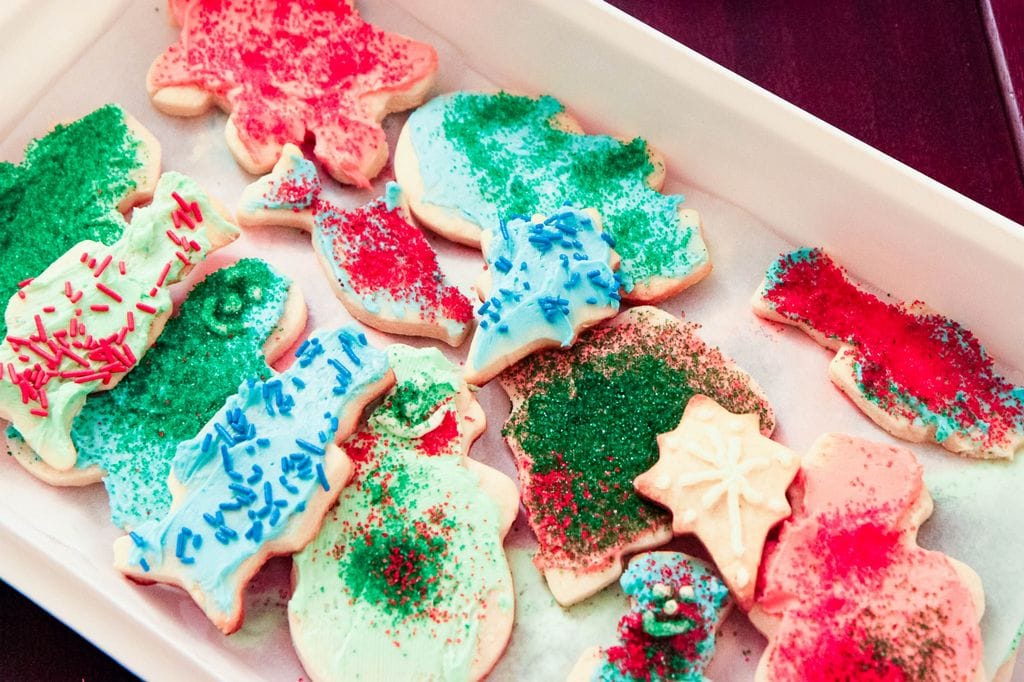
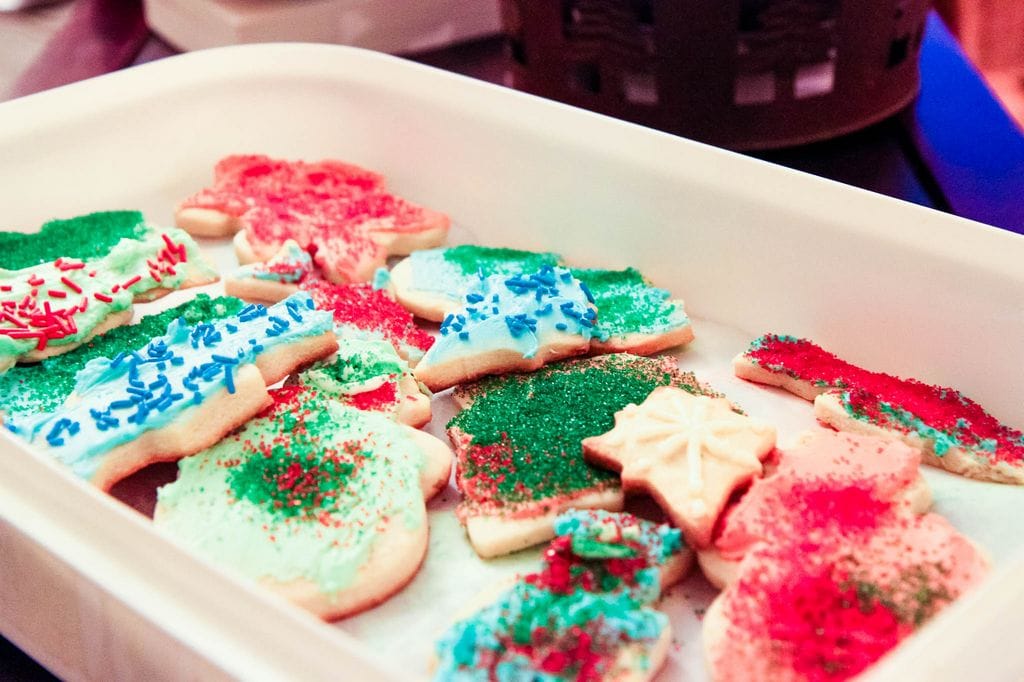
The cookies looked good, but the real question is did they taste good? I asked our very official taste-testing and decorating crew to give me their honest opinions.
Sometimes a picture is all you need! They were perfect, not crumbly, sturdy, but not thick, tangy, but buttery. Basically, perfection!
The cookies looked good, but the real question is did they taste good? I asked our very official taste-testing and decorating crew to give me their honest opinions.
Sometimes a picture is all you need! They were perfect, not crumbly, sturdy, but not thick, tangy, but buttery. Basically, perfection!
The Perfect Cut-Out Sugar Cookie Recipe
Recipe Type: Desserts
Author: Adapted from America’s Test Kitchen Family Cookbook
Prep time:
Cook time:
Total time:
Serves: approximately 3 dozen
Do you know the hidden secrets to the perfect cut-out sugar cookies? Put your stand mixer to work and blend up this incredible sugar cookie dough. You will learn how to make rolling and cutting sugar cookies easier. These tricks yield cookies that stay soft- bookmark this perfect cut-out cookie recipe today!
Ingredients
2 1/2 cups all-purpose flour
3/4 cup superfine sugar (purchased or diy this flour with my instructions above)
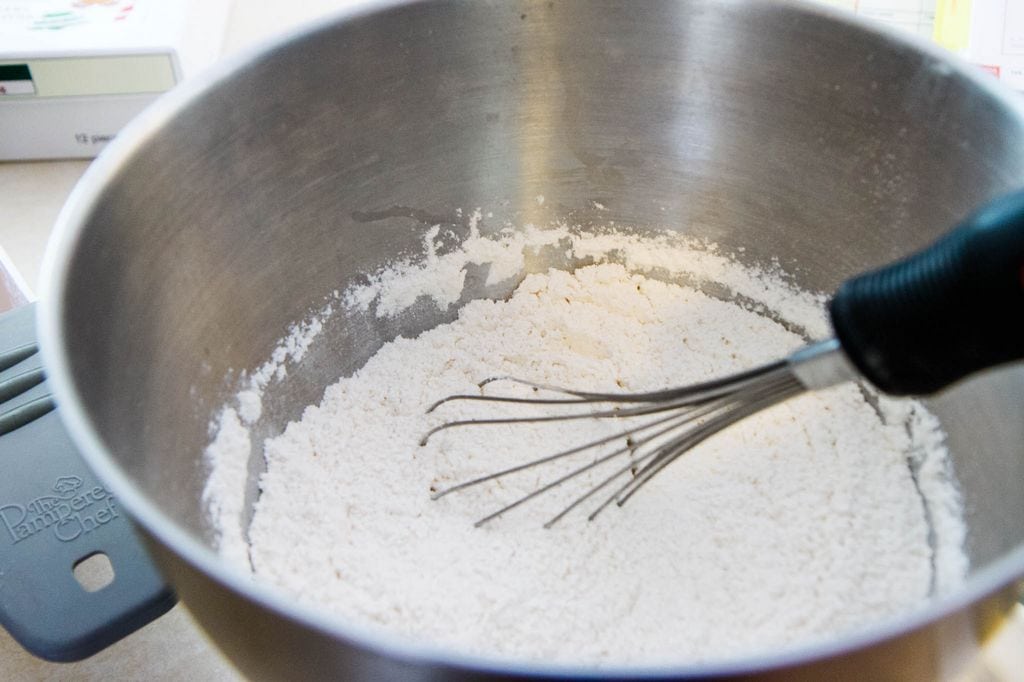
Whisk the flour, sugar, & salt together in a large bowl.
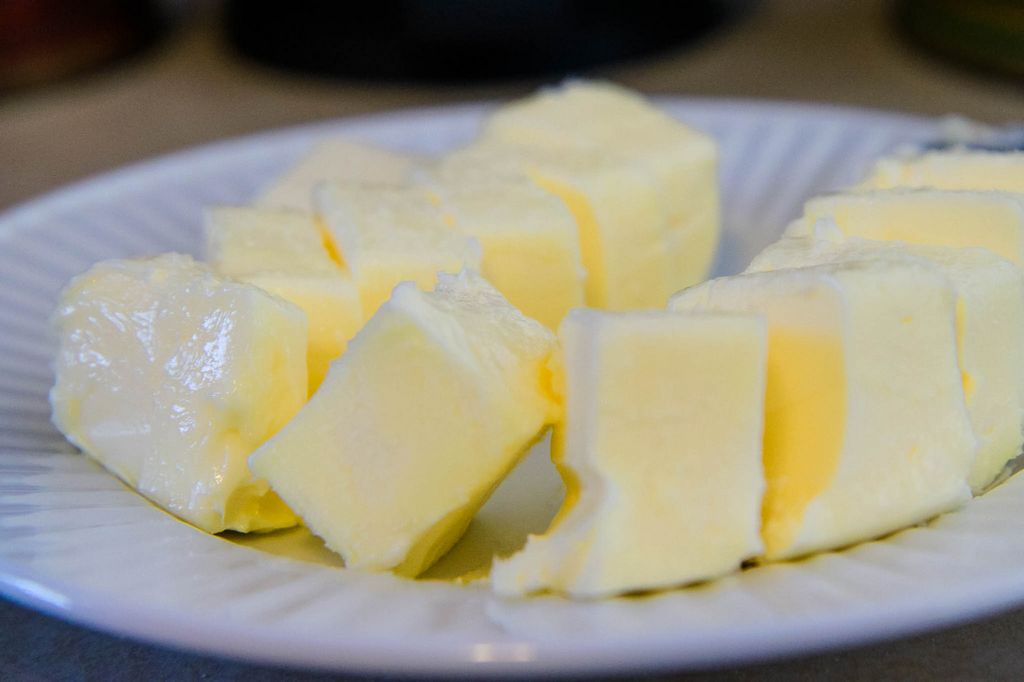
Beat the butter pieces (into the flour mixture) one piece at a time. I suggest using an electric mixer on medium-low speed, and beating until the mixture looks crumbly and slightly wet. This should take about 1 to 2 minutes.
Beat in the cream cheese & vanilla until he dough just begins to form large clumps, about thirty seconds.
Knead the dough in the large bowl by hand a few times until it forms a large, cohesive mass.
Turn the dough out onto a clean counter, divide it in half, and apt into a two four inch disks.
Wrap the disks tightly in plastic wrap and refrigerate until they begin to firm up, 20 to 30 minutes.
Adjust an oven rack to the middle position and heat the oven to 375.
Work with one disk at a time, roll out the dough to a 1/8″ thickness between two sheets of parchment paper.
Slide the rolled dough and parchment onto a baking sheet & refrigerate again until firm.
Working with one sheet of cookie dough at a time, cut out shapes using your cookie cutters.
Next, lay them on two parchment-lined baking sheets, spaced about 1″ apart.
Bake the cookies until light golden brown, about ten minutes, rotating the baking sheet halfway through baking.
Let the cookies cool on the baking sheet for two minutes before transferring them to a wire rack.
Be sure to allow them to cool completely (approximately 30 minutes)
When cooled, the cookies can be decorated as desired.
For frosting: In a large bowl, cream together confectioners sugar and shortening until smooth.
Gradually mix in milk and vanilla with an electric mixer until smooth and stiff, about five minutes.
Color with food coloring if desired.
3.4.3177
I would highly recommend adding this cookbook to your holiday wish list. That same recipe can be adapted for many different types of cookies! It has definitely earned its keep on my bookshelf.
Do you have a favorite holiday cookie recipe? Please share your recipes or links here!
As an Amazon Associate I earn from qualifying purchases.
This post contains affiliate links.
Love this post? Here are a few other baking tutorials that might help you in the kitchen!
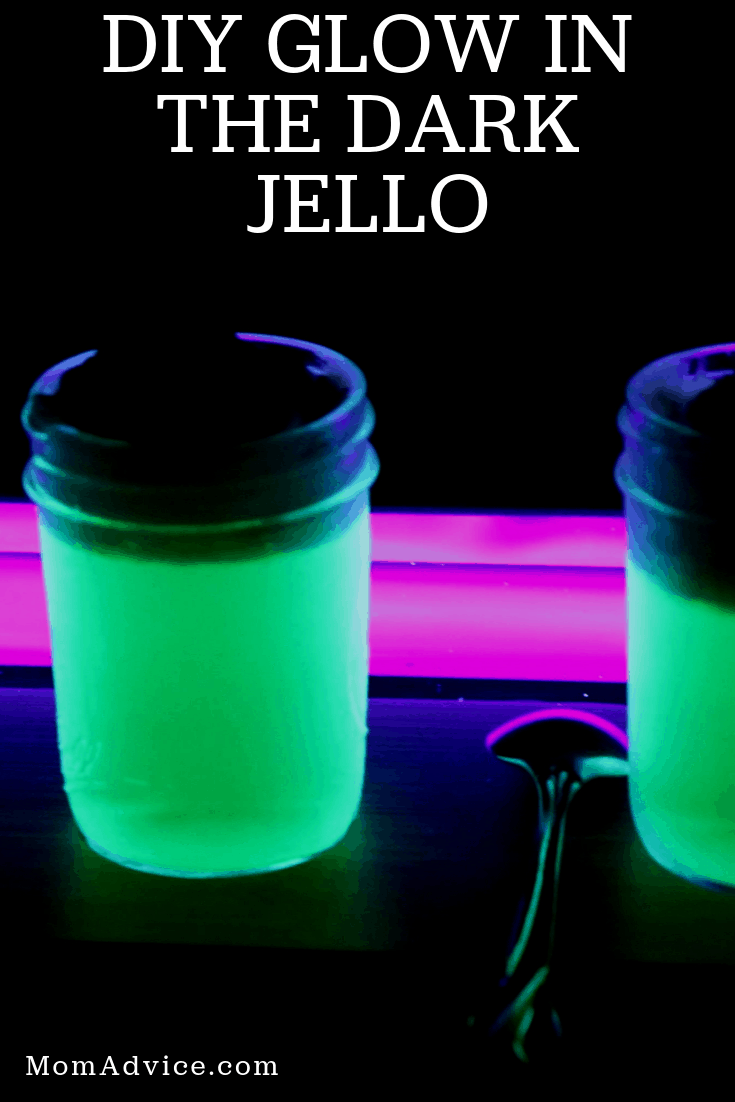
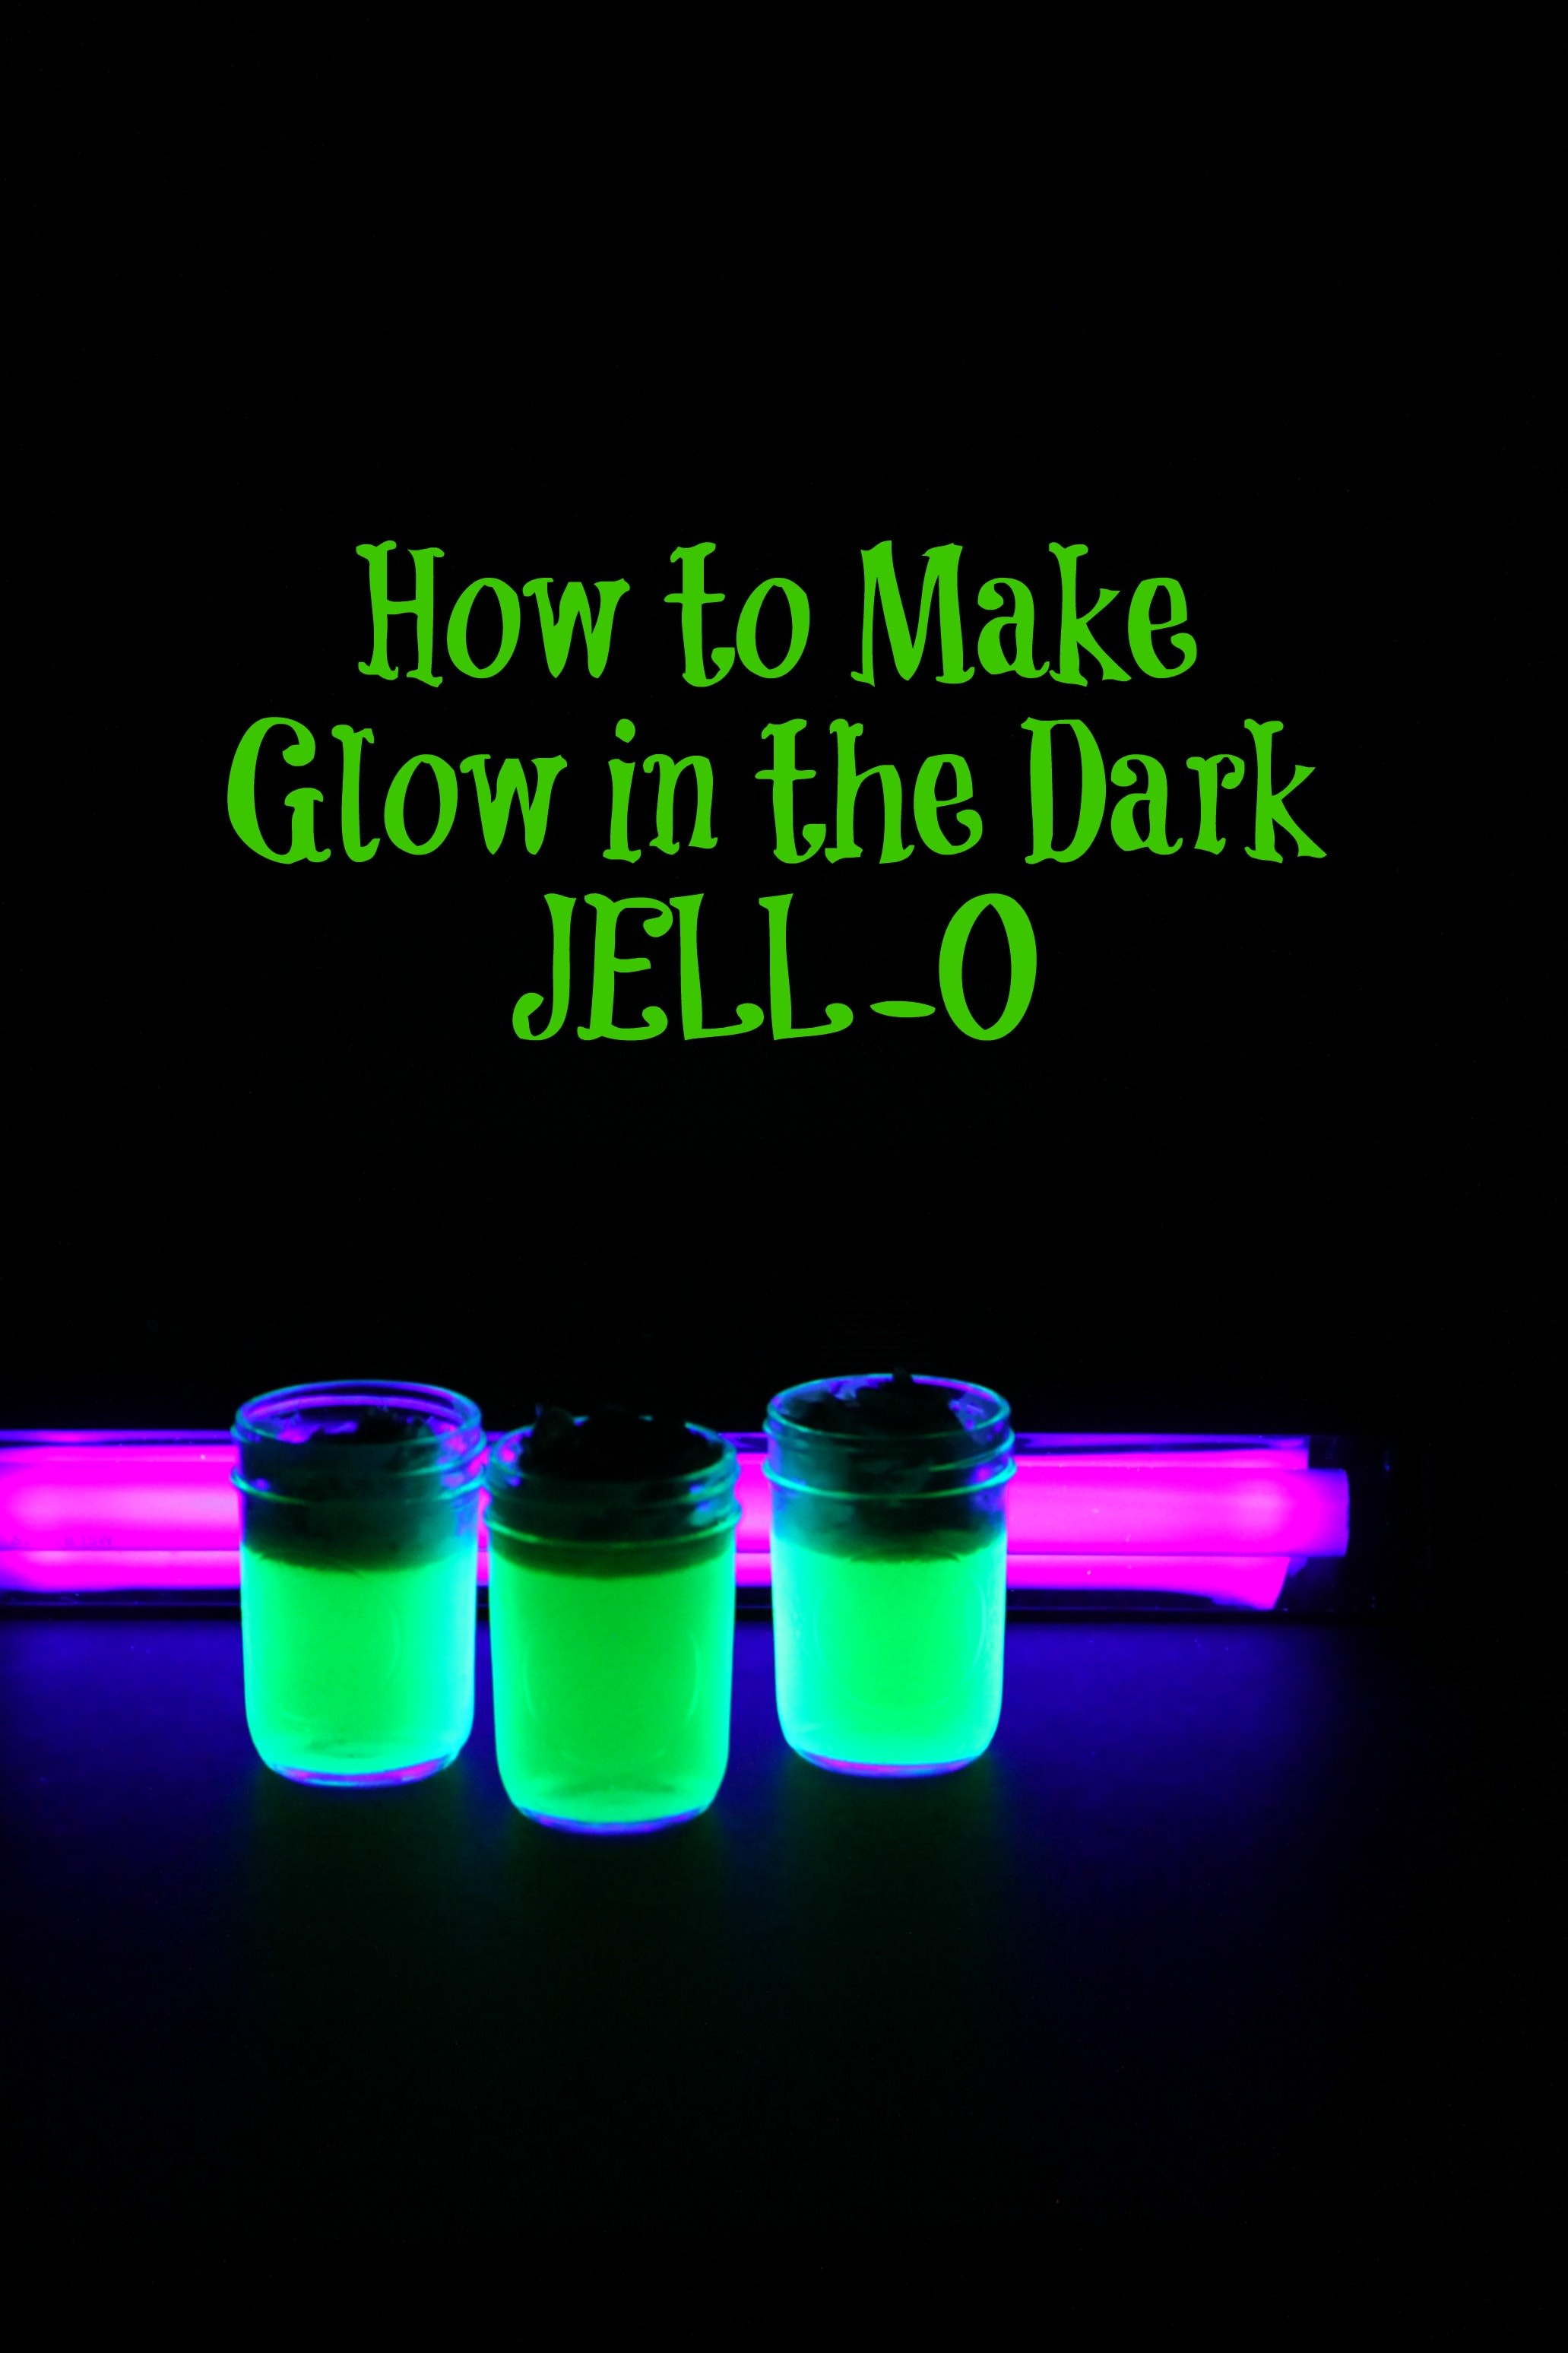
This easy recipe for Glow-in-the-Dark Jell-O is perfect for kids to make for Halloween! Mix science and spookiness for an edible experiment any budding (mad) scientist will love!
Halloween is just around the corner and today we wanted to showcase a fun and easy craft you could do with your kids.
Today’s recipe offering is how to make glow in the dark JELL-O in jars for a spooktacular Halloween dessert.
Glow in the Dark JELL-O is a recipe that your kids can easily mix up and gives you a fun opportunity to talk a little bit about the science behind it in the process.
How Does it Glow?
Did you know that tonic water can glow under a black light?
My kids were in awe of this bubbly drink and how it could glow under the black light.
The glowing comes from the fluorescence of the quinine in the tonic water.
Quinine also gives tonic water a distinctive bitter flavor which is why it is best mixed with other sweeter ingredients.
As you can see, the quinine glows blue-white when placed under a black light which makes it the perfect ingredient for a spooky JELL-O treat.
Do All Colors of JELL-O Glow the Same?
Hypothesis…yes.
Answer…no!
All of the colors of JELL-O will definitely not glow the same.
We tested two colors (green and orange) and found brilliant results with the green JELL-O and dull results with the orange JELL-O.
Although our tutorial below shows the orange, we recommend the green variety for a truly great glow!
Other readers have stated that a black bulb does not achieve the glowing results so please keep that in mind when purchasing your bulb.
So It Glows…How Does it Taste?
As we mentioned before, the quinine in the tonic water makes the tonic water glow, but it also yields a bitter taste.
We tried to cut the bitterness by using half water and half tonic water.
I also topped each jar of JELL-O with whipped cream and sprinkles which would add another layer of sweetness.
Try adding more sugar to the concoction to help cut some of the bitterness.
The kids loved the glow, but said they were, “spicy,” which is what they say about all sodas and bubbly drinks.
If your kids have a sensitive palate like mine, they might not love them, but they still ate the whipped cream and loved doing the experiment.
I still call this experiment a win for creativity, cool science factoids, and fun.
I had a great helper in the kitchen for this project.
Emily was excited to show you all just how easy it is to make this JELL-O and you can find the recipe below along with her picture tutorial on how to recreate this fun experiment in your kitchen.
You can totally steal the experiment, but I am keeping my sous chef for myself!
Glow in the Dark JELL-O
Author: Inspired by American Girl Magazine
Prep time:
Cook time:
Total time:
Serves: 4
Glow in the dark JELL-O is not only a fun science project, but a super fun Halloween treat. Pick up a black light at your local Halloween shop to show off it’s glow!
Ingredients
1 cup boiling water
1 cup tonic water
1 package of JELL-O
Whipped Cream and Sprinkles for topping (optional)
Additional Sugar (to help cut the bitterness)
Jars
Black Light
Instructions
Bring one cup of water to a boil.
Pour JELL-O packet into a large bowl.
Have a grown-up help you add your boiling water.
Stir for two minutes with a wire whisk.
Have a grown-up pour one cup of tonic water into a measuring cup.
Slowly whisk while adding the tonic water. The mixture will be very bubbly. Give it a couple of minutes to rest.
Pour it into four clean jars.
Place in the refrigerator for two to three hours to set.
Top with whipped cream and sprinkles.
Place under a black light and watch it glow. Happy Halloween! EDITORS NOTE: See notes above for taste and ideas for improving flavor.
3.2.2708
Love this idea for Halloween? Can I make a few other fun fall recommendations?
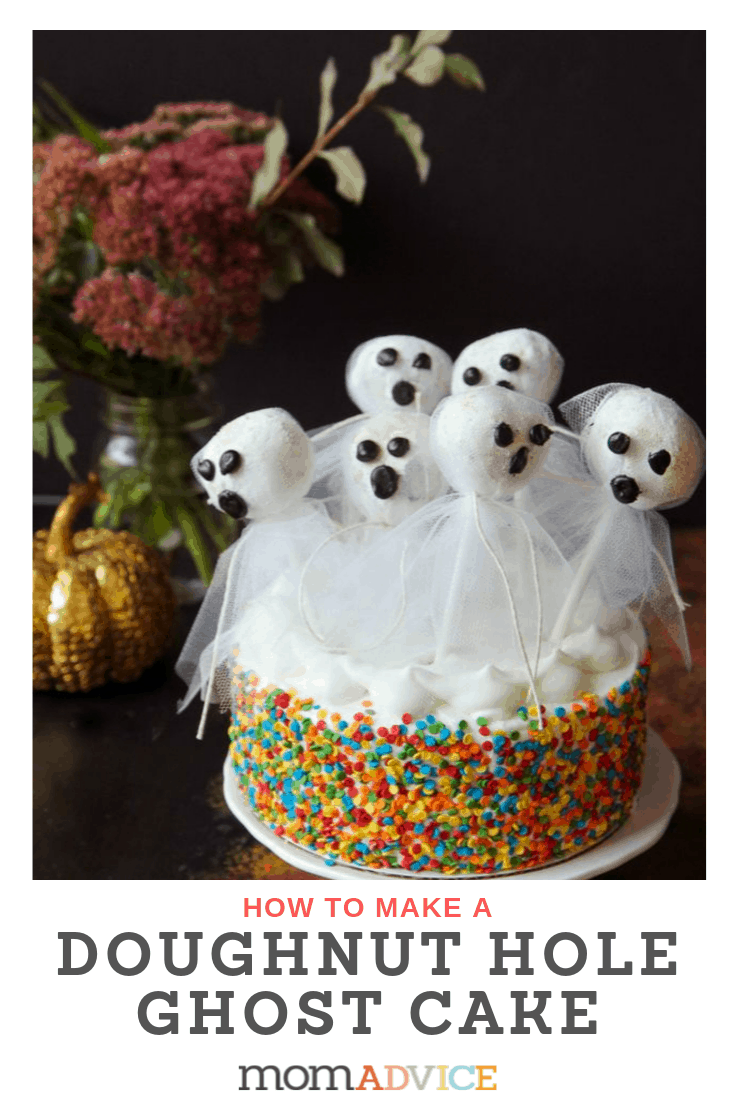
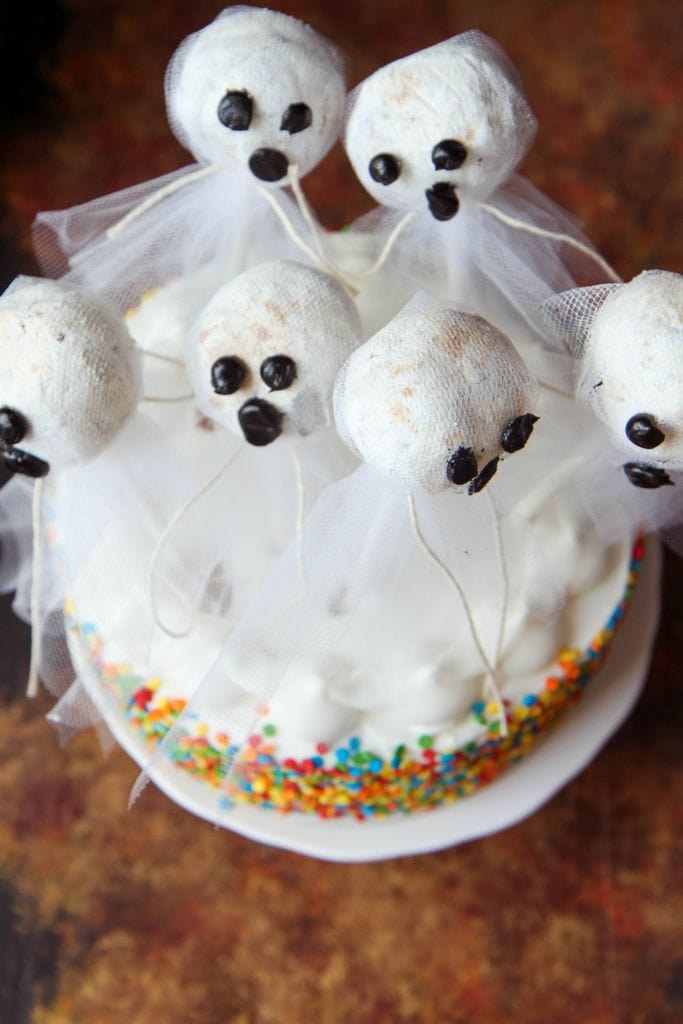
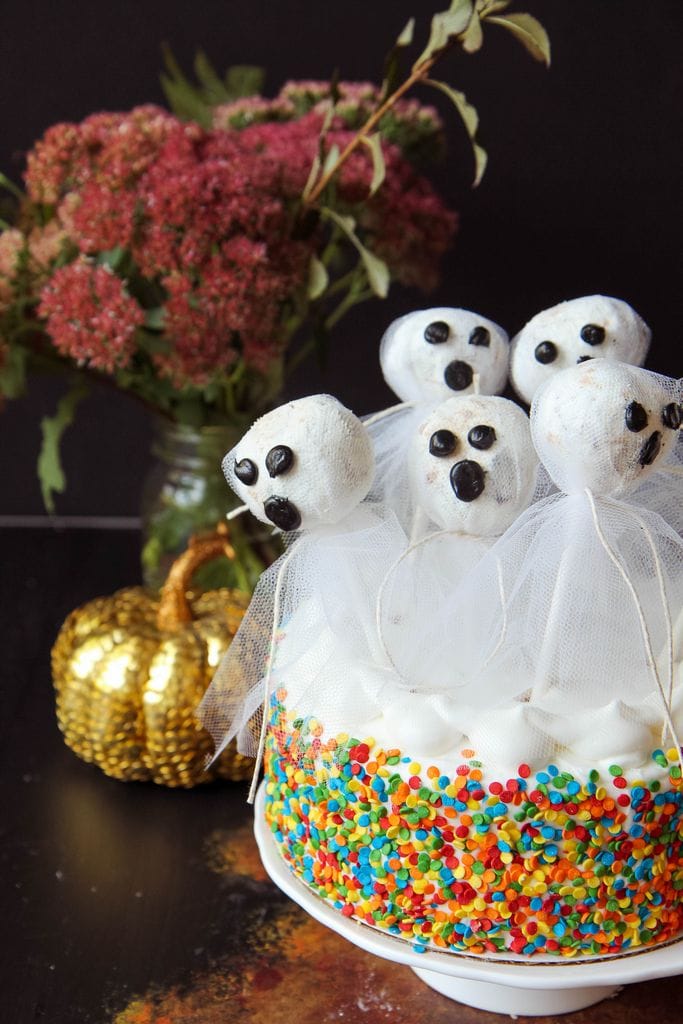
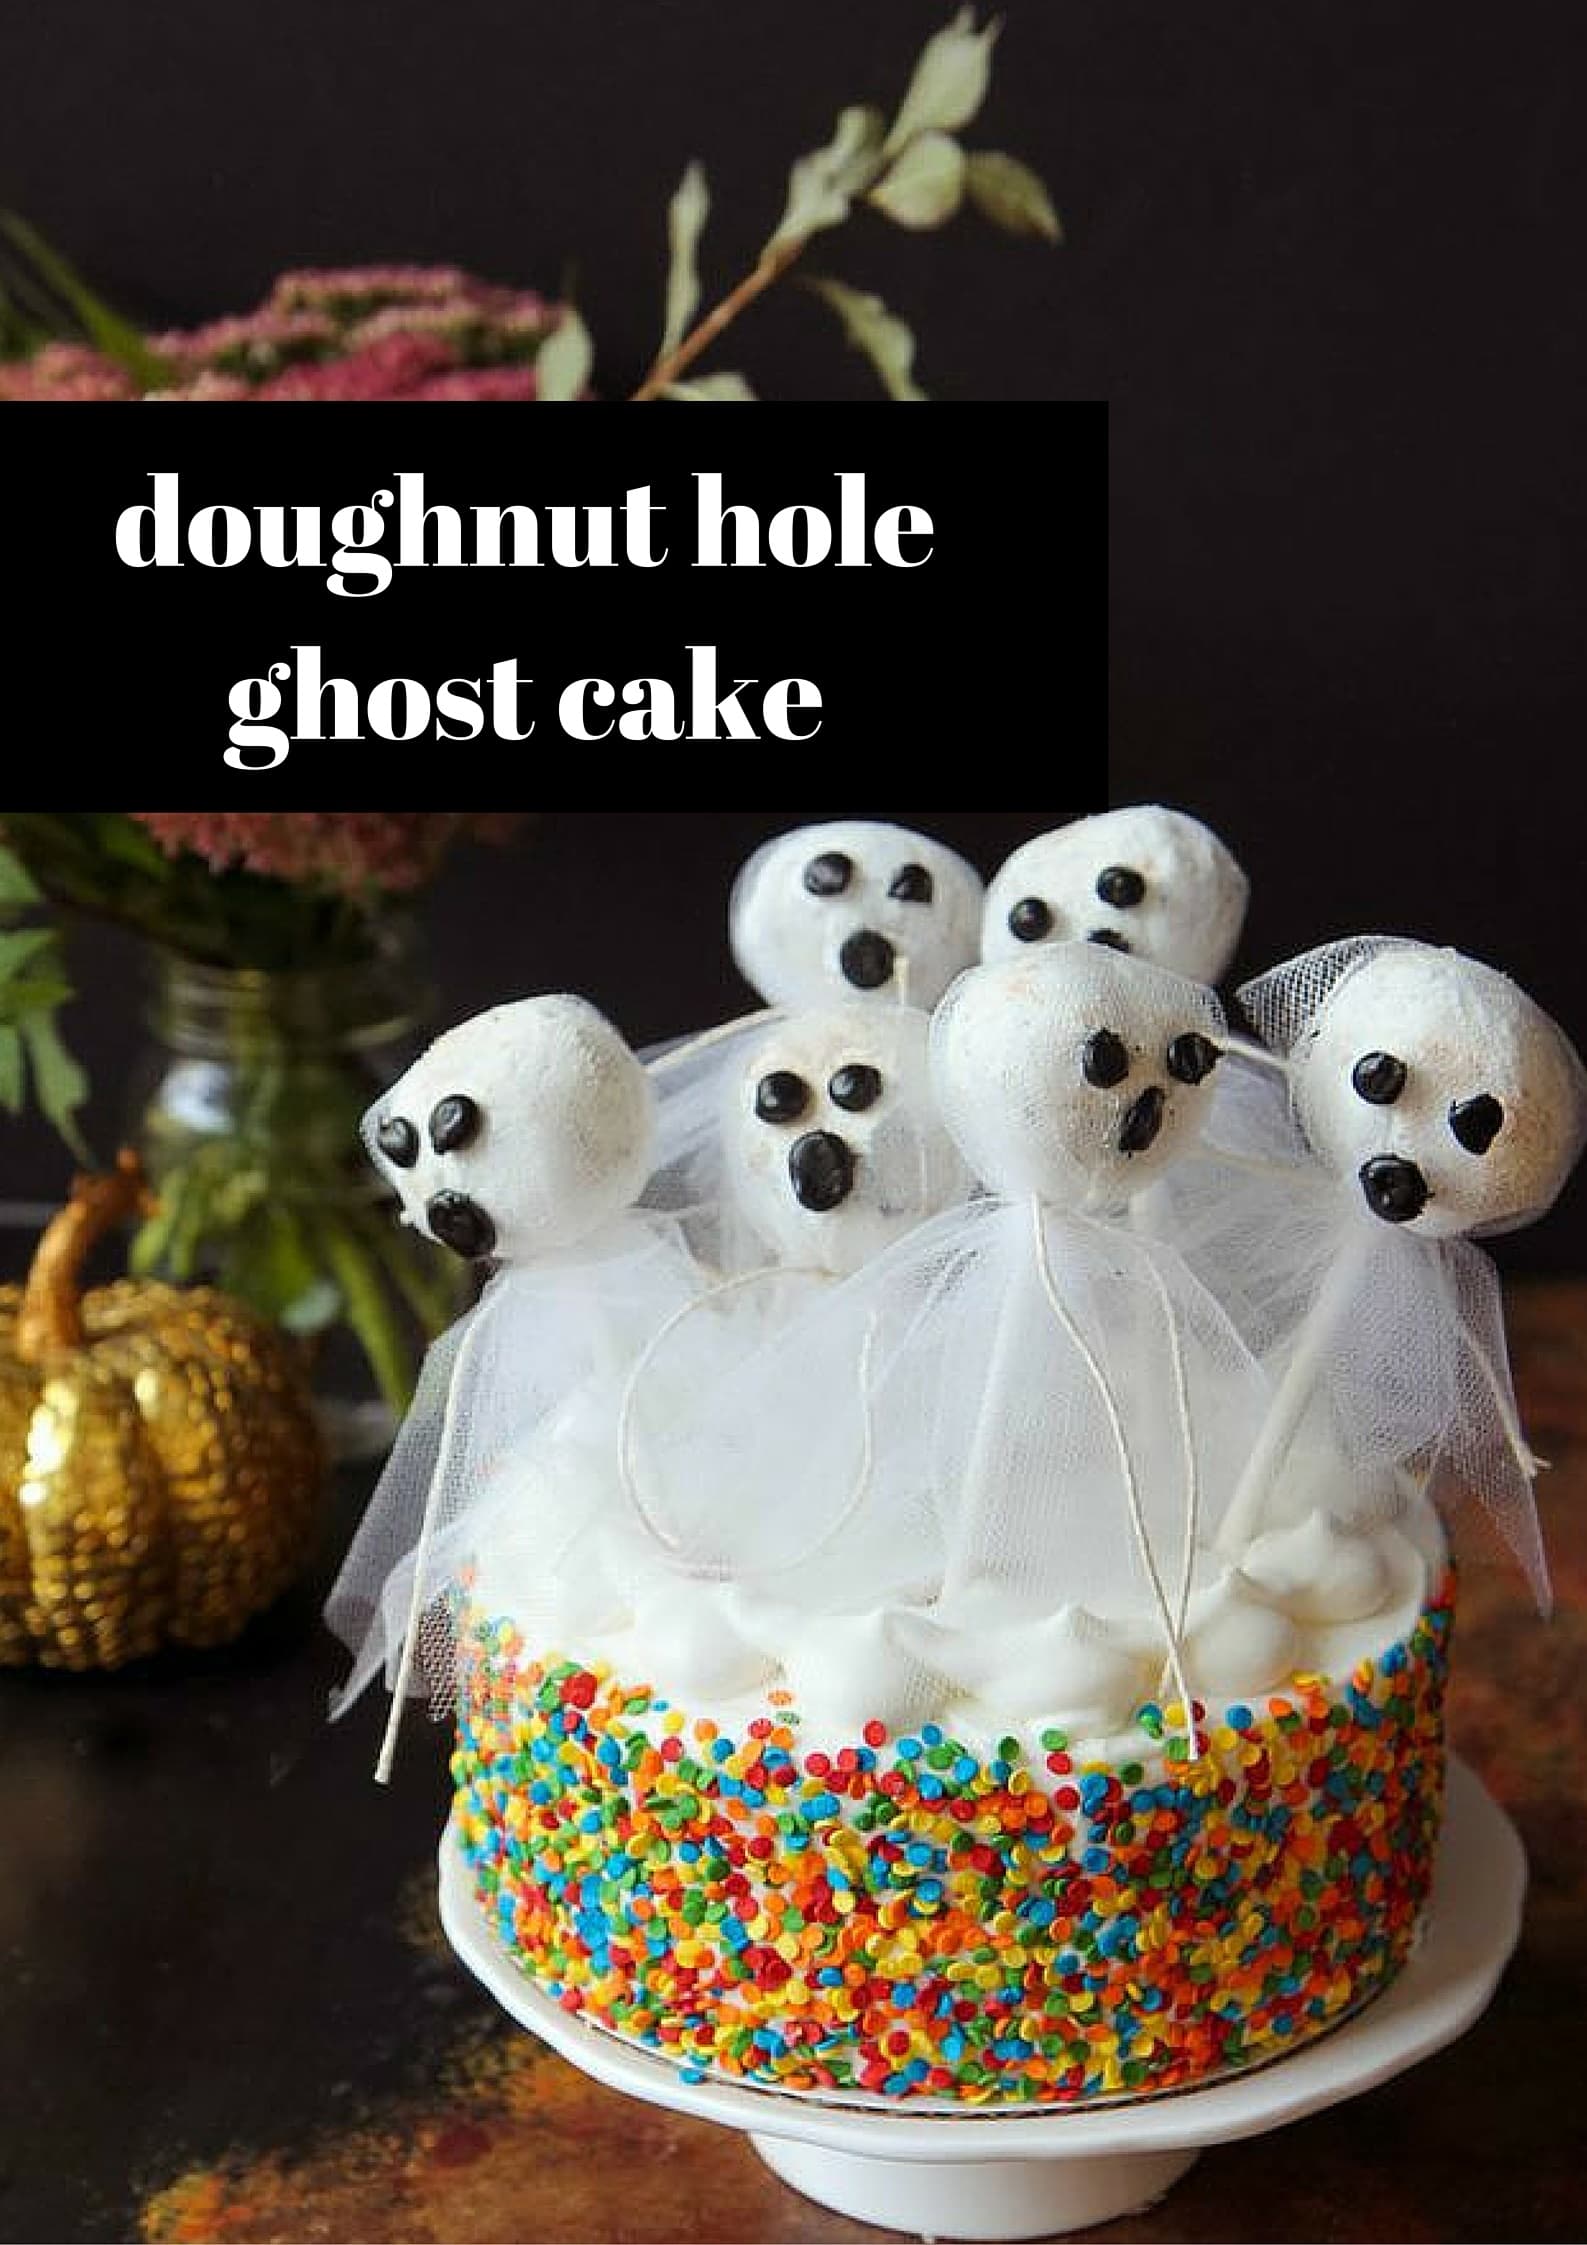
This ghost cake is a fun and spooky Halloween cake that even your kids can make it! Using store-bought ingredients, you can have a Halloween treat in minutes.
If you are anything like me, you are already on the hunt for easy Halloween ideas!
Today’s easy food craft is for a festive Halloween cake that you can whip up quickly to celebrate with your kids, fellow trick-or-treaters or to add to your Halloween party spread.
This can be made for under $20 and NO COOKING is required!
Can I get an AMEN?
What if I Don’t Want to Spend $20 on Halloween Cake?
As you know, I’m pretty darn frugal, so I want to share a tip that might help you at your store.
Be sure to check the rear of your store (over by the dairy section usually) to see if there are any reduced to sell bakery items on a rolling cart.
It is there where I often spy prepared cakes and doughnuts that are perfect for sharing with guests or for rounding out a meal together with friends.
If you check there first, it is possible you might be able to score these treats for a fraction of the price that I paid.
I promise to not be jealous.
How Can I Make This Treat Gluten-free?
Welp, you know that gluten-free cake isn’t going to be an affordable treat.
Oh, the price ding on removing wheat!
Ouch.
Did you know that you can purchase gluten-free donut holes in the freezer section of many supermarkets.
Is it just me or are you scared to pay a million dollars for gluten-free snacks because you got burned on a past purchase?
How Can I Save Money at My Local Gluten-free Bakery?
If you aren’t using Groupons, you are missing out on some free money. Anytime that we eat or do anything local, we check to see if there are any deals on things like this. You just never know when the new up and coming bakery might be looking for a fresh way to promote their business.
What Can I Substitute for Cake if I’m Gluten-Free?
Gluten-free cakes can be expensive though so I recommend you bake a cake yourself. I have some super easy gluten-free cake recipes to share with you that might just make the most perfect cakes.
I promise, these gluten-free cakes are as easy to put together as any other cake because I rely upon cake mixes for their creation.
1 container of powdered sugar doughnut holes (I had enough in an assortment pack)
Roll of white tulle (over by the party/wedding favor supplies)
Black Decorating Icing small pieces cut off a stripe of candy corn, candy eyes, or small Halloween candy (like Mini M&M’s) for your eyes.
1 prepared cake
1 container of powdered sugar donut holes (I had enough in an assortment pack)
Roll of white tulle (over by the party/wedding favor supplies)
Black Decorating Icing (over by the cake decorating supplies/crafts), small pieces cut off a stripe of candy corn, candy eyes, or small Halloween candy (like Mini M&M’s) for your eyes.
Cookie Sticks(over by the cake decorating supplies/crafts)
1. On a rimmed cookie sheet, insert the cookie stick into your doughnut hole.
2. Cut out two squares of tulle, approximately the same size, and angle them slightly. Fold them over your doughnut hole. Secure with a little white twine, making sure to bring the tulle down snugly over the top of the doughnut hole to make a level surface for your piping.
3. Pipe two eyes and a mouth on your doughnut hole. I found that getting the icing a little warm helped make the piping easier so keep that in mind!
4. Stick your ghosts on top of your cake.
Done.
How easy is that?
This cake was such a hit and I loved that it adds a homemade touch to a store-bought treat!
As you know, I’m pretty darn frugal, so I want to share a tip that might help you at your store.
Be sure to check the rear of your store (over by the dairy section usually) to see if there are any reduced to sell bakery items on a rolling cart.
It is there where I often spy prepared cakes and doughnuts that are perfect for sharing with guests or for rounding out a meal together with friends.
If you check there first, it is possible you might be able to score these treats for a fraction of the price that I paid.
I promise to not be jealous.
I look forward to sharing more fun Halloween ideas with you in the upcoming month and hope you love this festive (and easy) treat idea!
Don’t miss these other great ideas from MomAdvice.com:
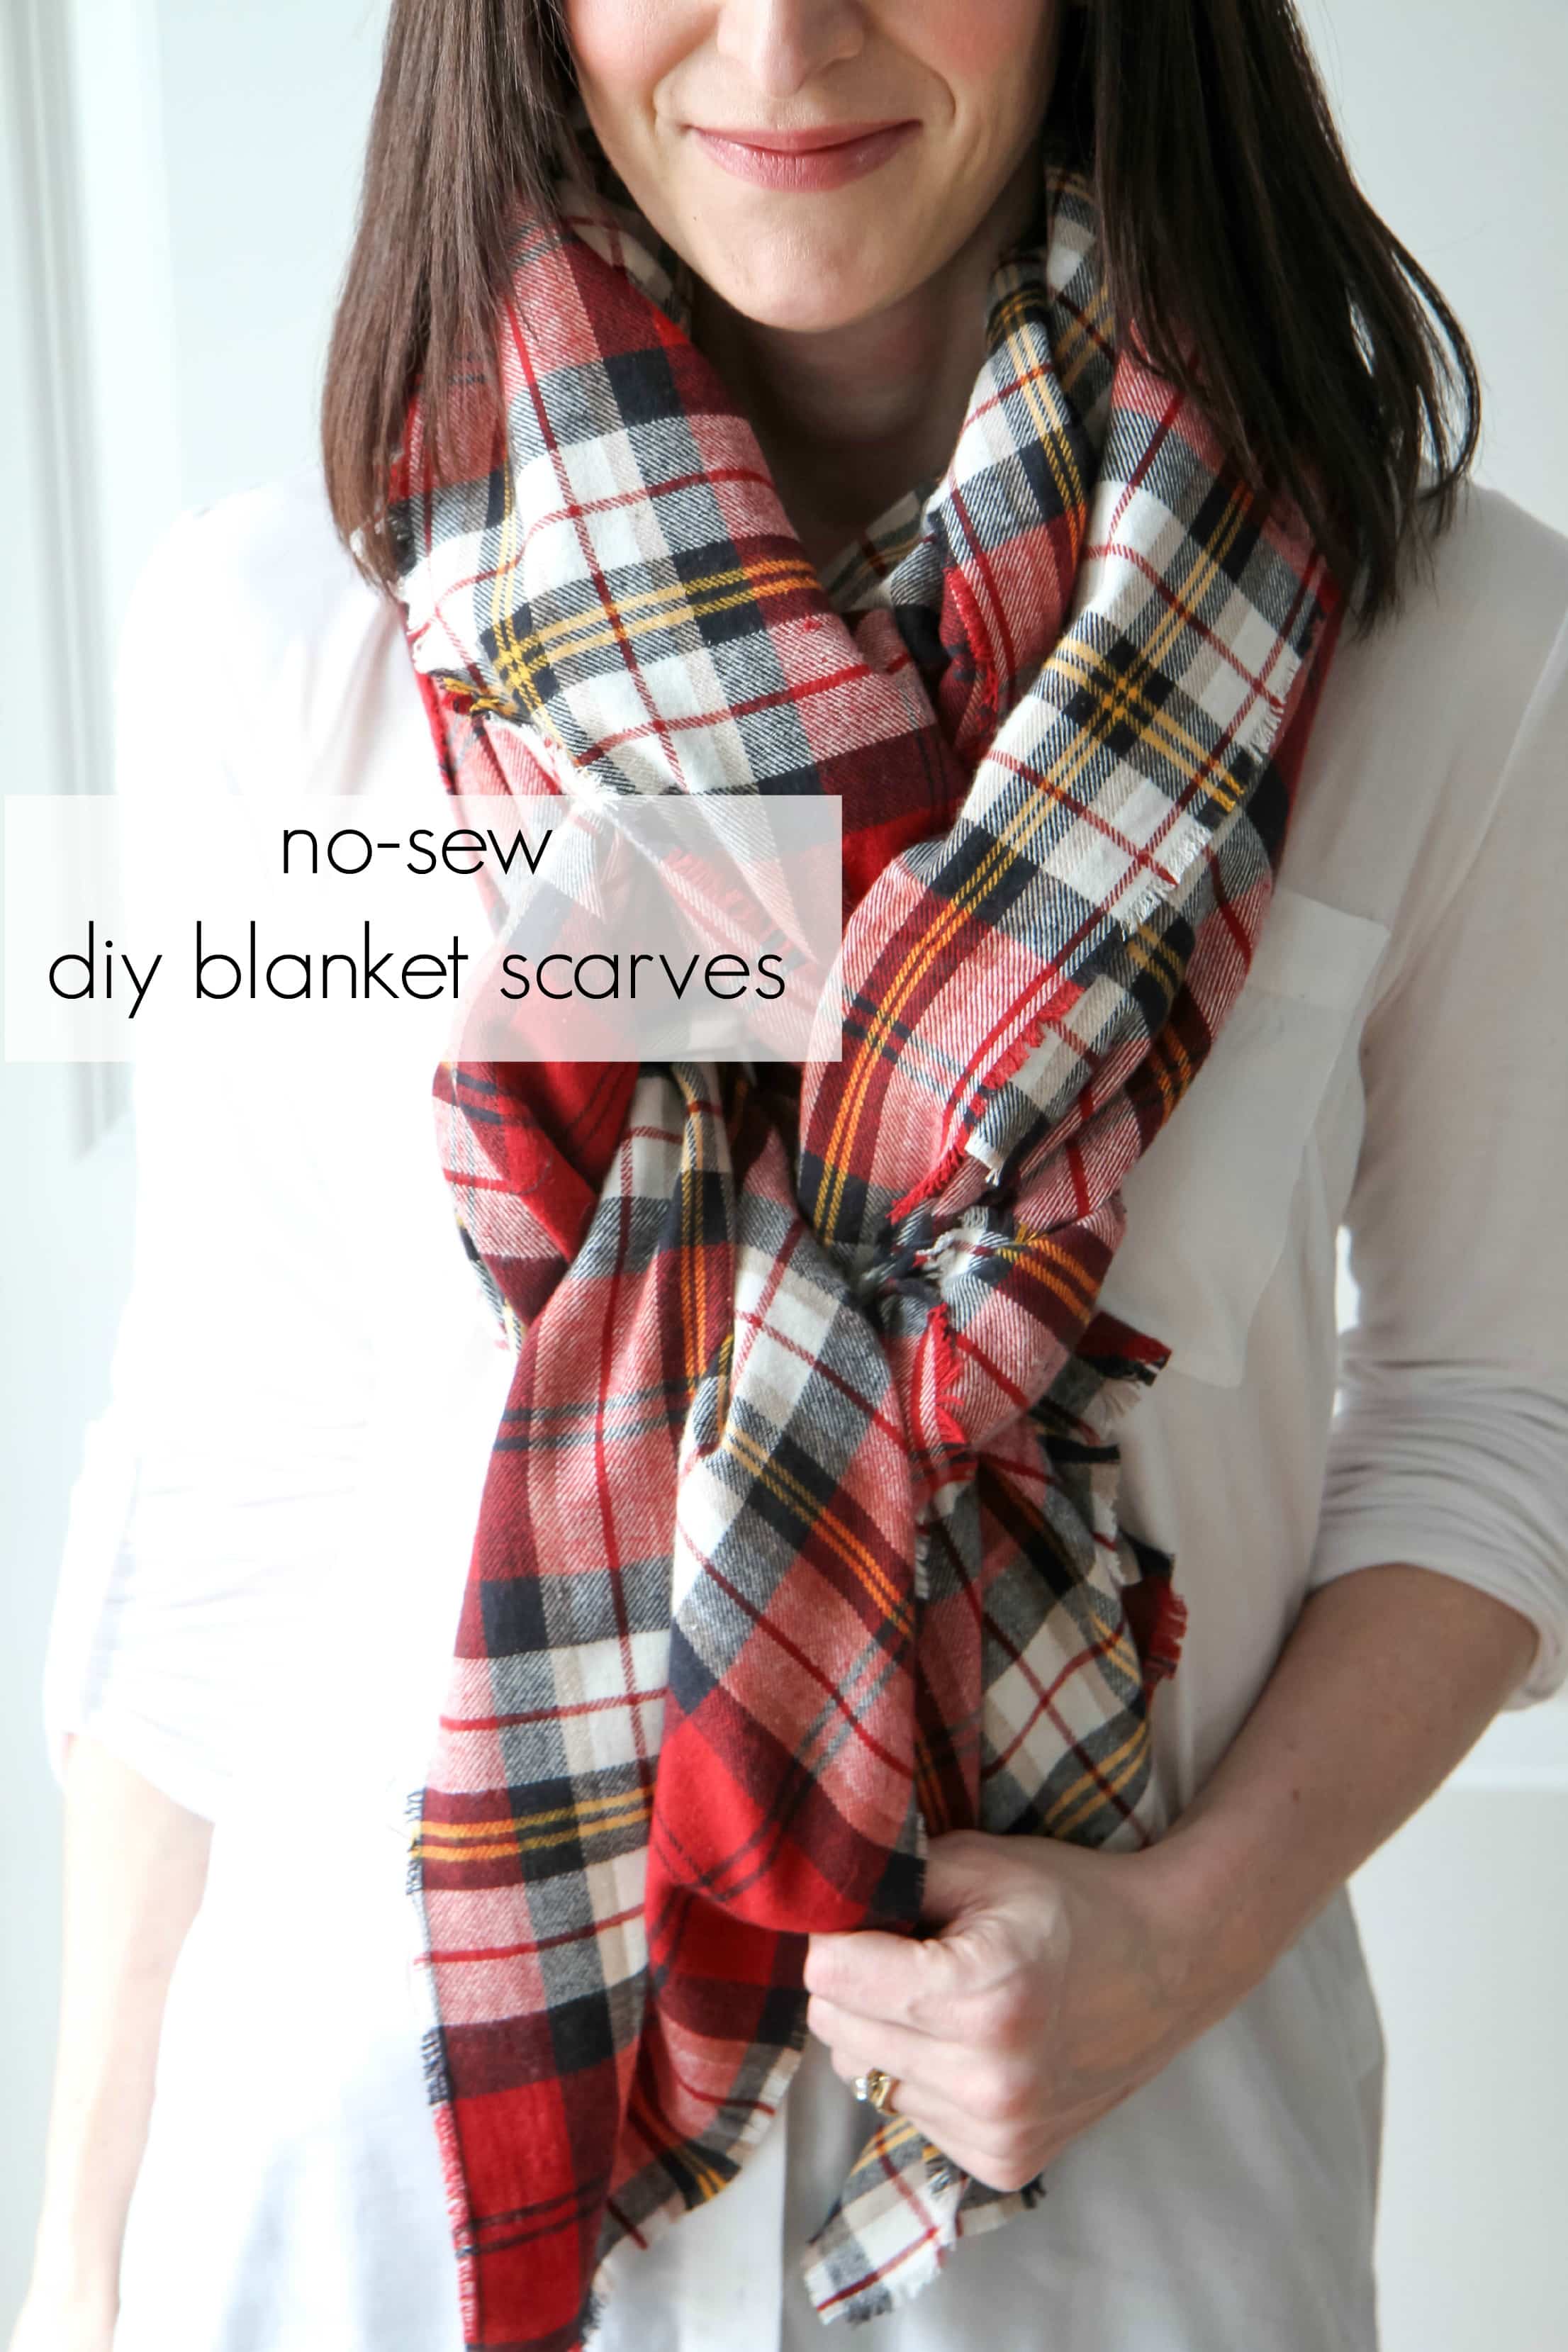
Blanket scarves are so trendy and an easy no-sew DIY to make for cold weather. Check out this diy blanket scarf tutorial and how to style your plaid blanket scarf with this easy tutorial. One trip to the fabric store for flannel plaid fabric and you will have everything you need to make a blanket scarf of your own…no sewing machine required!
All of these fabulously fashionable women were rocking these gorgeous oversized scarves, but they were out of my price range or lacked the fullness & beauty that was captured online.
I mean, who couldn’t get behind the idea of wearing a blanket and calling it an oversized scarf?
Count Me In!
I decided I wanted to make some for my minimalist wardrobe because it would add so much. Did you know you can make a blanket scarf with no sewing skills required?
Let’s begin by taking a peek at the coveted $44 Zara scarf (that sells out in minutes, not kidding).
I want to zoom on in it so we can take a closer look.
The thing I want you to see is that the edges are frayed on their version too.
Guess what?
You can achieve that with a little flannel and pulling.
The best part is that this version will cost you quite a bit less than $44. I am going to make a big stack of them to show you and then I am going to show you some fun ways to tie them.
The first thing you will need to do is shop for your fabric which is so much fun. I went to a few shops to check out fabric and ended up finding it at Jo-Ann Fabrics.
If not, that same link will provide you a 40% off coupon. You will DEFINITELY want to use this because it makes these scarves budget-friendly. Don’t forget your coupons.
Head over the Fashion Flannel…at least that’s what they call it in Mishawaka (oh-la-la!).
Select your favorite patterns, tell them the amount you need, have them tell you they don’t have that much on a bolt, go grab another one, try again… Be annoyed.
Decide to do two sizes because you want you what you want, that’s why you brought it up there.
Got it?
I am going to show you what a 2 yard scarf looks like and then I am going to show you what a 2.5 yard scarf looks like below.
I love them both for different reasons and what you can do with them. The price (with no sales or coupons) is $8.99 per yard. That’s why it is great to see the two version (for cost-savings) and also really great to bring a coupon to save a bit on the fabric.
I wouldn’t recommend anything more than that or your scarf will choke you and you will die from scarf blanket suffocation.
It will be all over the headlines.
They will be laughing at you in those ridiculous segments on the radio where they try to shock you at the stupidity of Americans. Your family will miss you. It would all be very tragic.
If you would prefer to shop online, I love to check over here for flannel by the yard. SO MANY great choices!!
How to Make a Blanket Scarf
1. Purchase 2-2.5 yards of flannel fabric (make sure the flannel printing is on both sides).
2. Using the patterned flannel edge as a guide (on the edges of the fabric), trim the edges of each side of your scarf with a pair of sewing scissors (these are what I have) to expose the cut edges.
3. Pulling out the vertical threads, on the cut side of the fabric, begin fraying the edges of the scarf.
You will discover that pulling out threads really creates a beautiful finished edge
If you are struggling to grab a thread, don’t be afraid to use a seam ripper.
Keep doing this until there are no loose threads and you have a beautifully frayed edge. Repeat on each side of the scarf. DONE!
This is what TWO YARDS of fabric looks like.
You can see that it has a lot of fullness, but is not as long or as much to tie or knot around.
Do you want to see how to tie it to look like this?
Okay then.
How to Wear a Blanket Scarf
How to Style a Blanket Scarf
How to Tie Your Two Yard Blanket Scarf
1. Fold the scarf in half, lining the edges up evenly. This creates more of a square blanket scarf versus doing it on an angle.
2. Make sure one end is shorter than the other and tuck it up over your shoulder.
3. Loop around once with the long end (or possibly twice depending on your neck size!).
4. Fluff and puff. Fluff and puff.
Here is the same size, just not puffed up so much. Seriously, cute stuff!
How to Tie Your 2.5 Yard Blanket Scarf
No need to reinvent the wheel to tie a blanket scarf…I just headed online to figure out a couple of fun ways to tie these longer blanket scarves.
This poncho style leaves the scarf folded making a smaller poncho version.
I also love draping this scarf just around my shoulders during the cold winter months. It makes the perfect shawl!
Regardless of the way you tie it, I love pairing these scarves with puffy vests, long sleeve shirts, and my favorite fall boots. Flannel blanket scarves are the perfect addition to your fall wardrobe.
I’m Petite & Want to Make a Smaller Version- What Can I Do?
I’m pretty petite, but I know big scarves aren’t for everyone!
Shave 6-7 inches off the width on a 2 yard version to make a more petite version of this scarf with a little less bulk or experiment with your own sizing by creating your own custom version.
Just cut, try on, adjust.
There are no wrong or right lengths- it is what fits YOU or your recipient best!
Wear it a scarf or wear it as a blanket. The possibilities for this cozy project are endless.
Love this scarf tutorial? Here are a few other DIY projects I’m proud of!
I hope you have a blast making these quick scarves for yourself or for holiday gift-giving. Check out this list of 54 handmade gifts you can make for the holiday season to inspire you even more! Happy crafting!
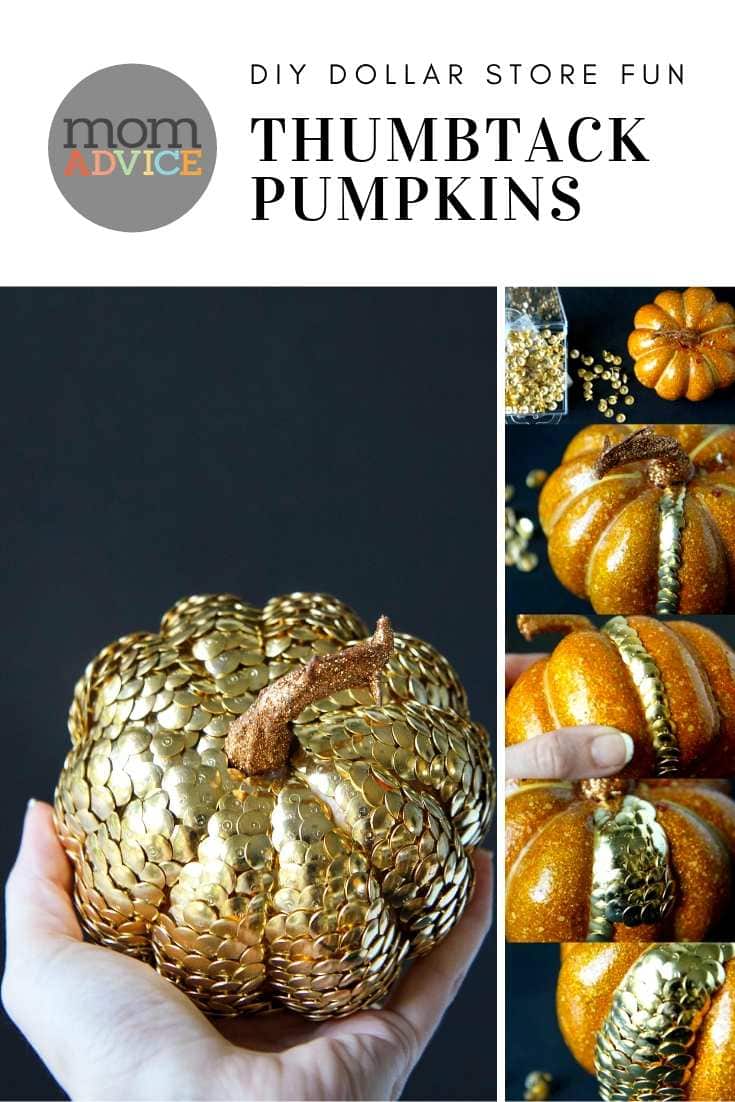
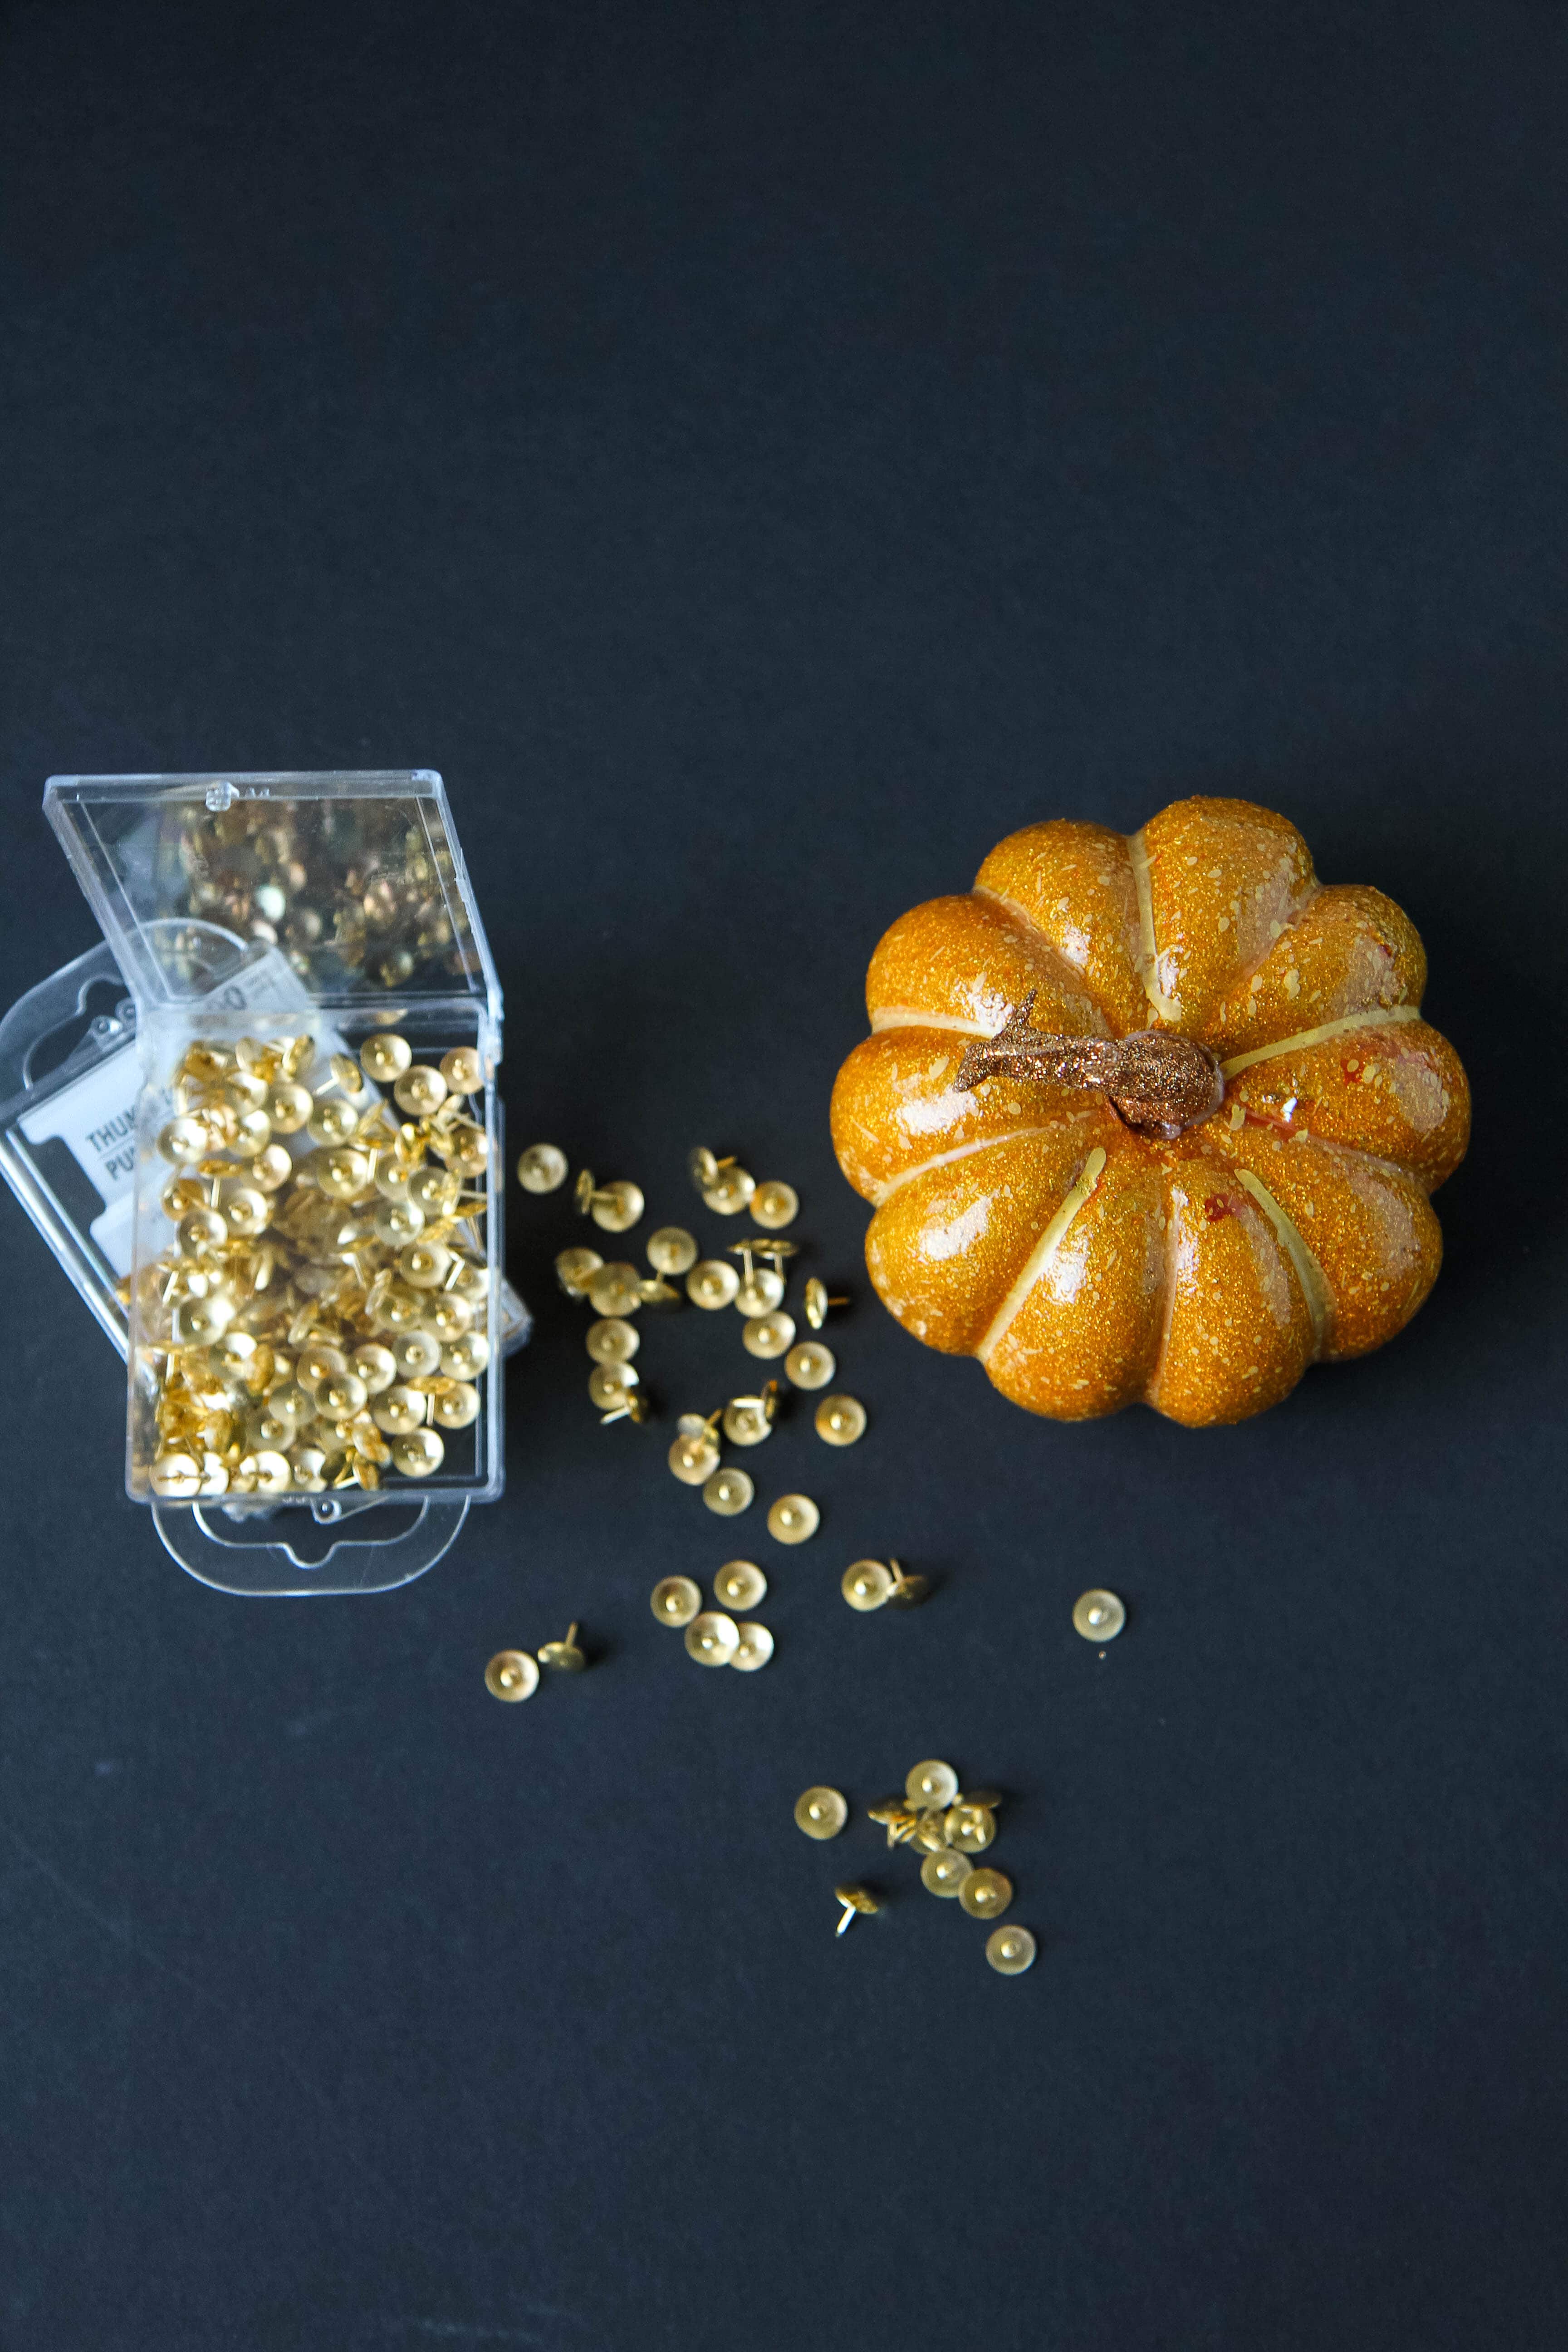
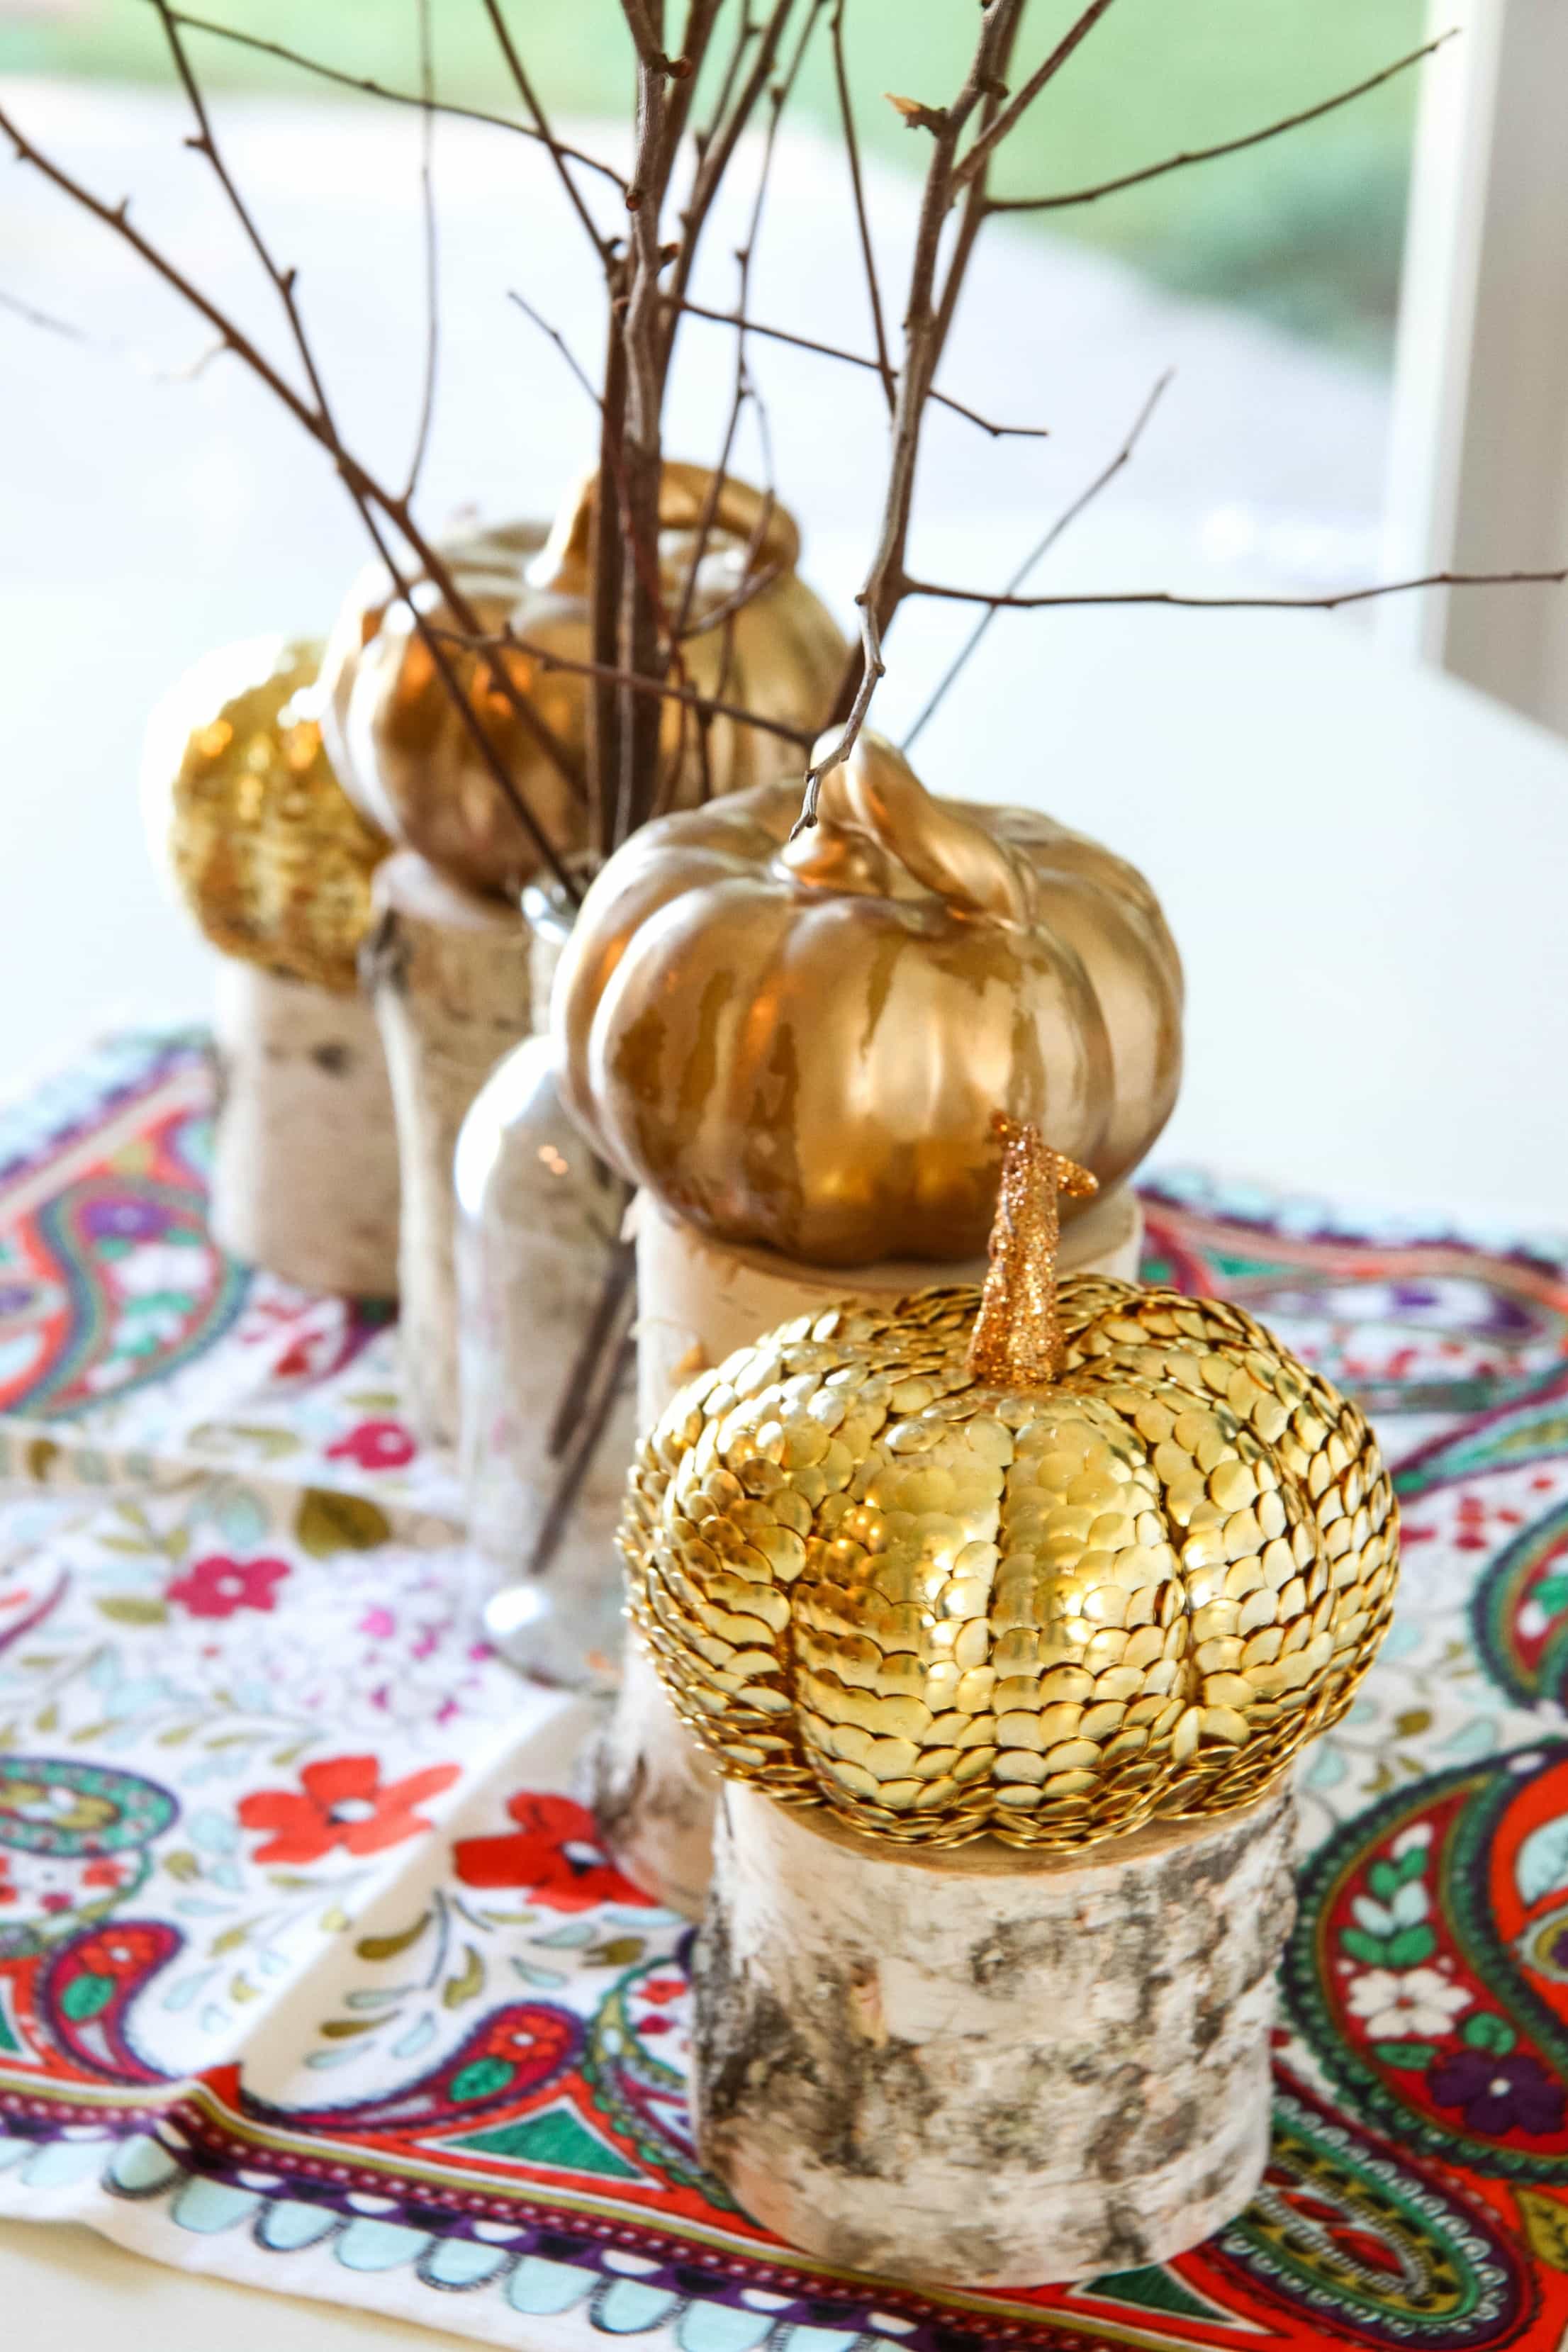
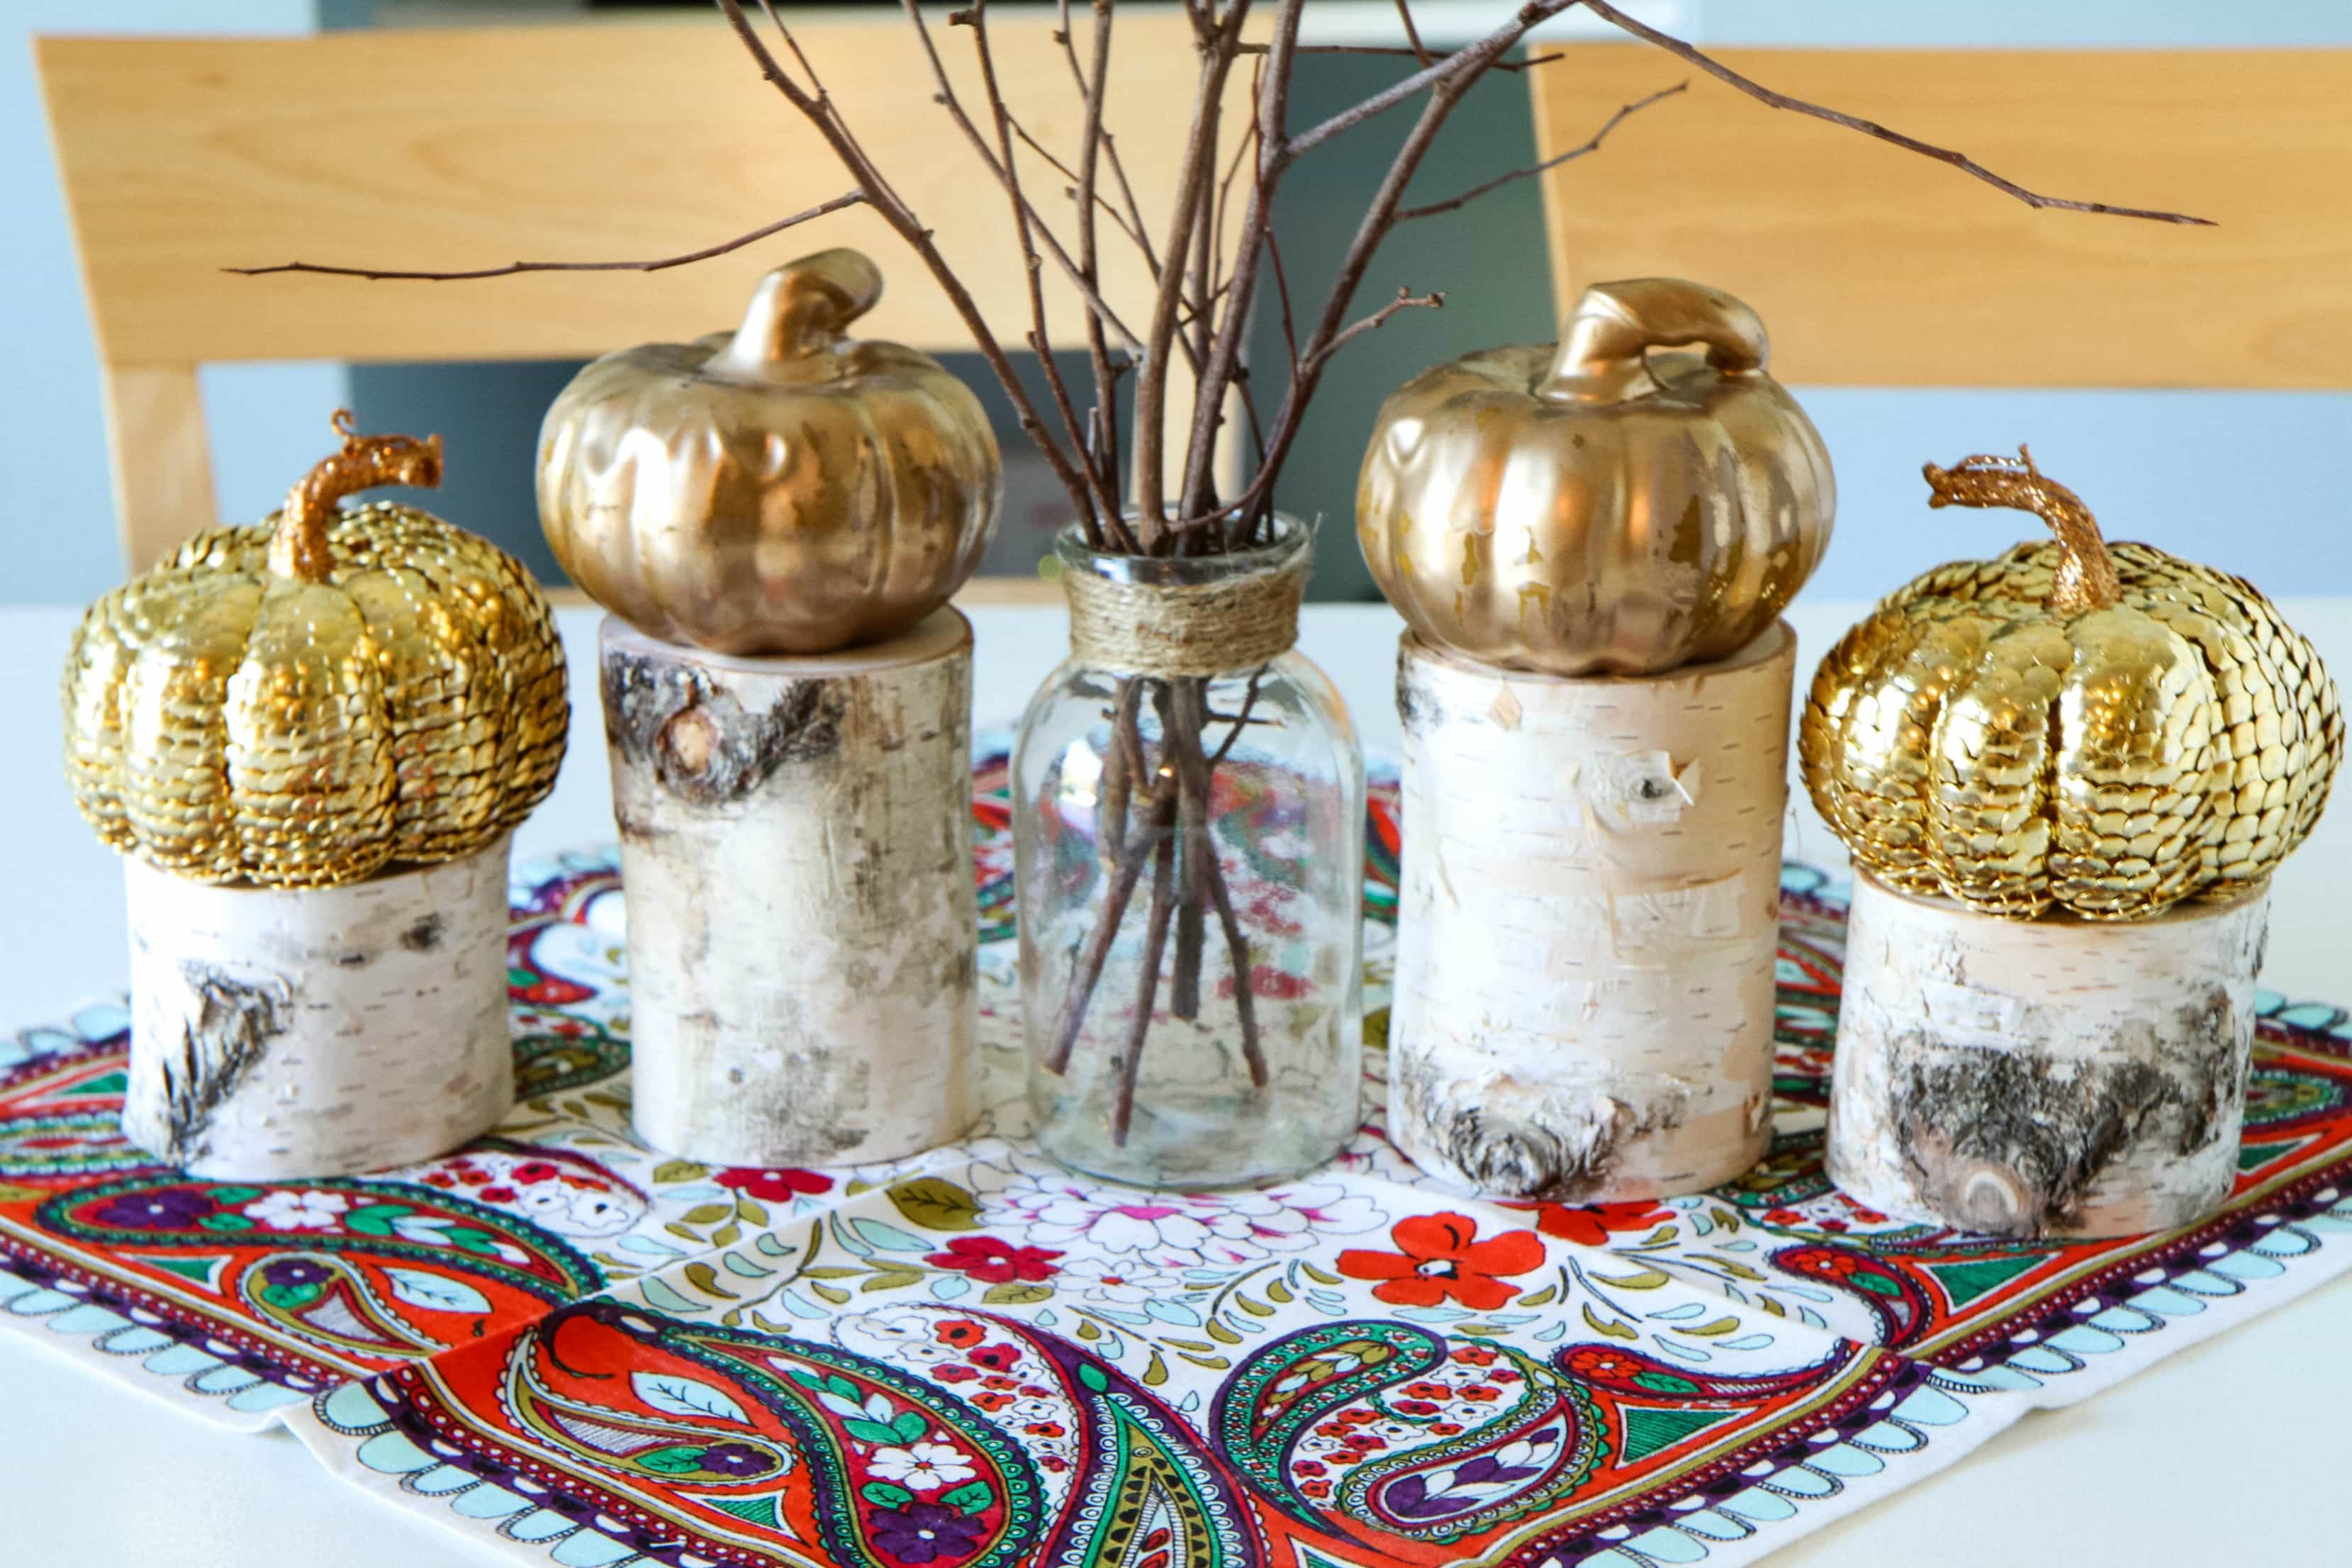
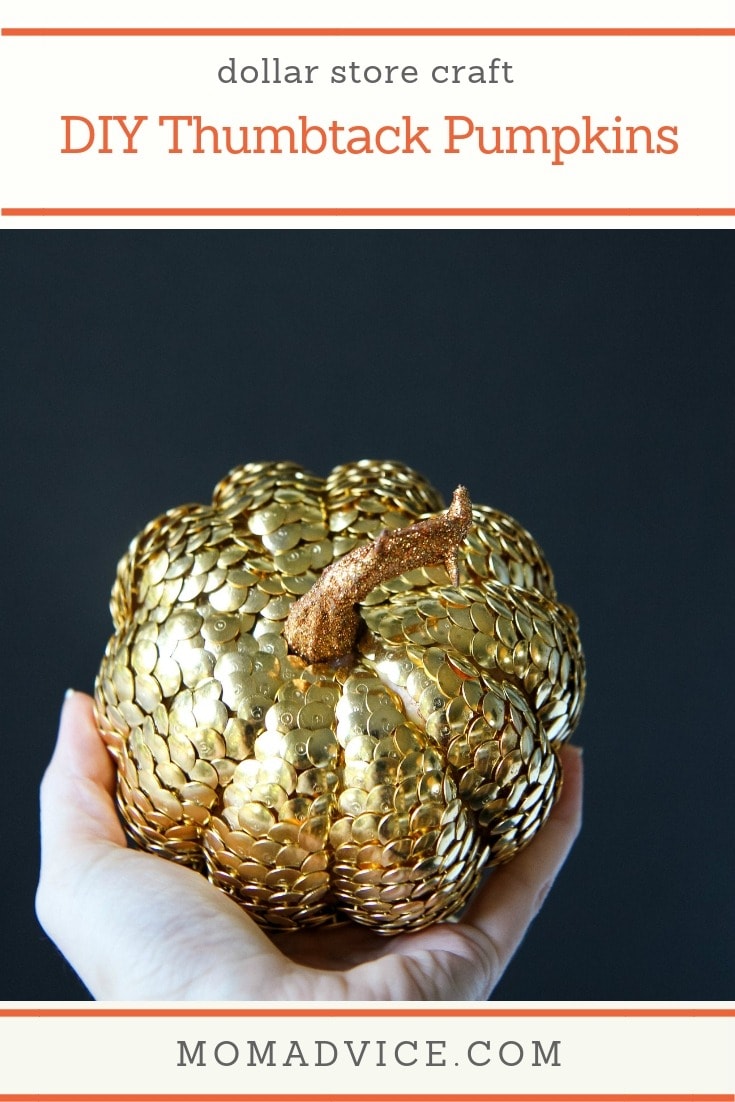
These gold pumpkins are the perfect craft for autumn, even if you aren’t crafty. You will love these DIY Thumbtack Pumpkins for your home!
I don’t know about you, but I am always looking for new ways to decorate the holiday table that are festive while staying easy on the budget. The gold trend has really been catching my eye this year so I wanted to create something beautiful and gold that anyone can do, no matter what your craft level.
Today’s tutorial is for a decorative thumbtack pumpkin that requires just two items for a fun and festive touch to your table.
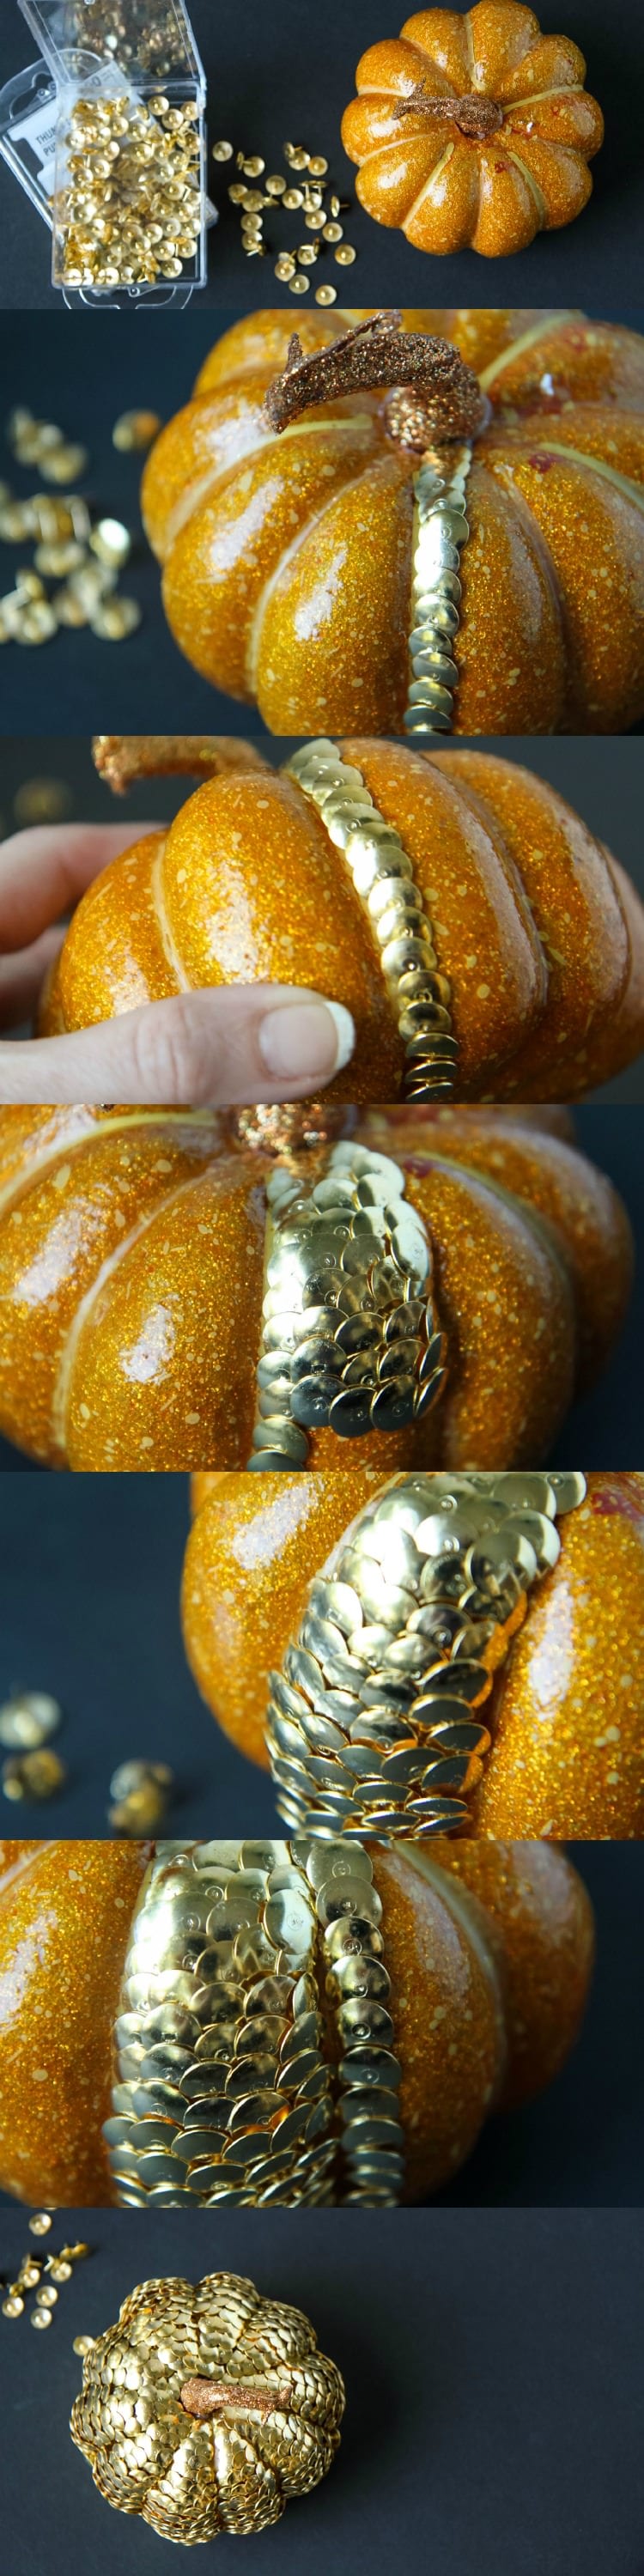
Going along one of the ridges of the pumpkin, begin inserting thumbtacks, starting at the very top and working your way down. You will want to make sure that they overlap just a bit to create a feathered effect on your pumpkin. You do not need to go to the very bottom, just enough to cover it so that if the pumpkin is placed on a pedestal or candlestick holder that you can’t see the plastic bottom. This row helps to anchor your ridge as you place the thumbtacks in.
Right next to that row, again overlapping from the side and down the row, begin placing thumbtacks in the same way, repeating this process until you have covered the entire ridge. Once the ridge is filled, just check and make sure there aren’t any holes in any places and fill, as necessary, with additional thumbtacks.
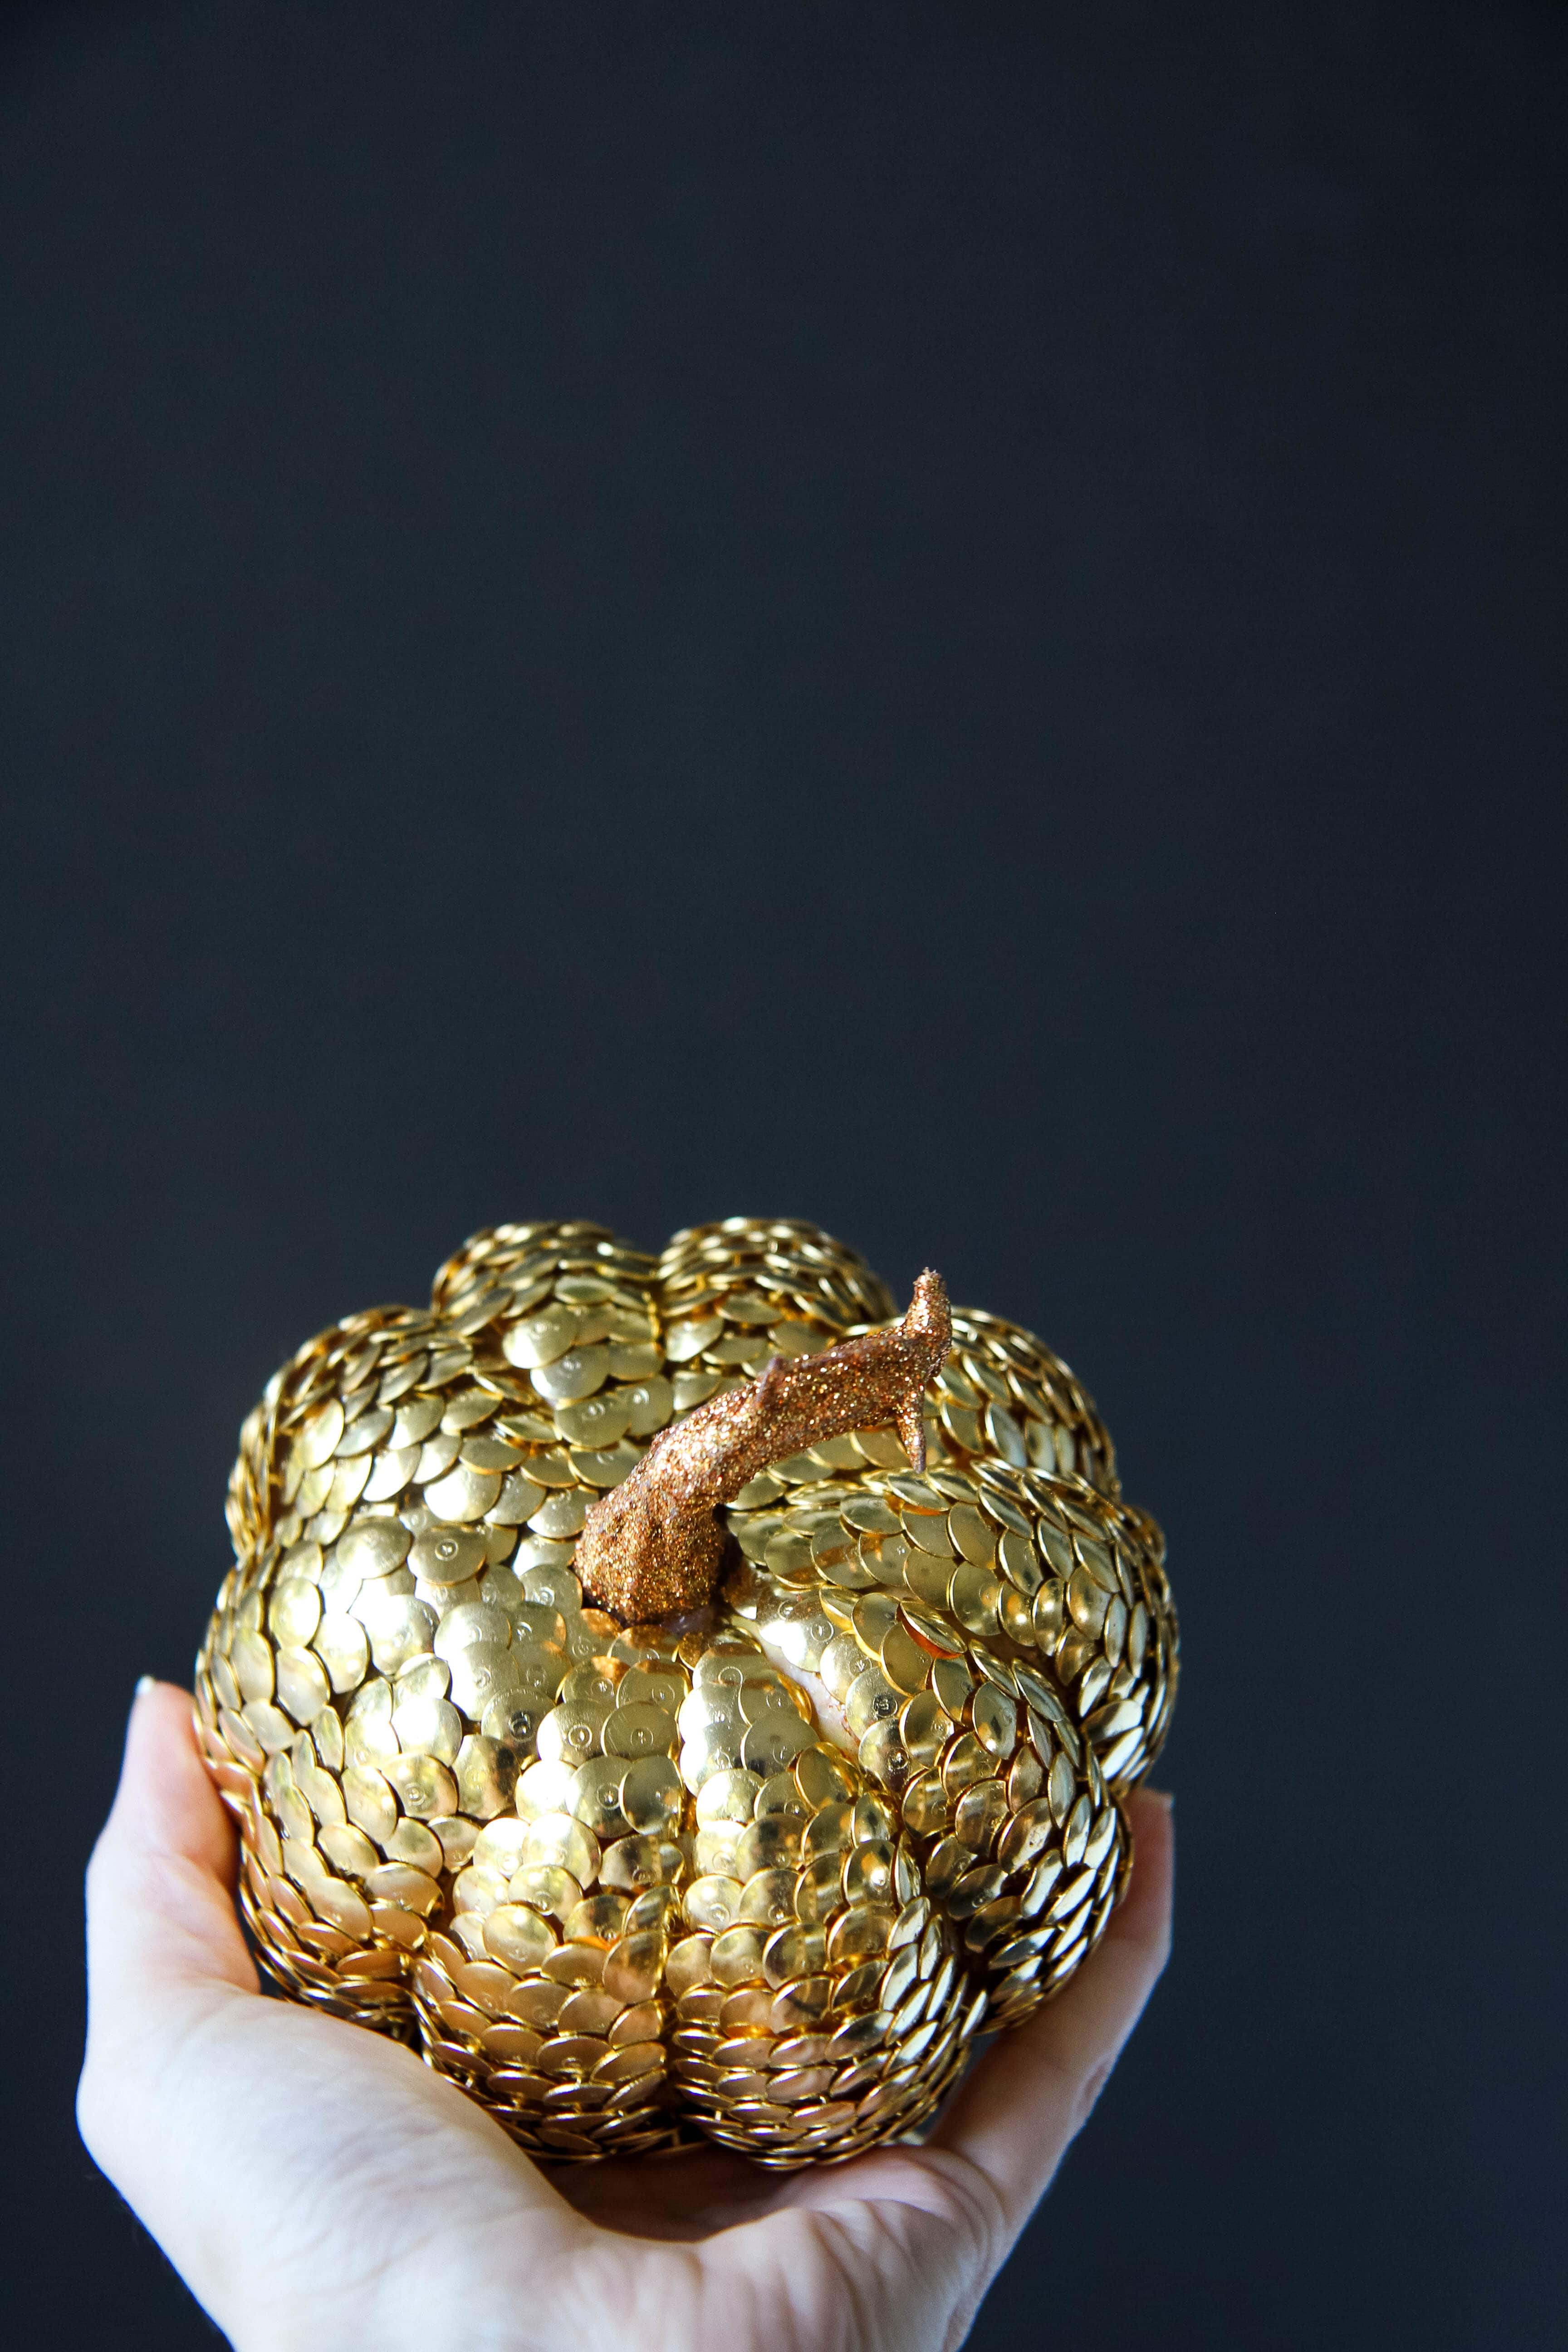
Begin in the next ridge, just as you did with the first, giving just a little room between those ridges so you can still see that pumpkin shape. Now repeat this process again and again, until you have filled the entire pumpkin. This small pumpkin took 700 thumbtacks, but you may need more or less depending on how tightly you are overlapping your thumbtacks.
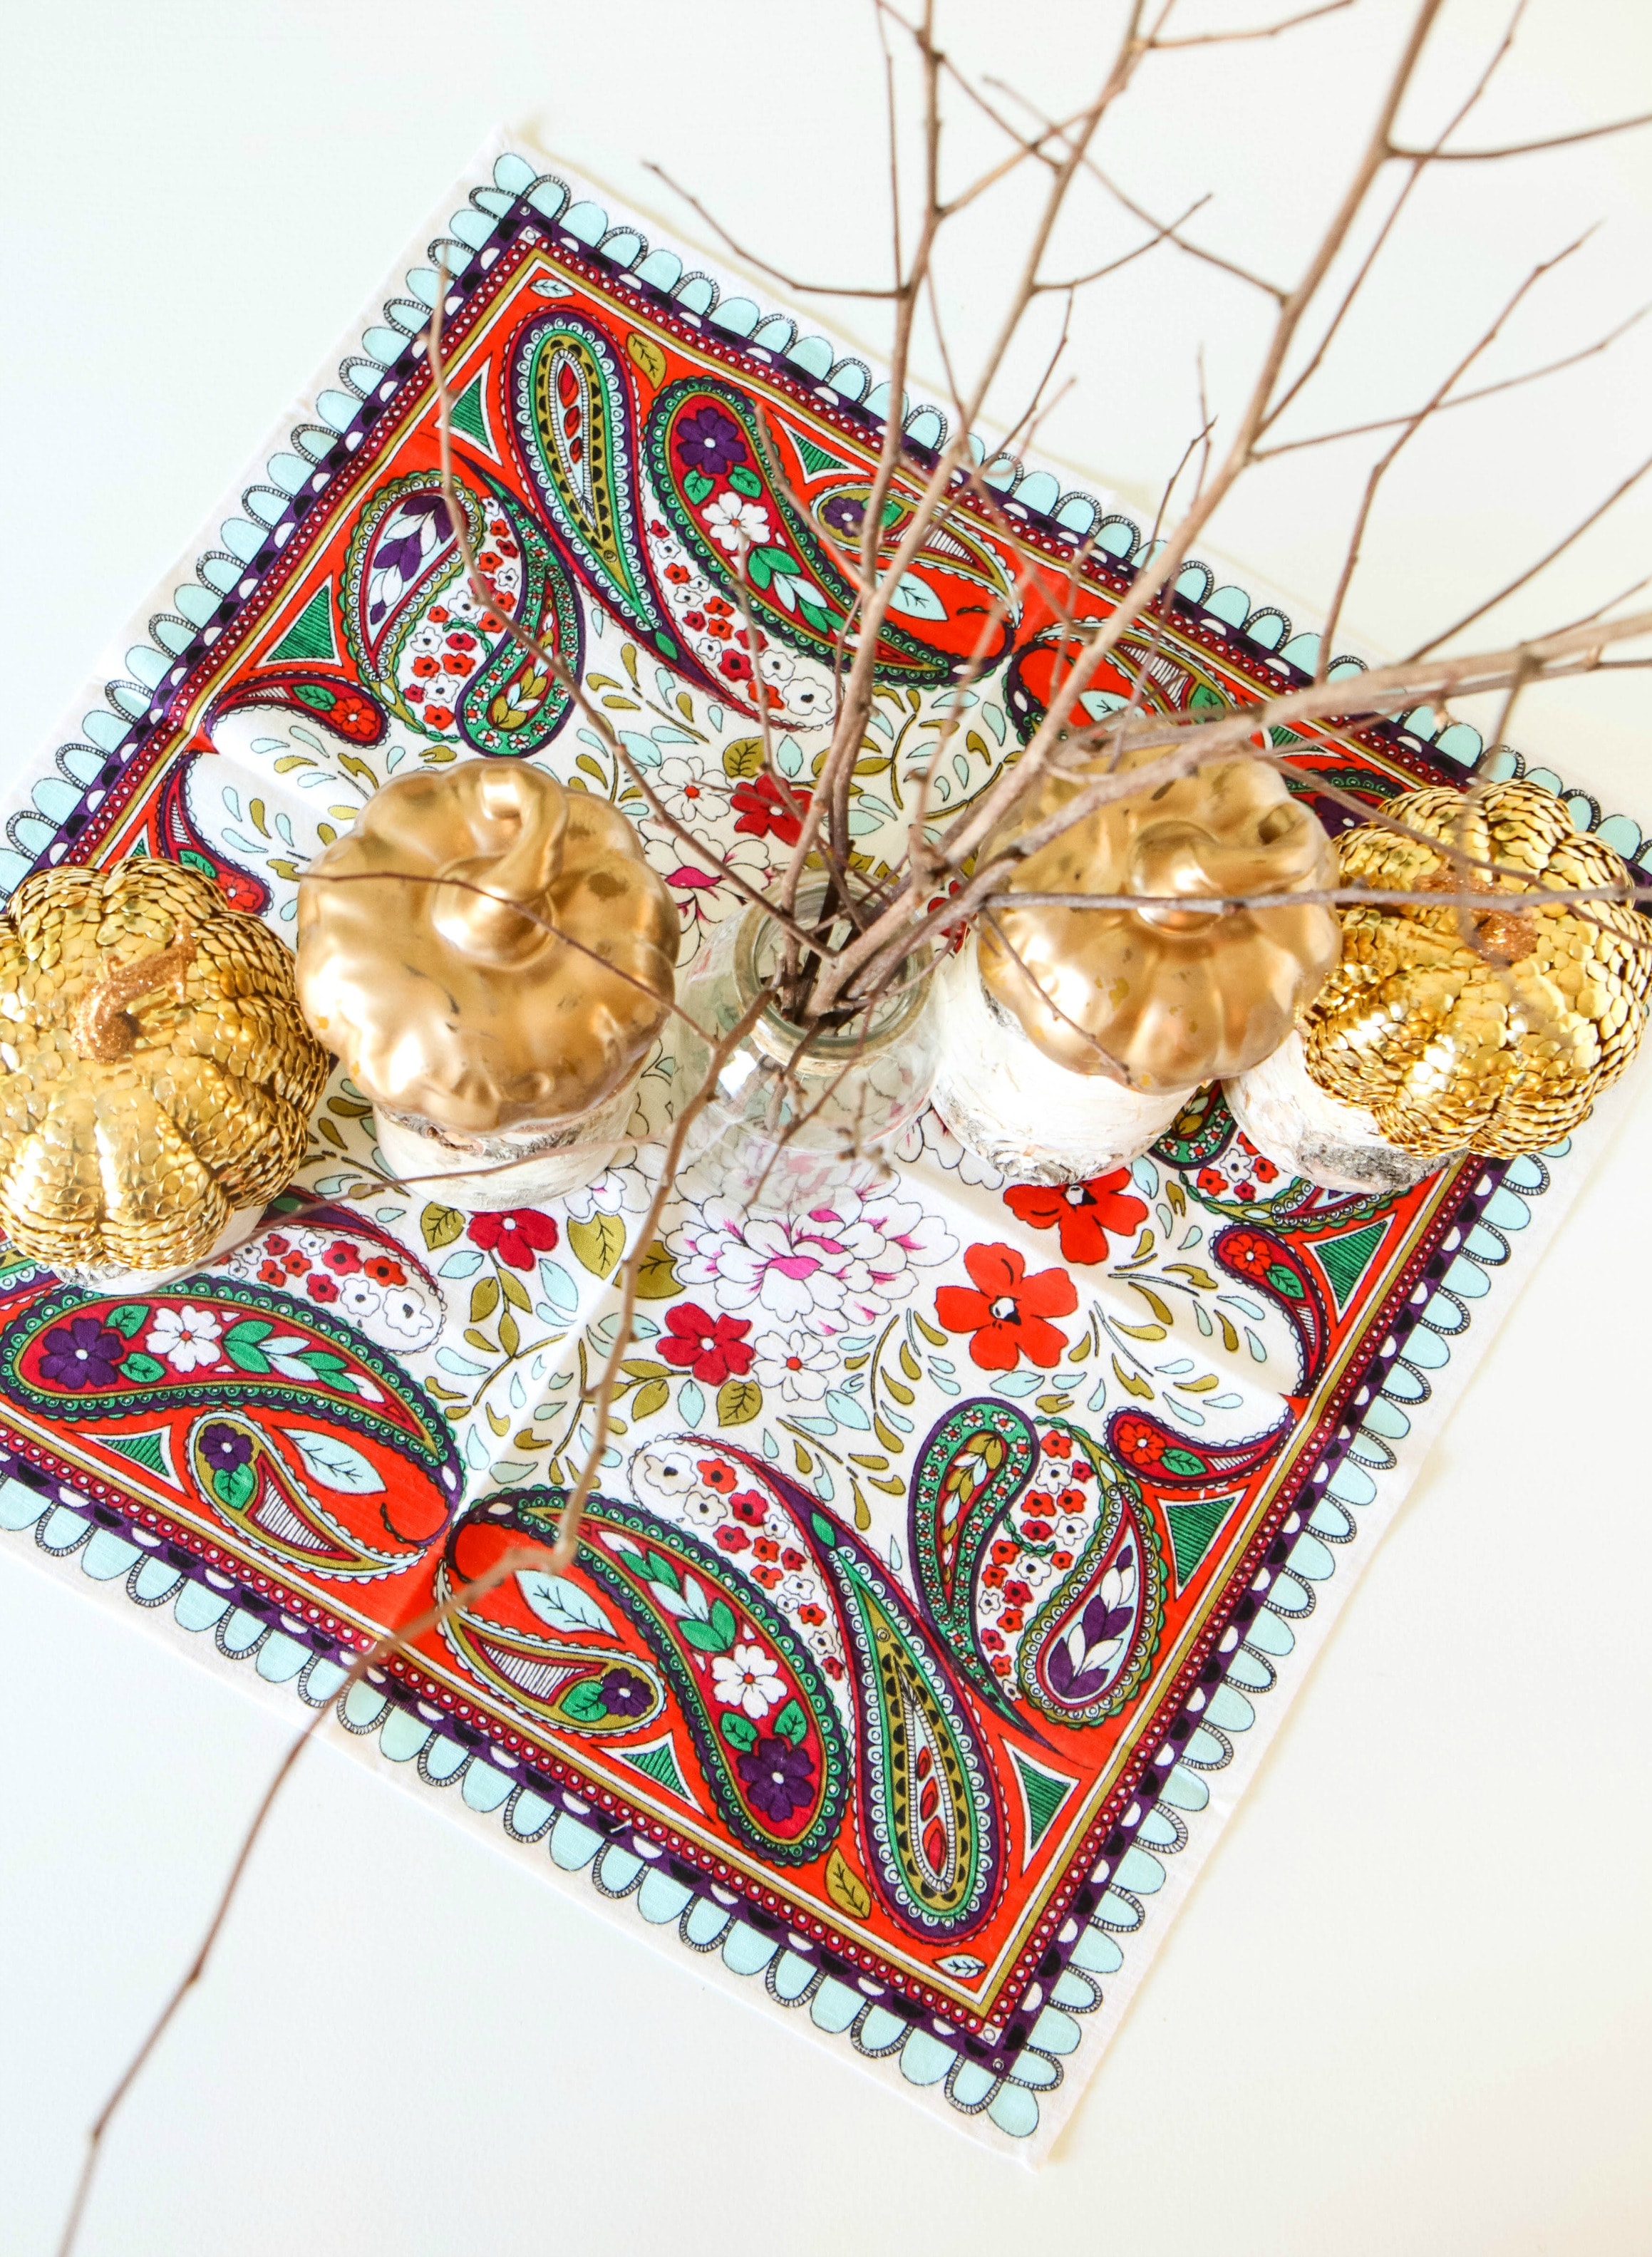
Isn’t this absolutely beautiful? Who would ever have guessed that it costs around $5 to make! I made two of them and wanted to show you a fun way to dress up your holiday table with these.
I spray painted two other faux pumpkins and then roughed them up with a little sandpaper. I filled a glass bottle with branches from our backyard to center these and then purchased these faux logs from my local craft store in two different heights to place my gold pumpkins on. I love all the variations on height and the different textures in this budget-friendly centerpiece.
I hope you find this idea easy and inspiring! Use your own creativity to create a few beautiful pumpkins of your own.
Speaking of autumn crafts…here are a few tutorials you might enjoy!
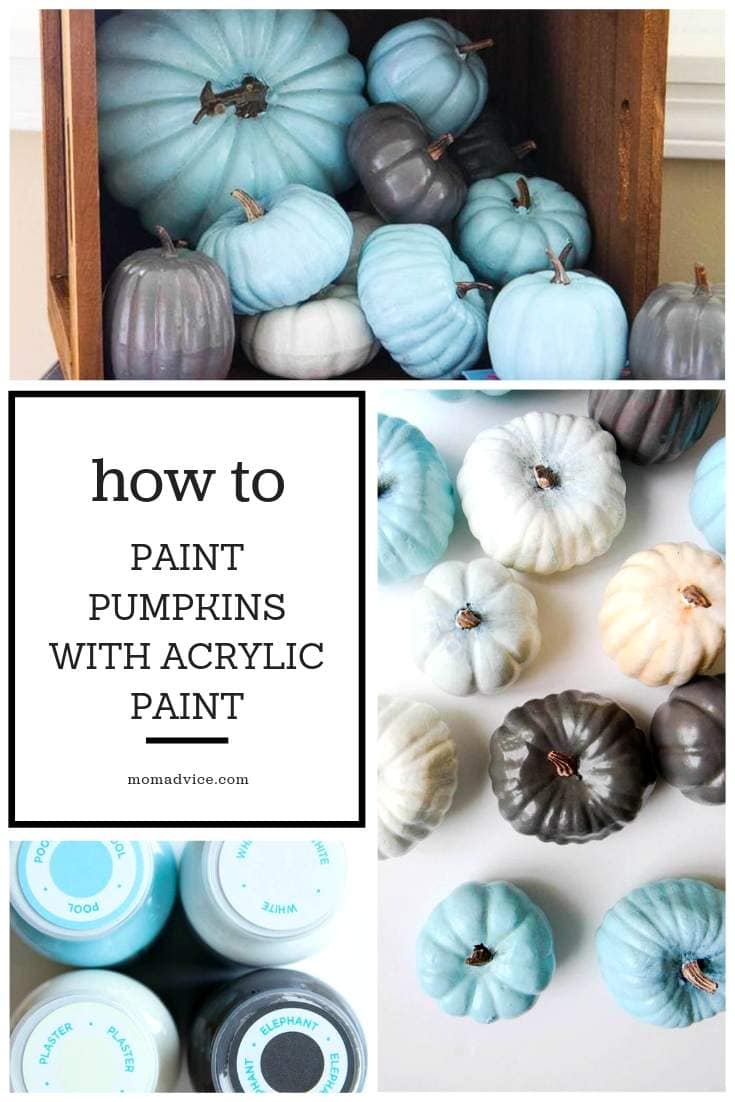
Have you ever decorated for fall with acrylic paint pumpkins? This tutorial shows you what kind of paint to paint pumpkins with and how to paint those faux pumpkins to match your home decor. You’ll love these creative ways to paint a pumpkin.
This post was created in partnership with Waverly Inspirations. Thank you for supporting the companies that support our site!
Who could use a pumpkin decorating craft for fall?
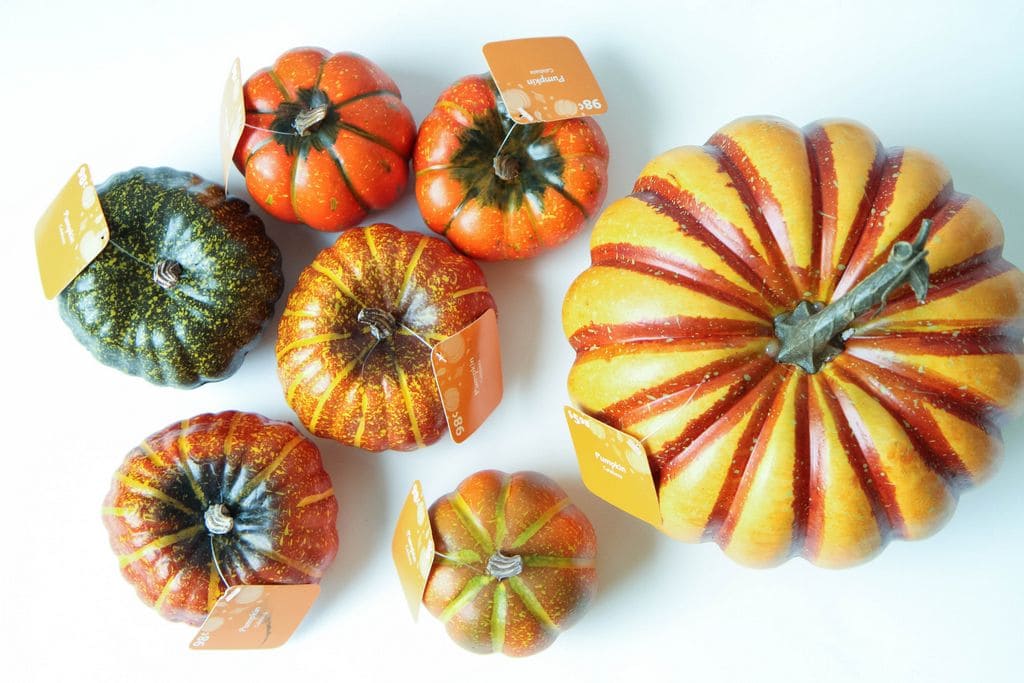
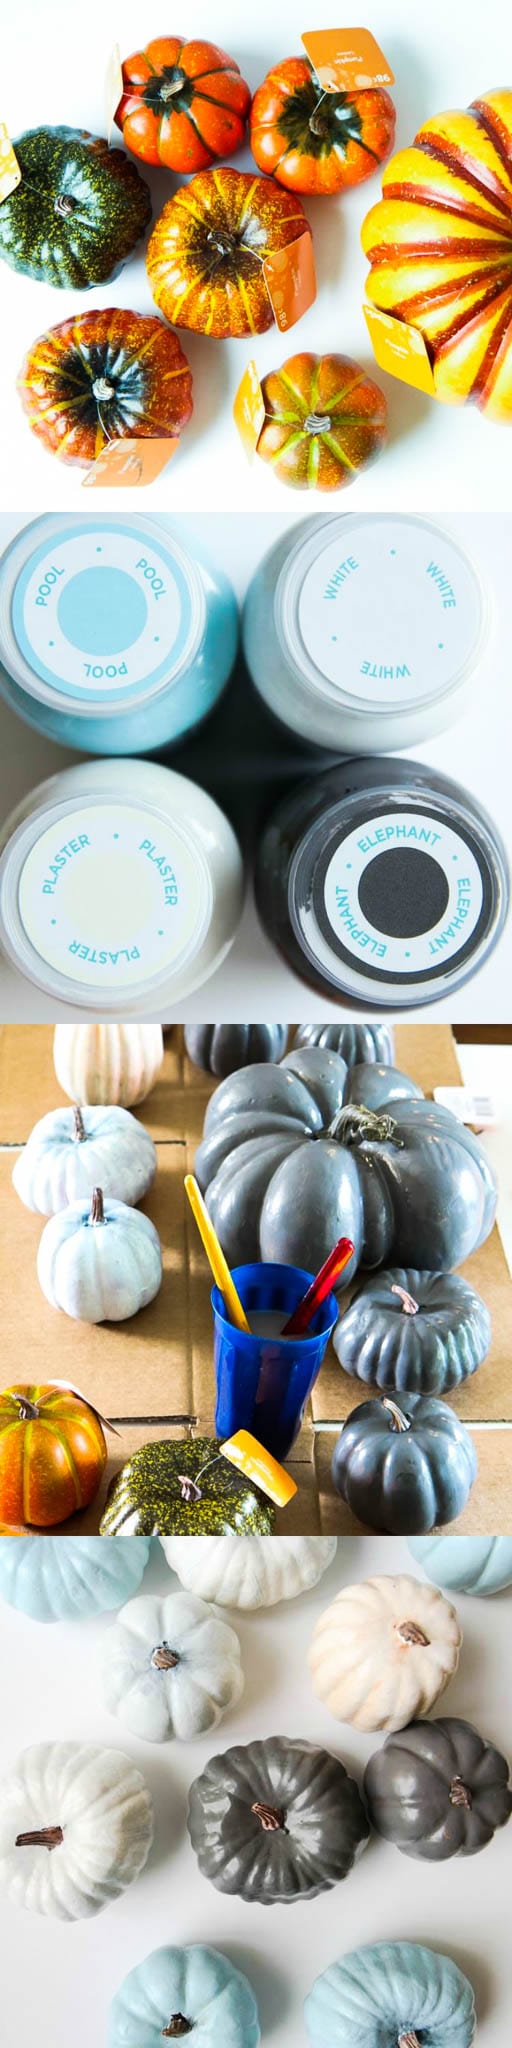
I decided to decorate fake pumpkins this year and am showing how you can do the same thing with supplies from your local craft store or even dollar store.
This was my first time painting our pumpkins this way and it could not be easier. I wanted to create a pumpkin display that would be perfect for the entire fall season and wanted to show you a cute way to display your pumpkins this year!
I am not big on decorating for Halloween and would prefer to skip right over that part of the fall decorating.
This month’s challenge was to create a Halloween decorations so I wanted to create a minimalistic display that would give a nod to the season, but complement our decor until it is time to deck the halls.
The best part is that these pumpkins can be used year after year and the painting is a lot less messy than carving pumpkins or using spray paint.
How to Paint Pumpkins With Acrylic Paint
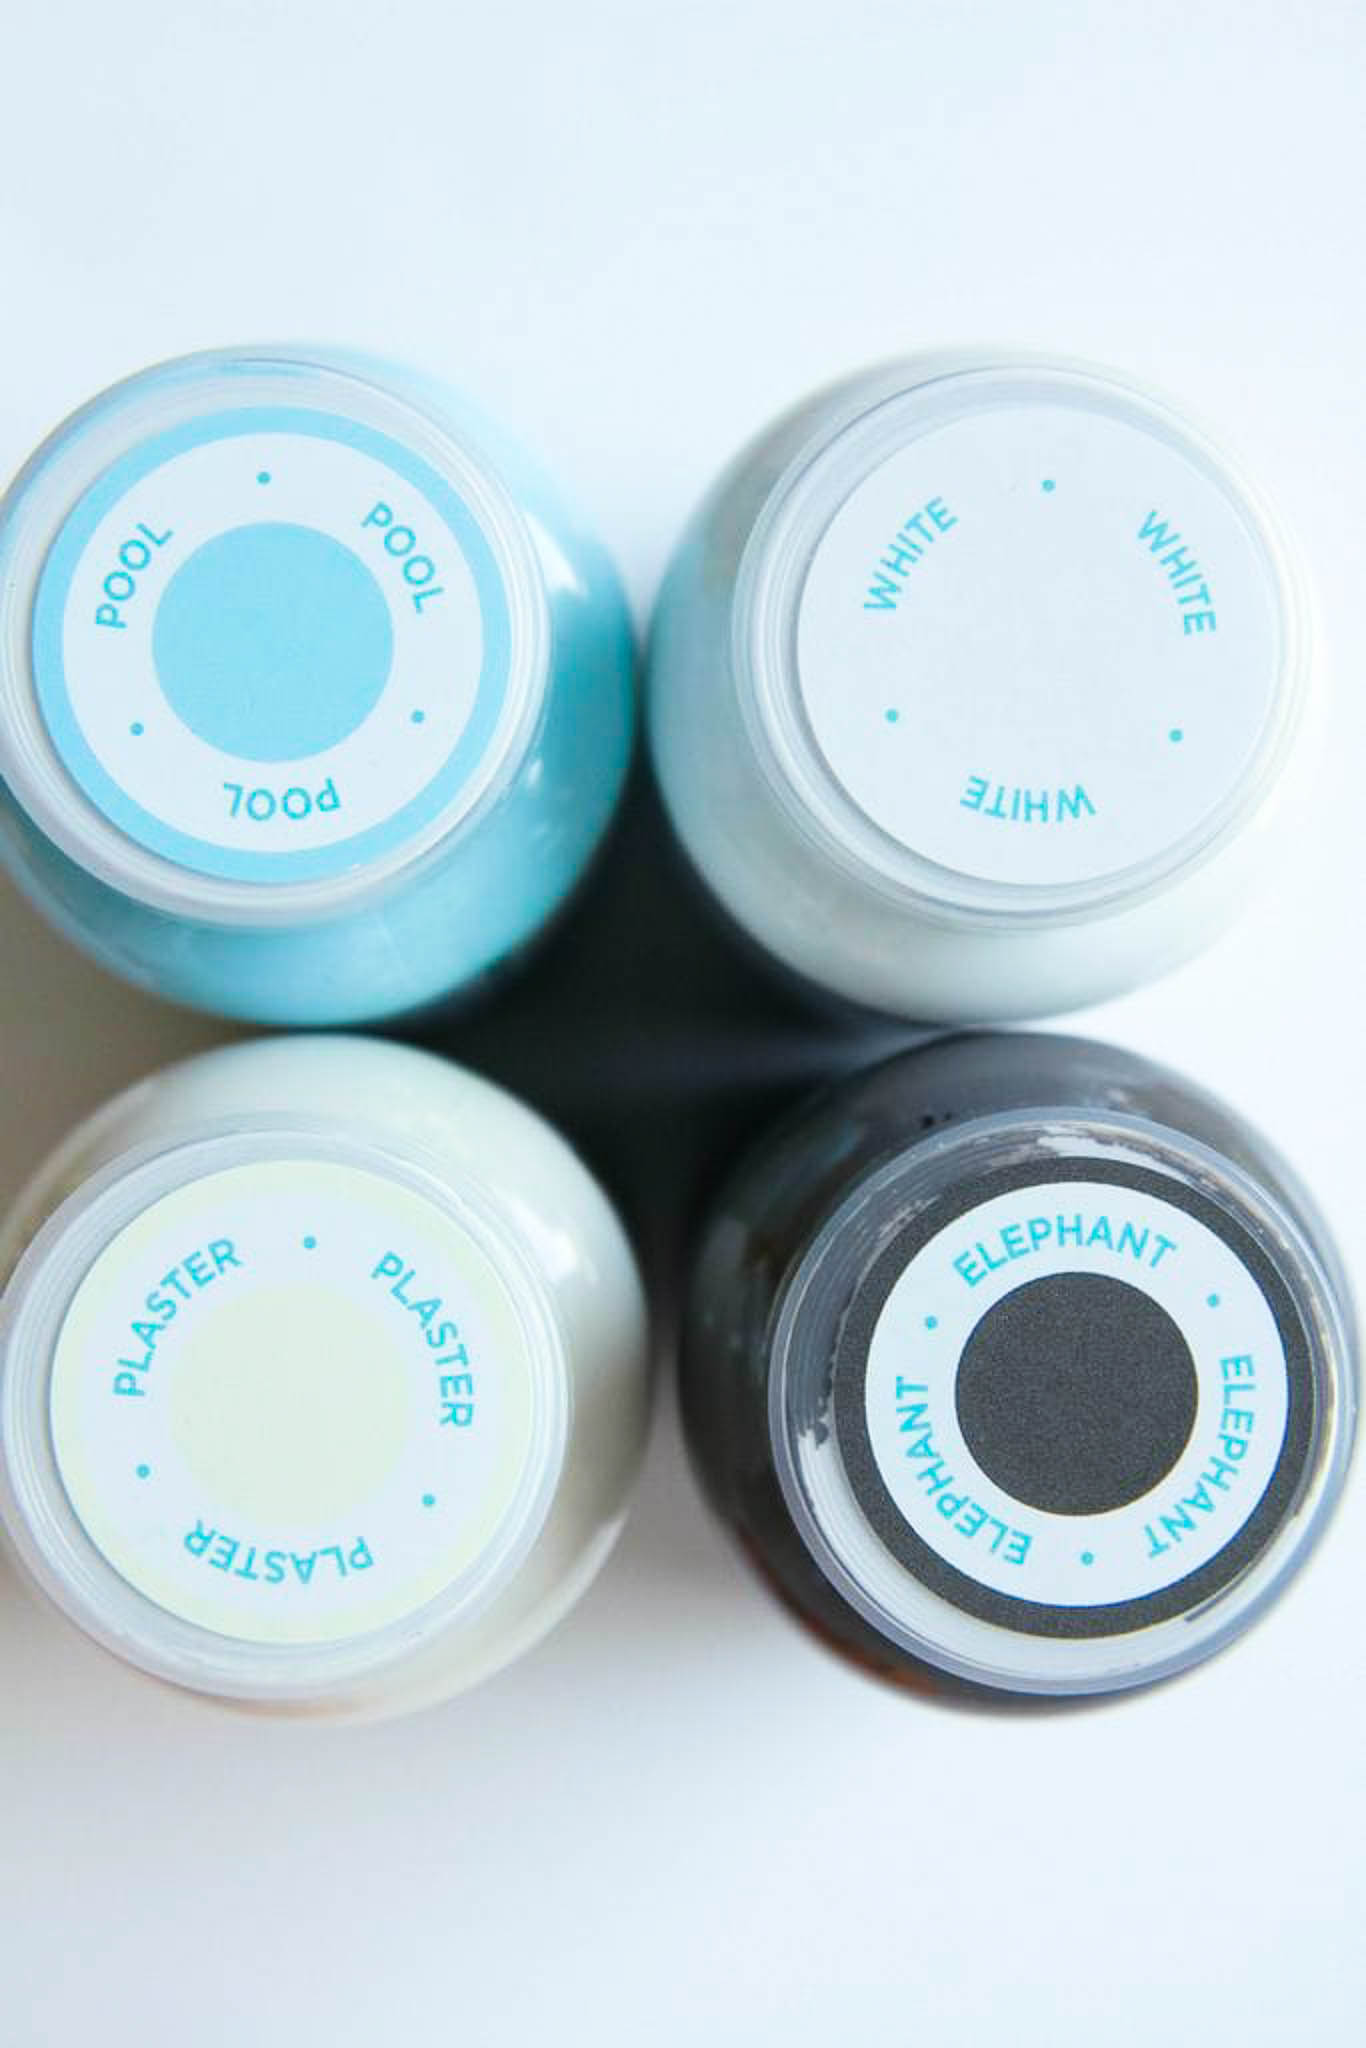
Supplies Needed (all of these supplies can be found at Walmart!)
Any size you like of their faux pumpkins- the small ones are just $.98!! (you could also do real pumpkins!)-try Etsy for supplies.
Cup with water, paper towels, and something to cover the surface while painting
Wooden Crate
Remove the labels from the pumpkins and protect your surface with cardboard while painting.
With a clean wide brush, begin painting your pumpkins, using the stalk of the pumpkin as a handle to work around the surface.
If you find the area around the stem to be difficult to decorate, you can pull the stems off carefully and use hot glue to reattach after they dry.
Paint the entire pumpkin and then set it aside to dry. Don’t feel limited by painting them all one color though. Feel free to add designs on your pumpkin for Halloween too or decorate your pumpkins with an autumn-theme. The possibilities are endless on the pumpkins you can create. Personally, I love polka dots and think that would be fun AND easy.
Drying time can take anywhere between 15 minutes to one hour, depending on how thickly you applied the paint.
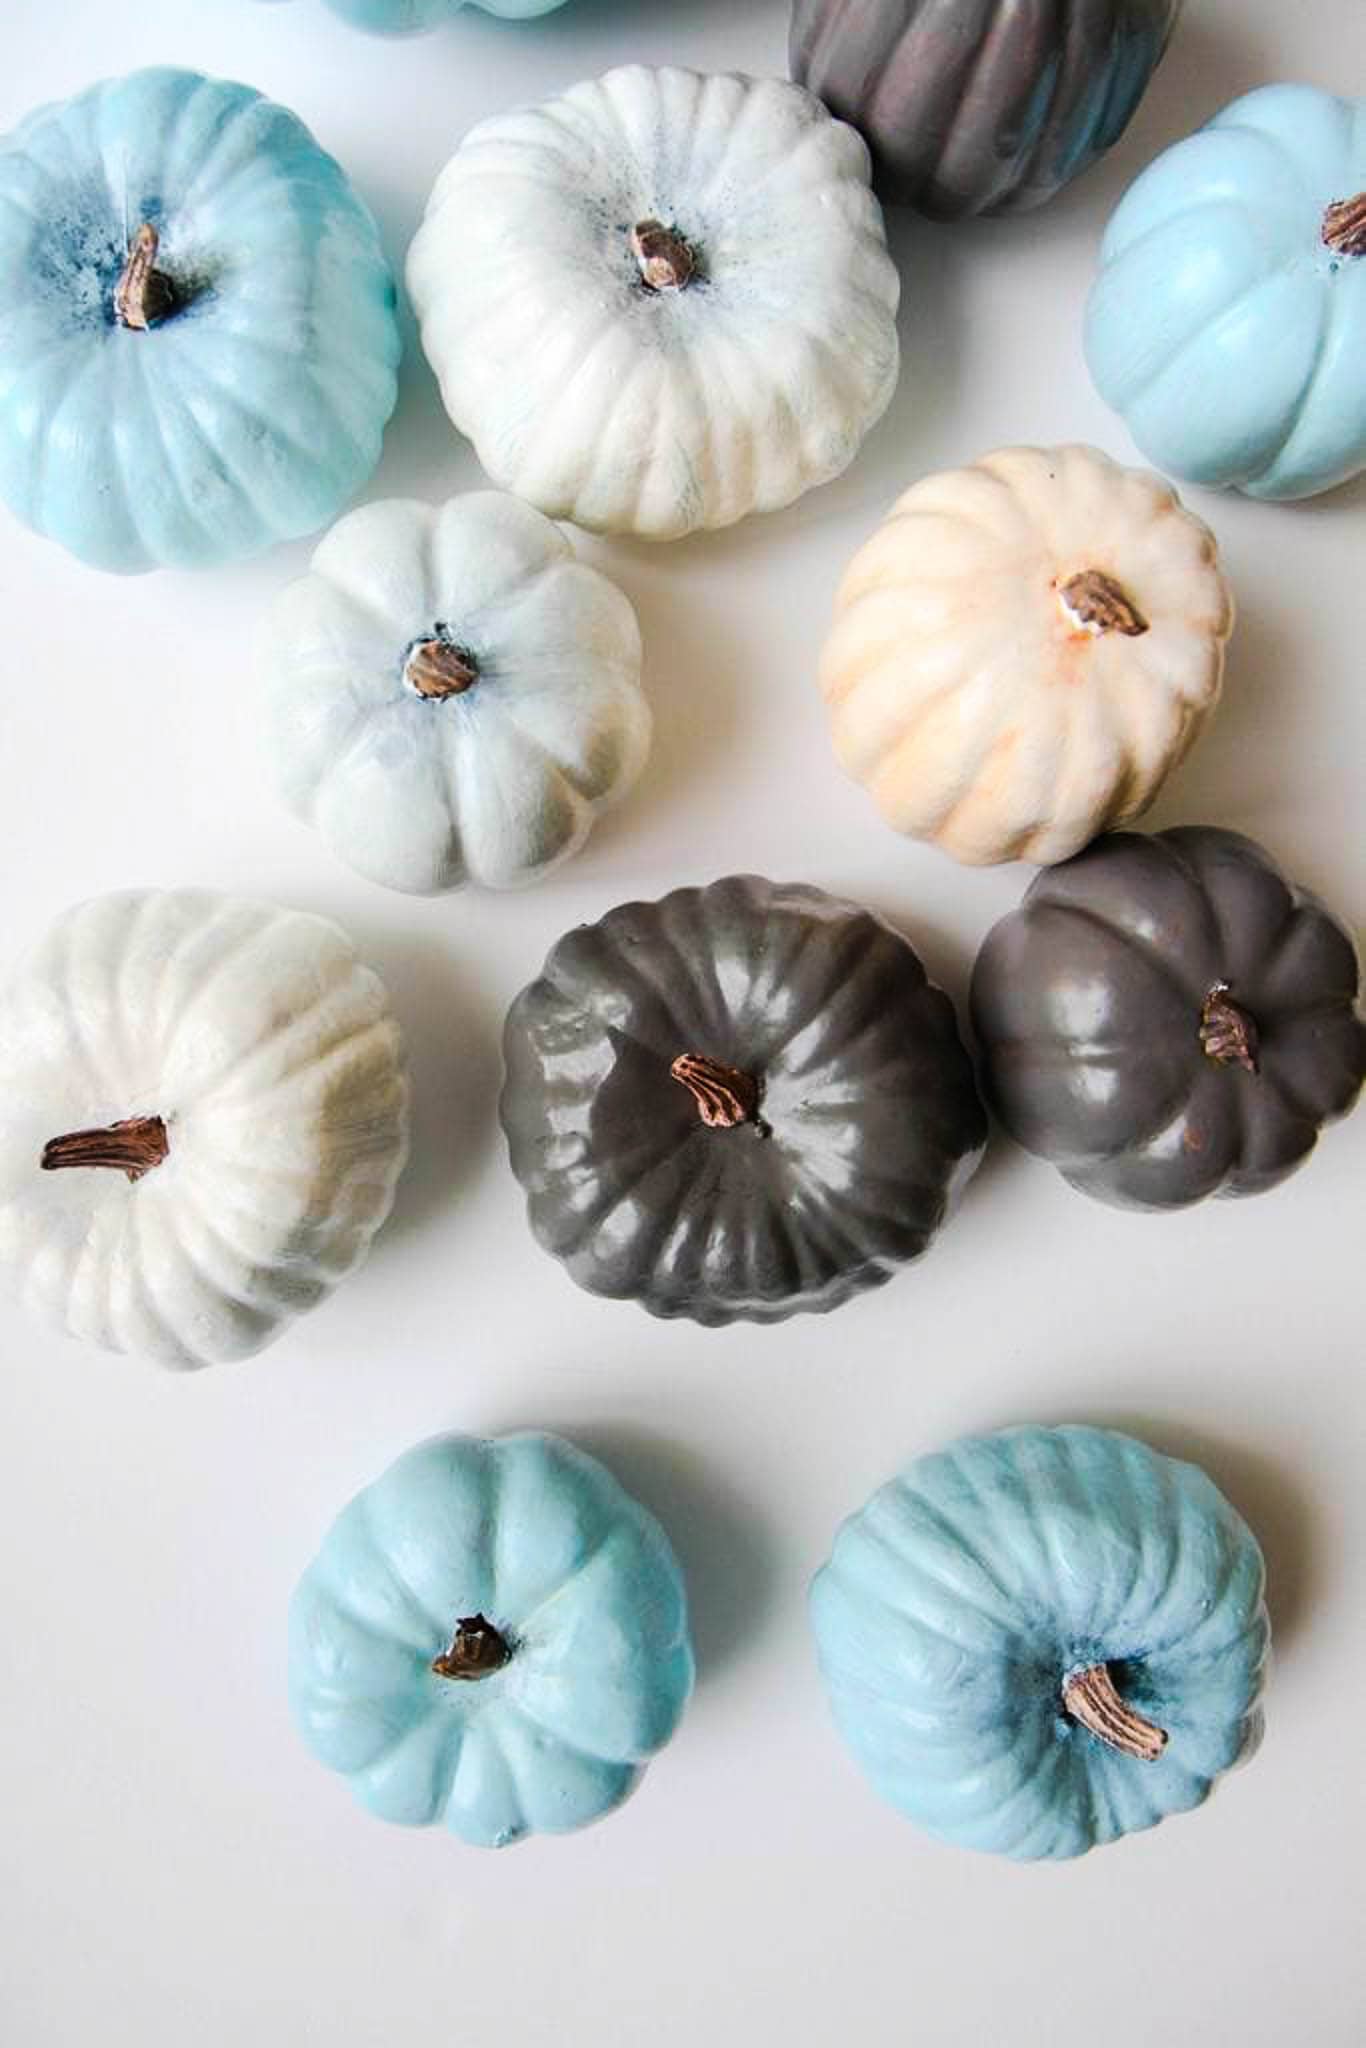
Repeat this process as many times as you like to achieve the hue you are going for.
I found the gray pumpkins only required a single coat, while the white pumpkins required two coats.
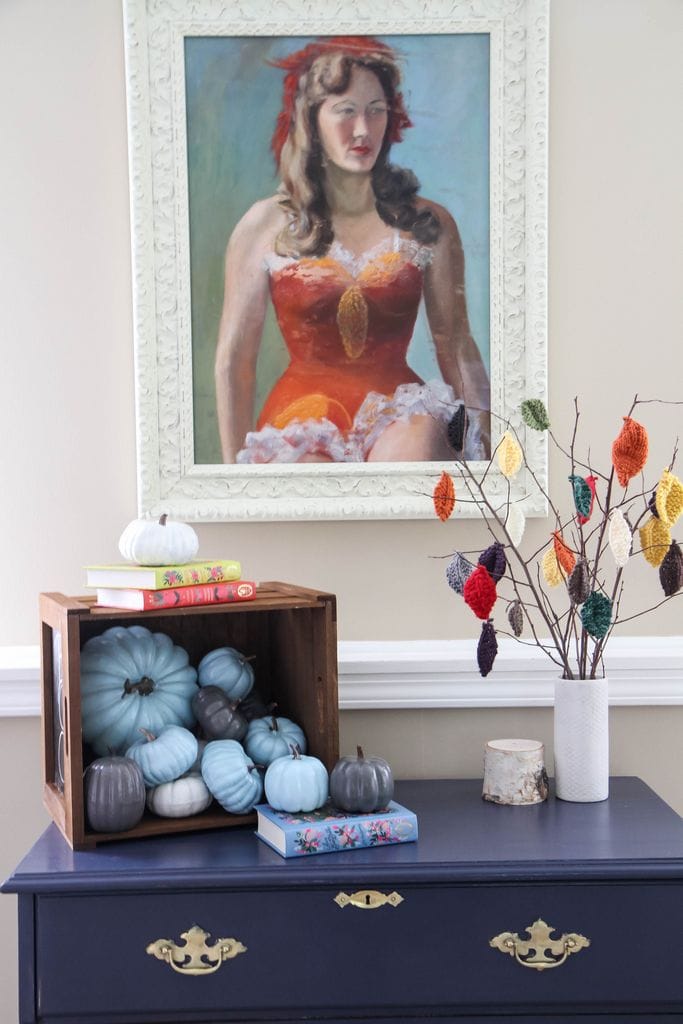
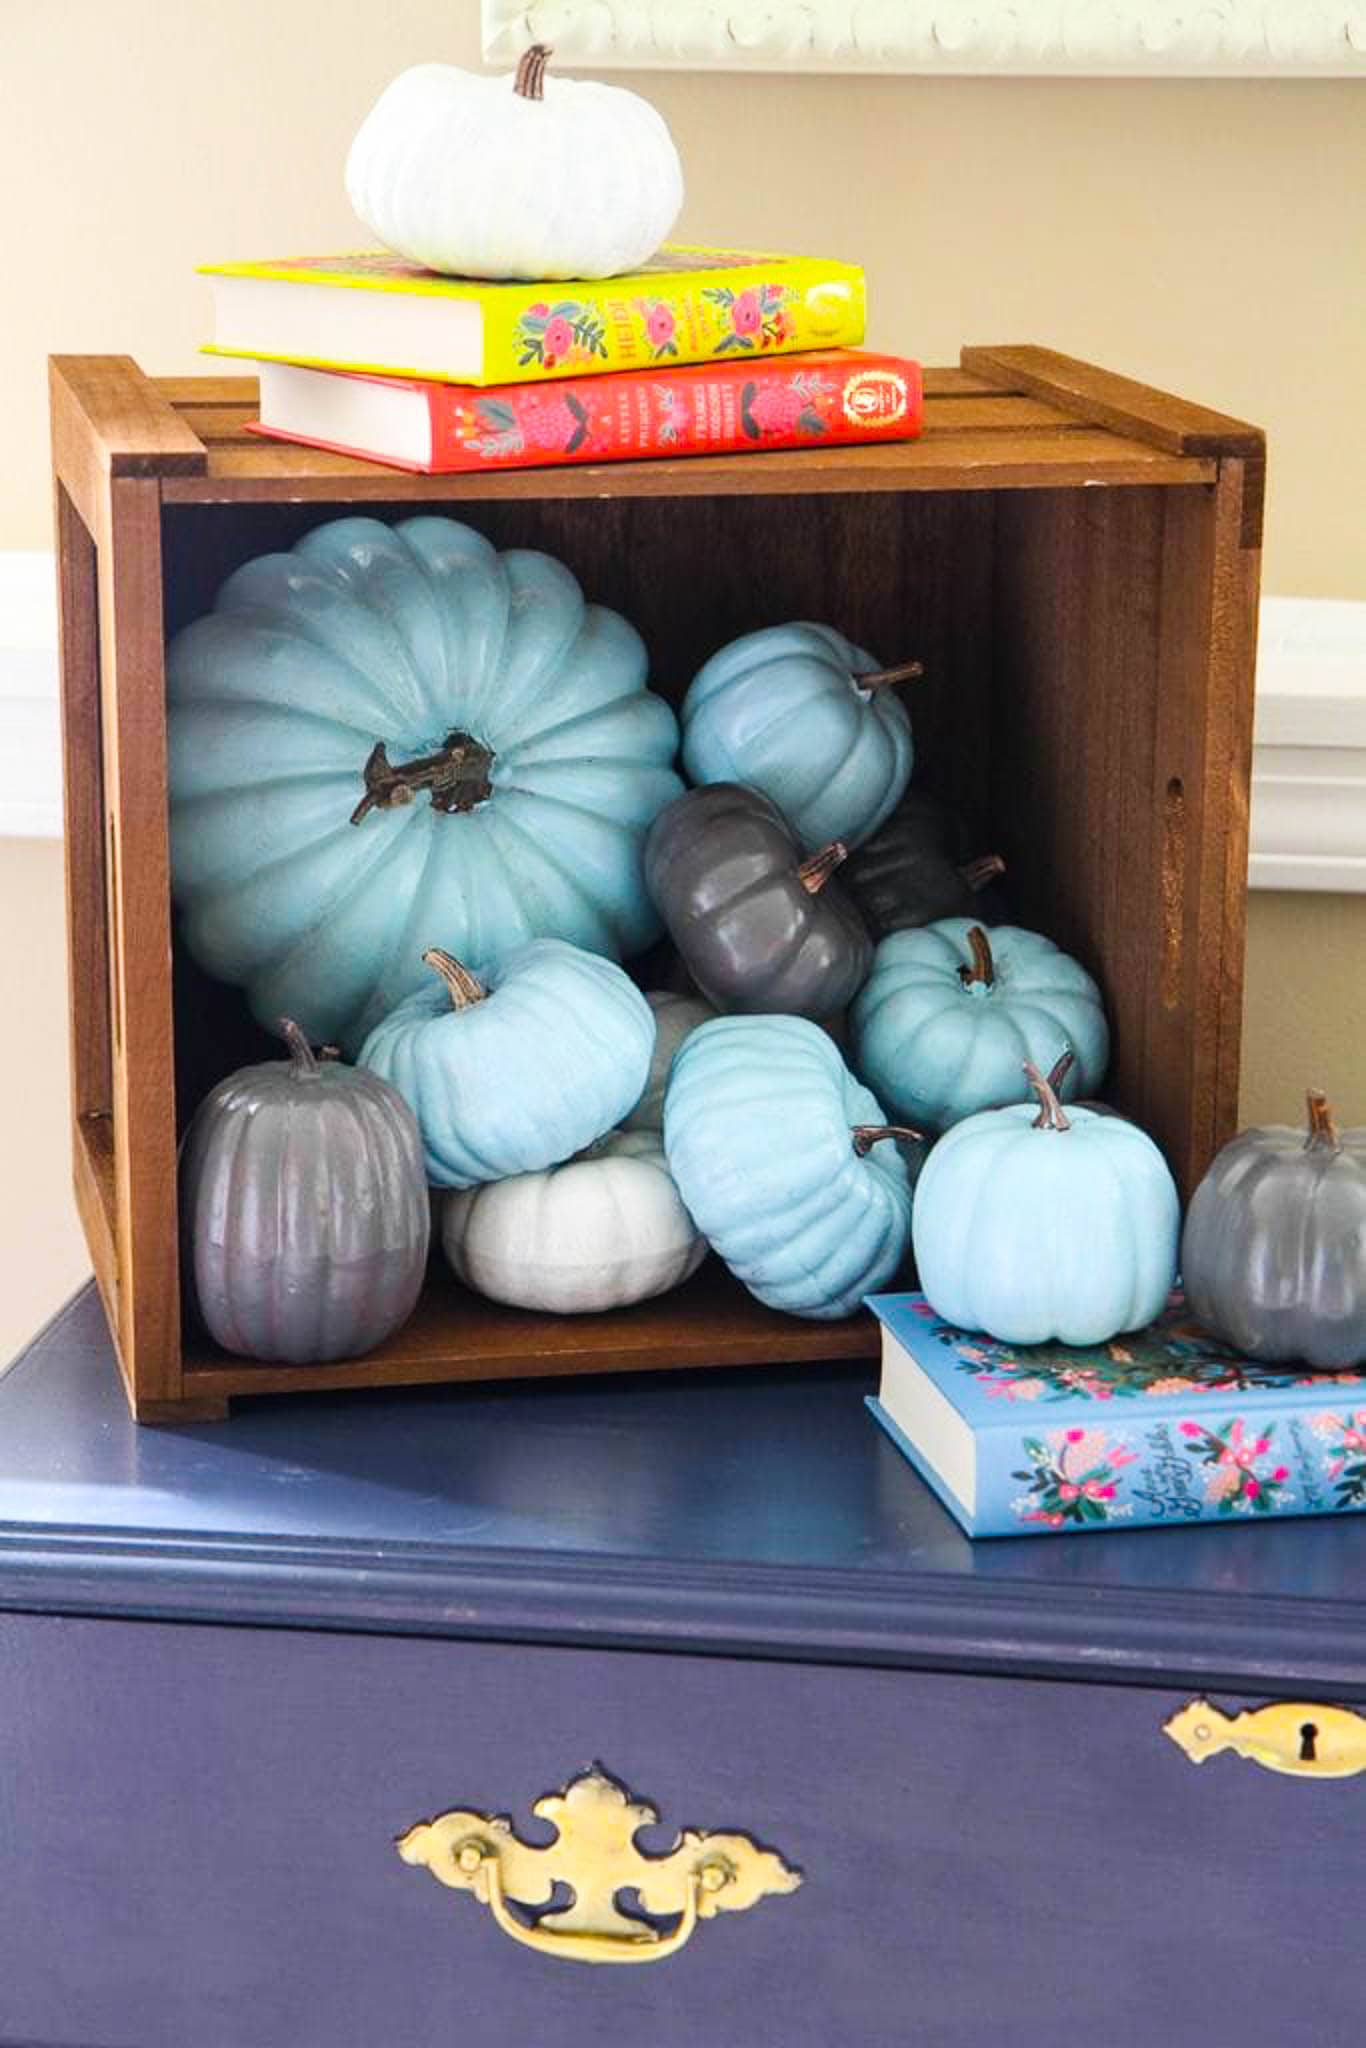
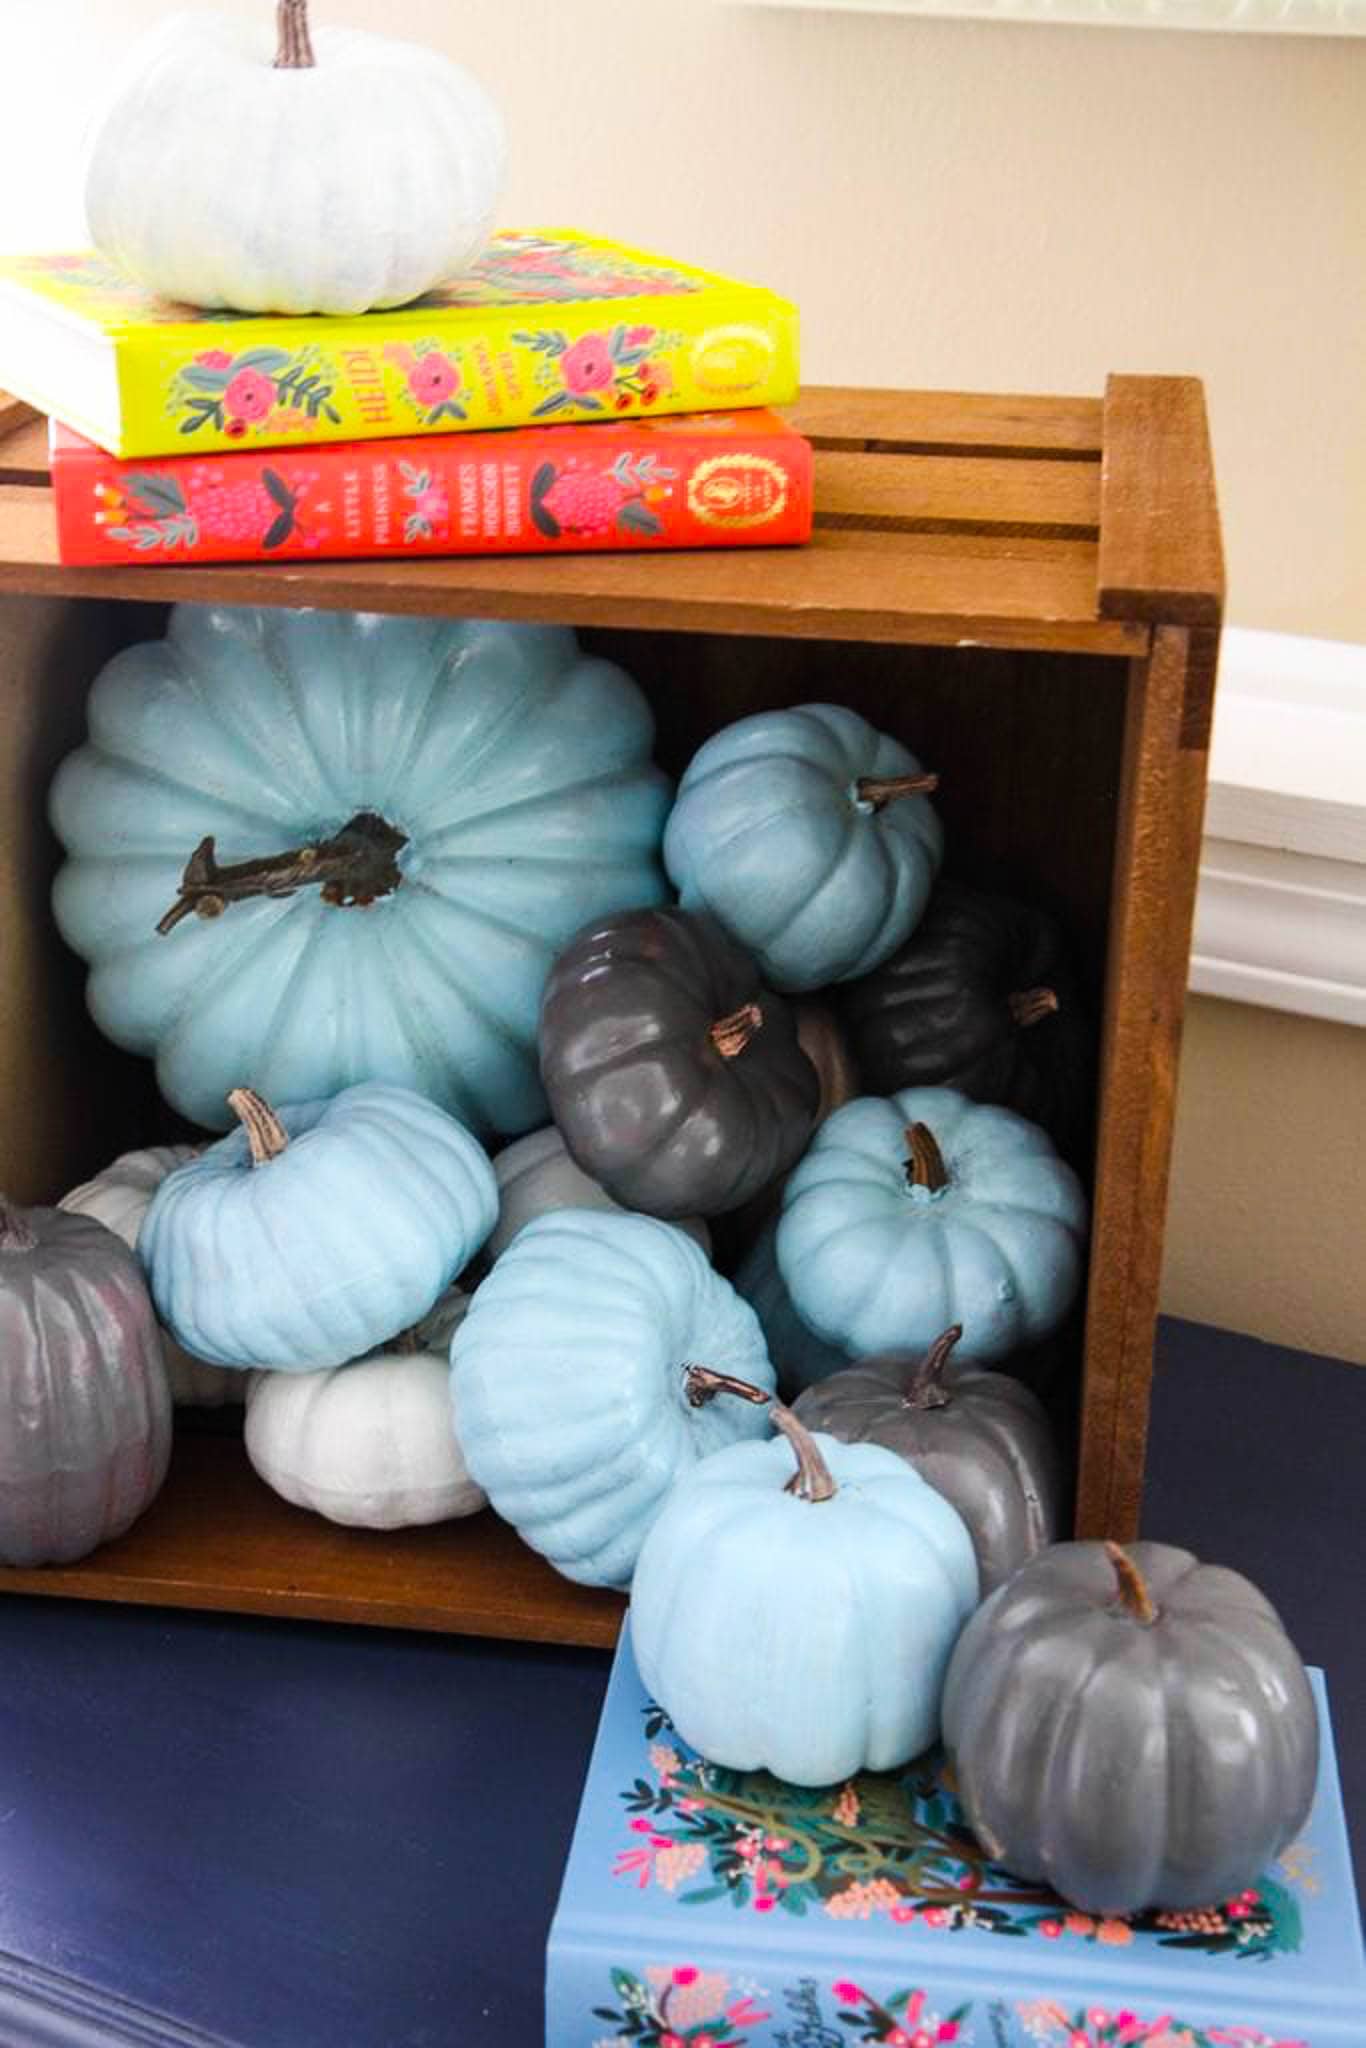
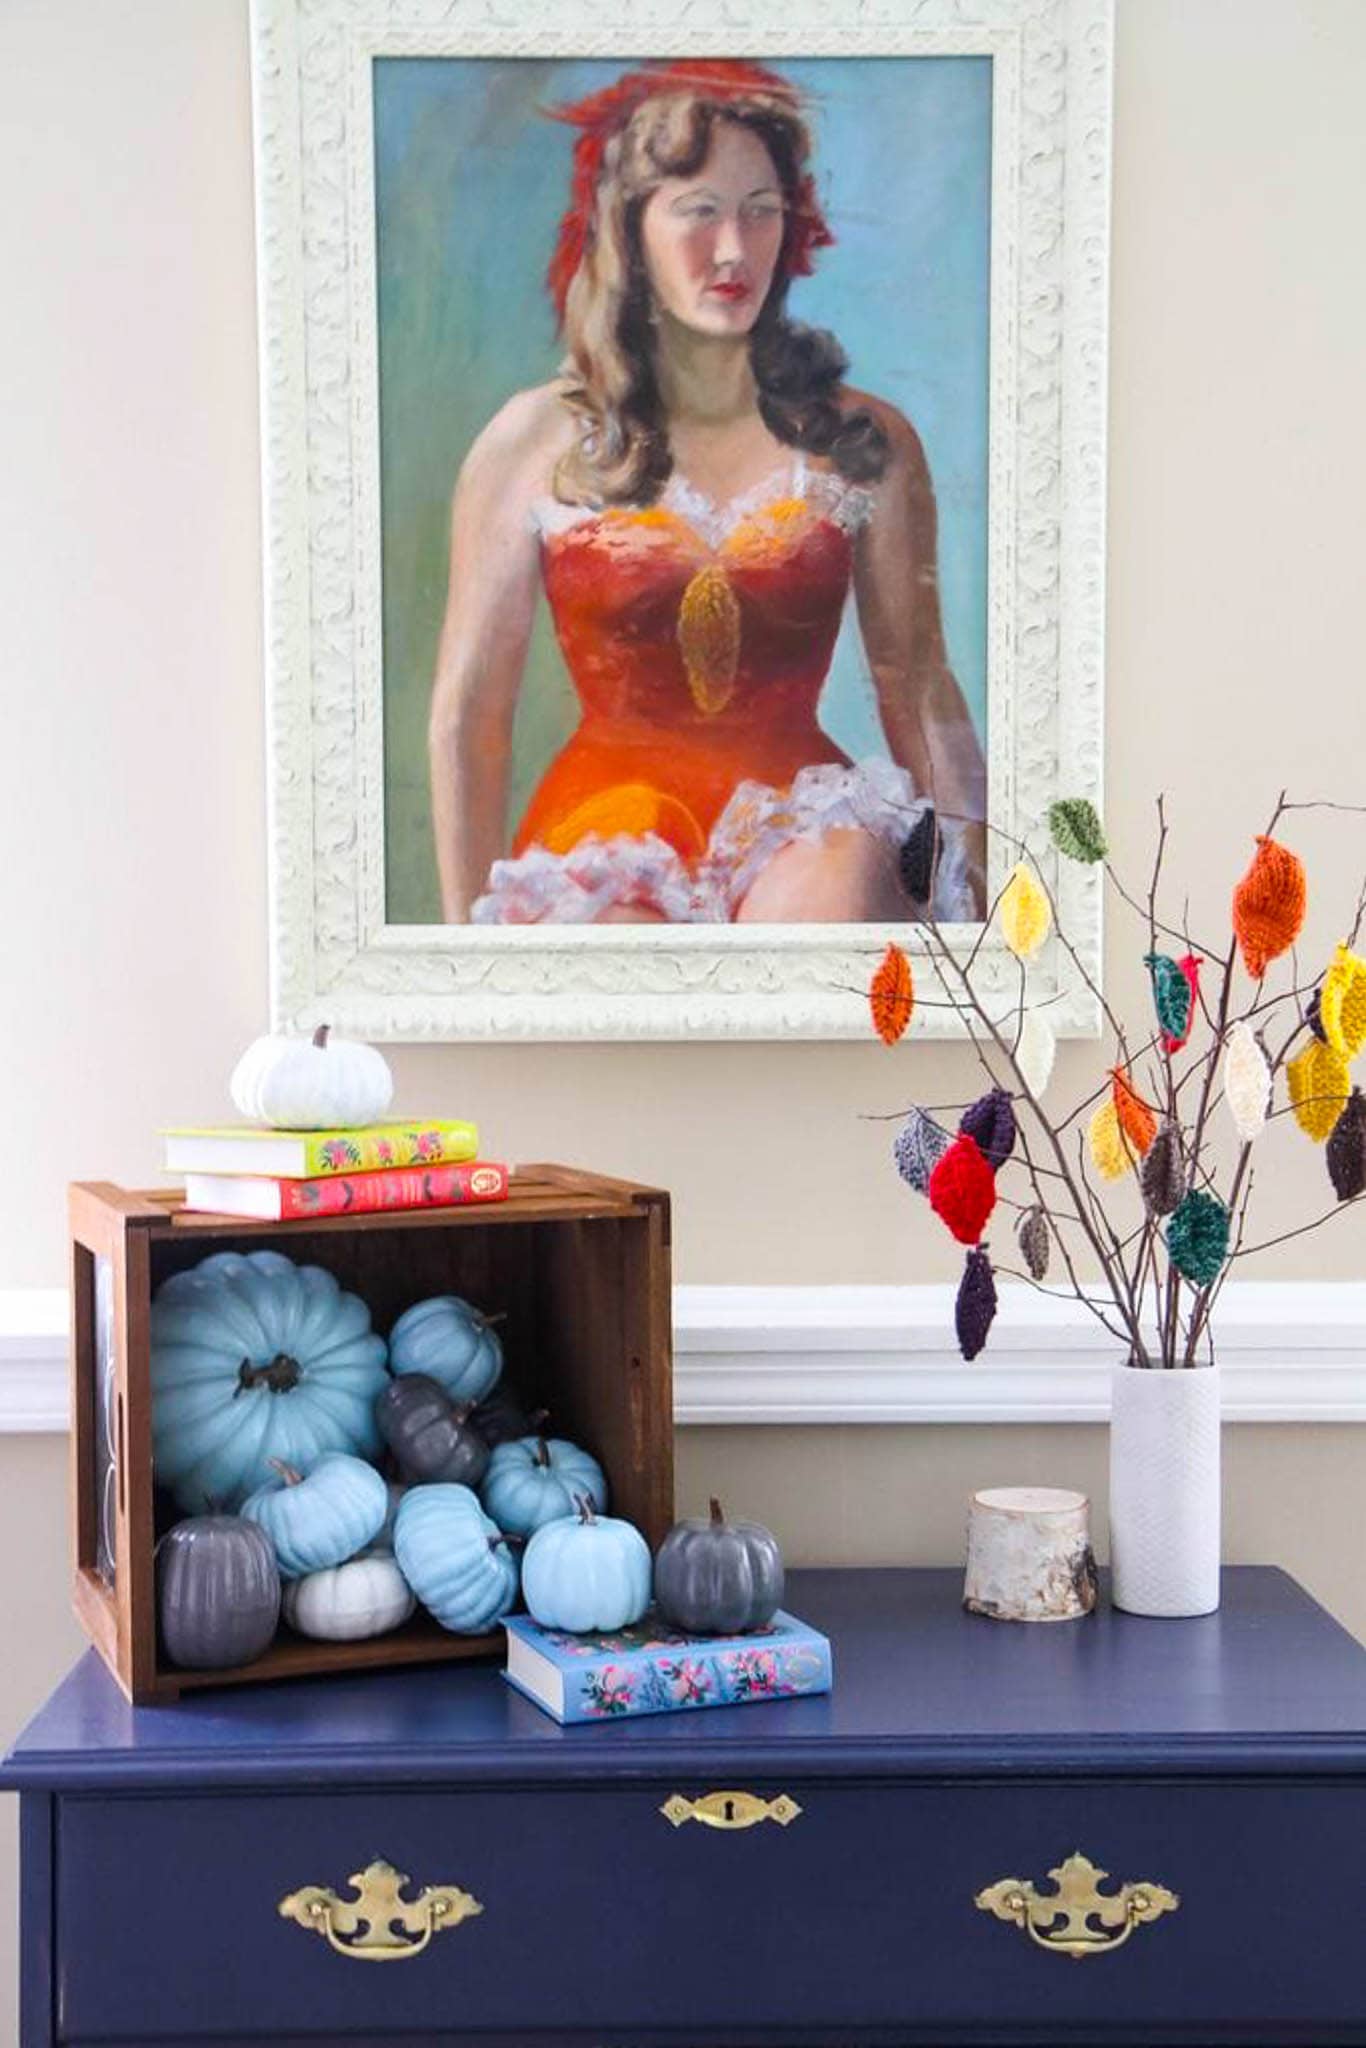
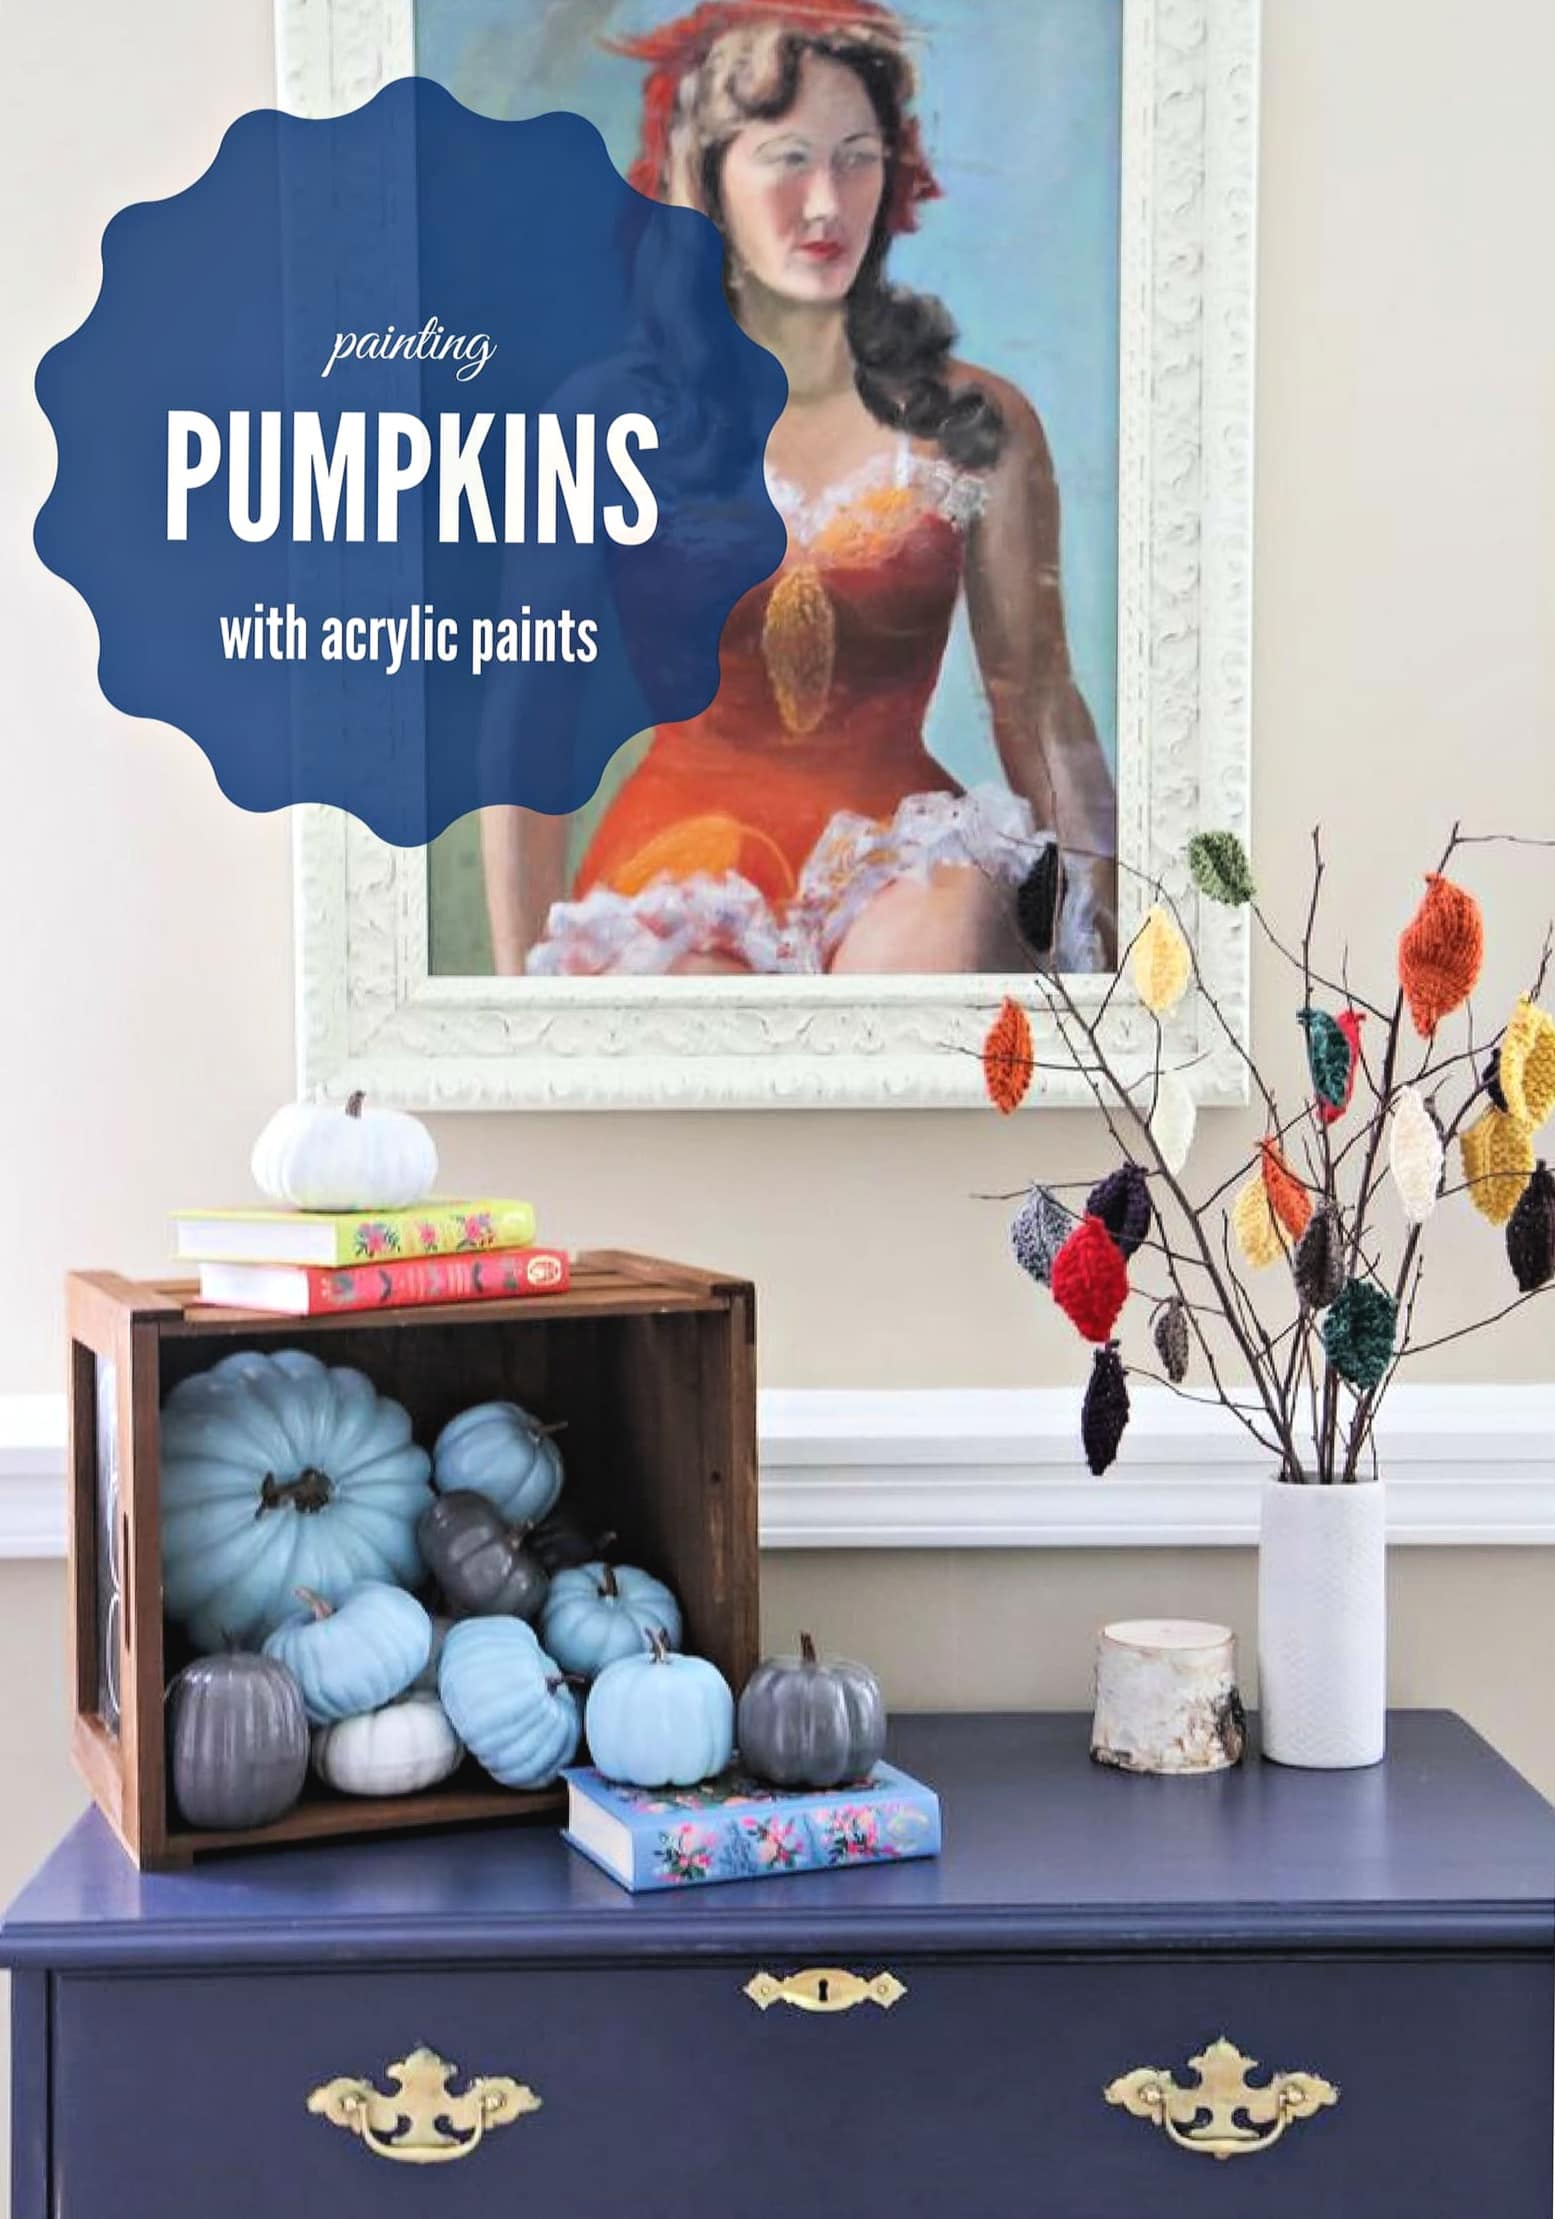
Once dry, sprinkle these pumpkins throughout your house or create a crate display like I have done.
I love how these pumpkins spill out onto some of my favorite childhood reads.
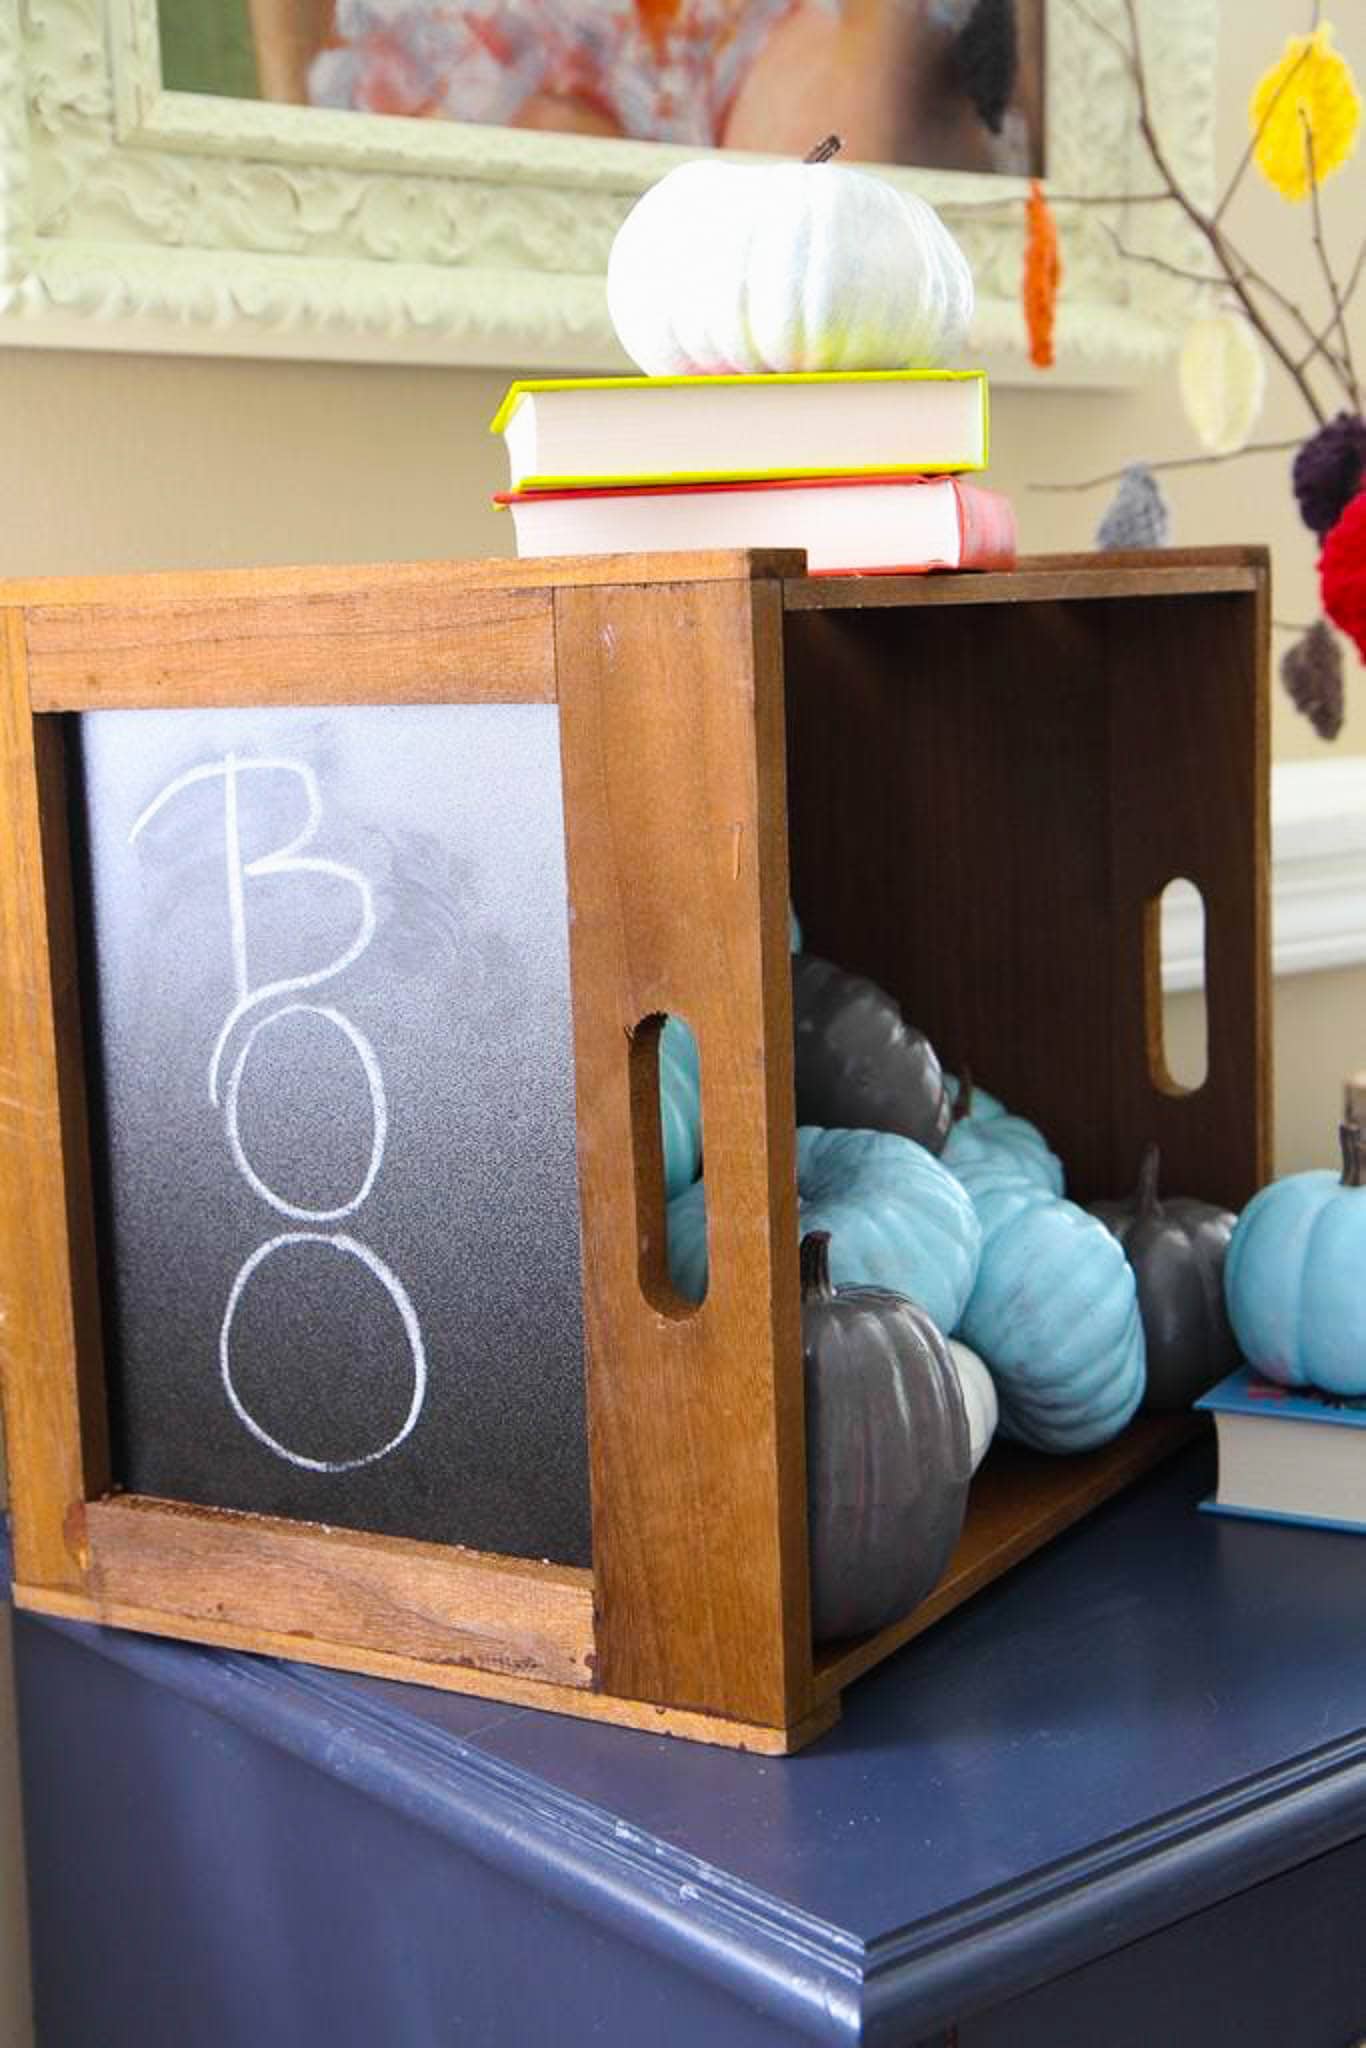
The chalkboard sideon this crate gives me the chance to make this display feel a little more Halloween and then can be replaced with a different label later in the fall. I added myknitted leaf centerpiece to the side of the table- I can’t believe how well these branches have held up over the years!
For a corner in our home that used to have nothing, this has quickly become my favorite focal point in our living room.
I love how these pumpkins spill out onto some of my favorite childhood reads.
The chalkboard sideon this crate gives me the chance to make this display feel a little more Halloween and then can be replaced with a different label later in the fall. I added myknitted leaf centerpiece to the side of the table- I can’t believe how well these branches have held up over the years!
For a corner in our home that used to have nothing, this has quickly become my favorite focal point in our living room.
Do you prefer to paint your pumpkins with chalk paint? I think you will get a kick out of the pumpkins we created for the season when our kids were small. We really have some of the best pumpkin painting ideas on here so please stick around!
What is the Best Way To Clean Up After Painting With Acrylic Paints?
Acrylic paint crafts can get pretty messy, especially if you are involving your kids in on the fun. I use a simple formula for removing paint from little hands that you should definitely try.
Whether you are dying eggs for the Easter season or painting pumpkins for Halloween, this formula is a great one to keep in your back pocket.
The best way to remove acrylic paint from your hands is to squirt a small amount of whitening toothpaste, add a squirt of facial exfoliant (or body exfoliant), and a squirt of baby oil. Just rub this combination on your hands until you have removed all the paint.
The best part is that you will have baby soft hands after you are done!
This post contains affiliate links. I receive a commission if you make a purchase through our links.
Love this project? Check out these additional craft projects!
This post was created in partnership with Waverly Inspirations and contains affiliate links. Thank you for supporting the companies that support our site!
Today we have gathered the best tips, easy projects, and fun activities you can play for the ultimate family staycation. Be sure to bookmark this for some of our favorite boredom busters!
From our marriage & parenting contributor, Mary Carver.
Last year, on the Friday before our school district’s spring break began, my daughter went on a field trip with her class. It was her first experience roller skating, and all week my husband and I joked with her, saying more than once, “Don’t break your leg!”
Well, the joke was on us, because just a short hour after I dropped her off at school that morning, I got a call from the school nurse. My daughter had, indeed, broken her leg. That ordeal is a story for another time. But what I’m remembering today, as we head into spring break season once again, is how so many people reacted to the news by asking if we’d had big spring break plans.
Apparently, many families plan big trips for their kids’ spring breaks. I feel silly admitting it, but I really had no idea. I had assumed most families would be staying home, juggling work and childcare, catching up on home projects, and possibly taking a trip to the movie theater or park before sending their kids back to school.
After all, that’s about all I had planned!
After hearing about other families’ more extravagant and adventurous plans, I didn’t feel guilty that we couldn’t afford that kind of travel or time off in the spring. But I did feel bad that I hadn’t put more thought into what we would actually do instead. Last year’s spring break was consumed by pain medicine, follow-up doctor’s appointments, and begging my daughter to JUST TRY TO USE THE CRUTCHES. But this year, I was determined to make the most of our five days off school!
Here’s what I did:
Evaluate your free time. Plan your work time.
Because of the nature of my work, I can’t simply take a whole week off. (Okay, I can, but it requires a level of nose-to-the-grindstone intention that I just didn’t pull off this time.) But I also don’t want to spend five days trying desperately to finish projects while hearing my kids ask, “When are you going to be finished?” So I’m planning three half days of work (and probably a chunk of time on the weekend to catch up). That way, they know they’ll have to entertain themselves during those times and I know I will need to focus so I can maximize those times.
Now we’re left with two full days and three half days. What will we do?
Take a look at your to-do-someday list. Get something done.
I’m not the only one with a Someday To-Do list, am I? A list of house projects, inconvenient errands, or seasonal tasks that always seem to get pushed to the back burner during the regular school year?
The trick with this part of a spring break staycation is positioning your to-dos as adventures or fun projects. If your kids are anything like mine, half the fun of spring break is spending extra time together — so why not use some of that together time to accomplish something? You’ll be relieved, and they’ll be proud they helped.
At least that’s my hope for having my girls help me recover the dining room chairs. I’ll let them weigh in on the material we choose, and any project involving a screwdriver and staple gun is fascinating to them (even if they don’t actually use the tools themselves). And since we sit on those chairs every single day, they’ll see the fruit of their labor daily. (Plus, at least in my house, anything can be fun if we add loud music, funny faces, or a special snack to eat when we’re finished!)
Other chores or errands might require some incentives, of course — like shopping for new spring clothes, but only after we go through and clean out their closets, or a trip to a special ice cream shop but only after we finally return those Christmas presents you’ve had in the trunk of your car for months and drop off the Goodwill donations you packed up back in January when you KonMari’d your house like the rest of the world.
Because I want to have two full days for full-blown staycation adventures, I’m planning our “project” (chore and errand) days for the other half of those days I’ll work. Now, finally, it’s time for the fun part!
Explore your town. Connect with friends. Make memories.
Whether you have a couple full days to fill, a few hours here and there, or an entire week, planning for fun will make sure your break doesn’t slip away without doing anything to write home about. (I know, you’re already at home. You know what I mean.) Here are some ideas:
Does your community have a children’s museum? Or art museum? Or, really, any kind of place where your kids can let loose and have fun (while also learning something because you’re a sneaky mom like that)? Go there. Bonus tip: Look on the museum’s website to find out if they have free days or hours, coupons, or special events that you can plan around.
Who are the friends you keep meaning to see but haven’t been able to? Who lives too far away for a simple dinner together during a normal week? Make plans to see them! Invite them over to your house for a playdate or lunch, or meet them at a park somewhere between your homes. (Or, if you really want to mix things up, you could combine an errand with a friend date and do your errands together. Need to stock up at Costco or Trader Joe’s? Why not go with a friend? Then grab lunch somewhere with a playplace so your kids can run free while you catch your breath.)
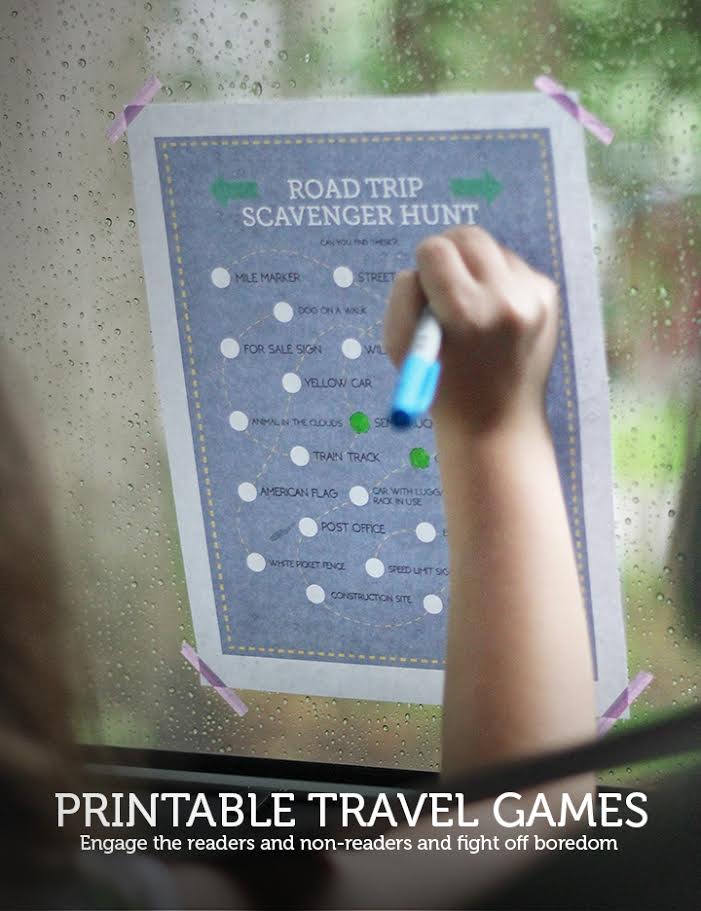
What’s new? Has a big store opened up recently? Or perhaps a new restaurant? Make an adventure of checking out the new place by putting together a scavenger hunt for your kids or giving them a “mission” or mystery to solve while you’re there. Tasks or items might include eating a food they’ve never tried before, spotting specific items or colors or numbers, deciding how they’d like to spend a certain amount of money (either pretend or real), or even figuring out where the public restrooms are located.
Take a trip down memory lane. If you’ve lived in your city for a while, take your kids to see some nostalgic sights (like your childhood home, the restaurant you and your husband had your first date, the park you took them to when they were much younger). If you’re new to town, you can use this time to learn about your community’s history. Check out a local museum, ask a neighbor to share one of their favorite spots, or just explore an area, road, neighborhood, attraction you haven’t visited yet.
And don’t forget this: My city has a specific website for parents, listing out special events, fun excursions, coupons and promotional codes, and more. I always, always go there first when playing a staycation. Does your city have something similar? (Or, perhaps a local parenting group on Facebook? Or your MOPS group? Whatever source has a collection of information about activities in your city, go there!)
Put the “stay” in staycation.
Finally, you don’t have to even leave the house to have fun during your break. If you have little kids or a health condition or any reason at all that makes going out to find fun more difficult than usual, just stay home! But that doesn’t mean you’re stuck with Disney Channel reruns or another week of mac and cheese lunches. You can mix it up, right from home!
Some of our favorite things to do on those days are trying a new recipe (let the kids help cook), doing simple science experiments we’ve found on Pinterest, trying to imitate the trick shots of Dude Perfect or the dance moves of Kidz Bop after we watch a few videos on YouTube, or doing one of those messy craft projects I normally don’t allow. (Hello, glitter slime!)
Whatever your staycation looks like, you can make it fun. And really? Your kids will enjoy just as much and remember just as fondly the day you let them spend hours in their swimsuits, splashing in the tub with all the toys as they would some tropical trip. Are you together? Are you doing something out of the norm? Are you laughing and letting loose, even just a little?
Then your staycation will be a success!
A few more tips for you:
Set a budget. Even if you’re staying home, you’ll likely spend a little more money when all your kids are home and “needing” to be entertained.
Plan for rest. Much as I adore schedules and lists, I know we can’t fill up every minute. Both my kids and I need downtime and quiet time, so I might as well plan for that, too.
Sprinkle in surprises. Even on those work or project days, you can delight your kids with their favorite dessert, a new Spotify playlist, a quick manicure, or a break to play catch in the backyard.
Want more fun activities for the perfect staycation or family getaway? Here are a few of our faves!
When I was a kid one of my favorite treats in the world was an apple pie that they served at a fast food restaurant in town.
The flaky crust in a pocket filled with the warm apple filling was the perfect comfort food to me and it always seemed to be the perfect amount to satisfy my sweet tooth craving.
Clearly, I am no food snob when it comes to the humble pie whether it is from a box in the grocery store or a local diner.
Just give me ALL THE PIE.
It should come as no surprise that my children adore pie like their mother so I wanted to create a treat for them that would be deemed one of the coolest after school snacks I have made to date.
Of course, we are creating the only pie worth making, at least according to our household.
For us, it is the incredible pumpkin pie that truly brings together the flavors of fall in every delicious bite and makes it feel like Thanksgiving… even if it really is just another boring Monday.
Of course, I have a little secret in the refrigerator now that I am a busy mom.
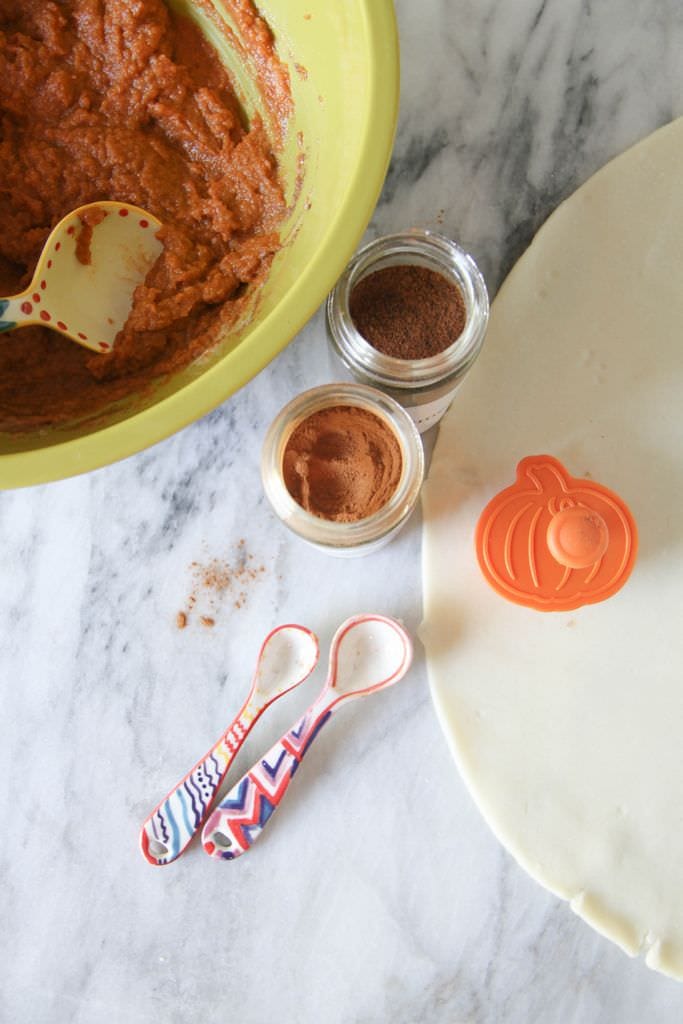
These little treats couldn’t be easier to prepare thanks to store-bought pie crust that saves me a lot of time on treats (and dishes).
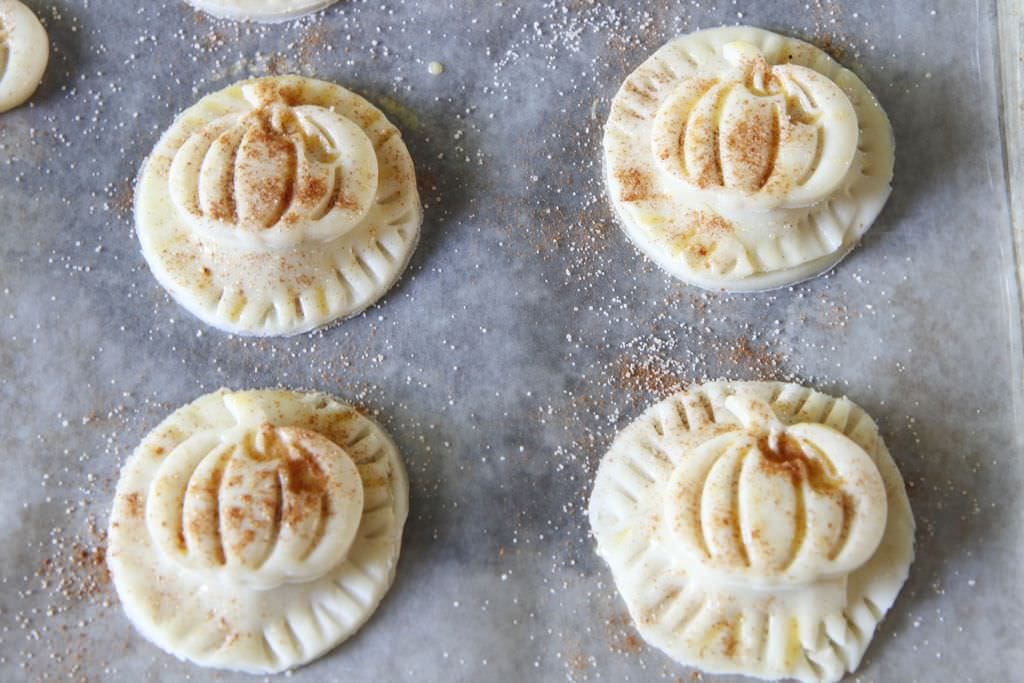
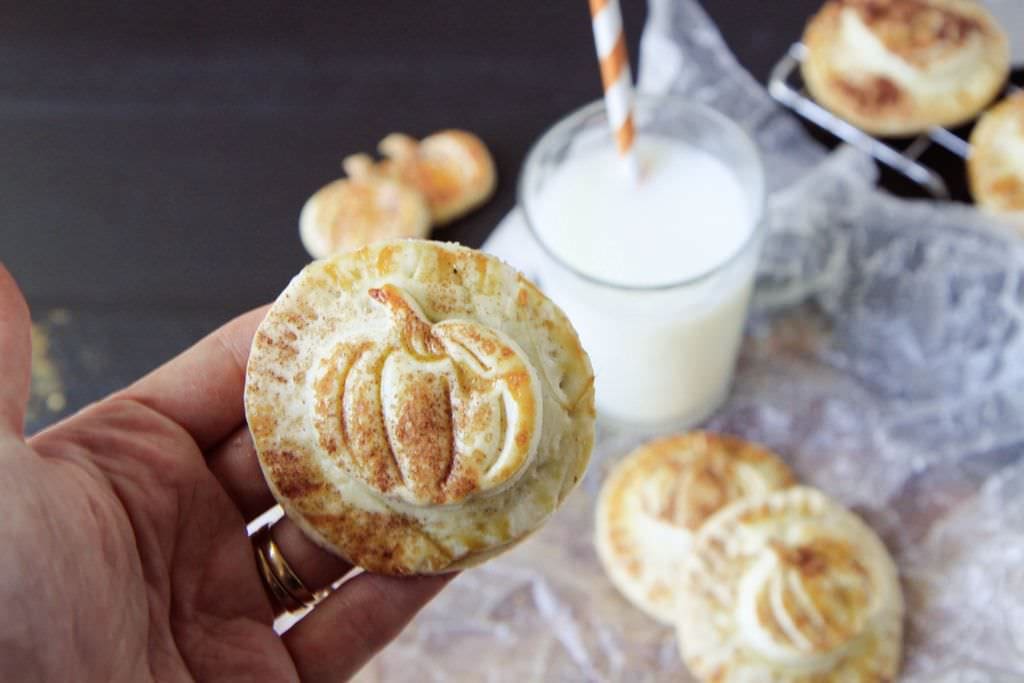
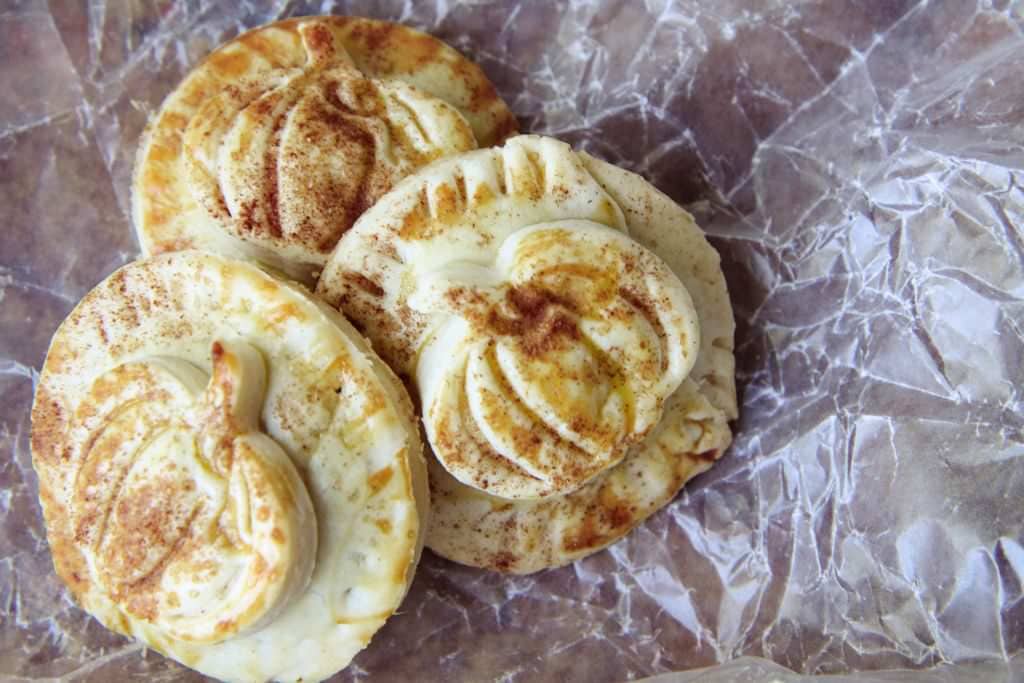
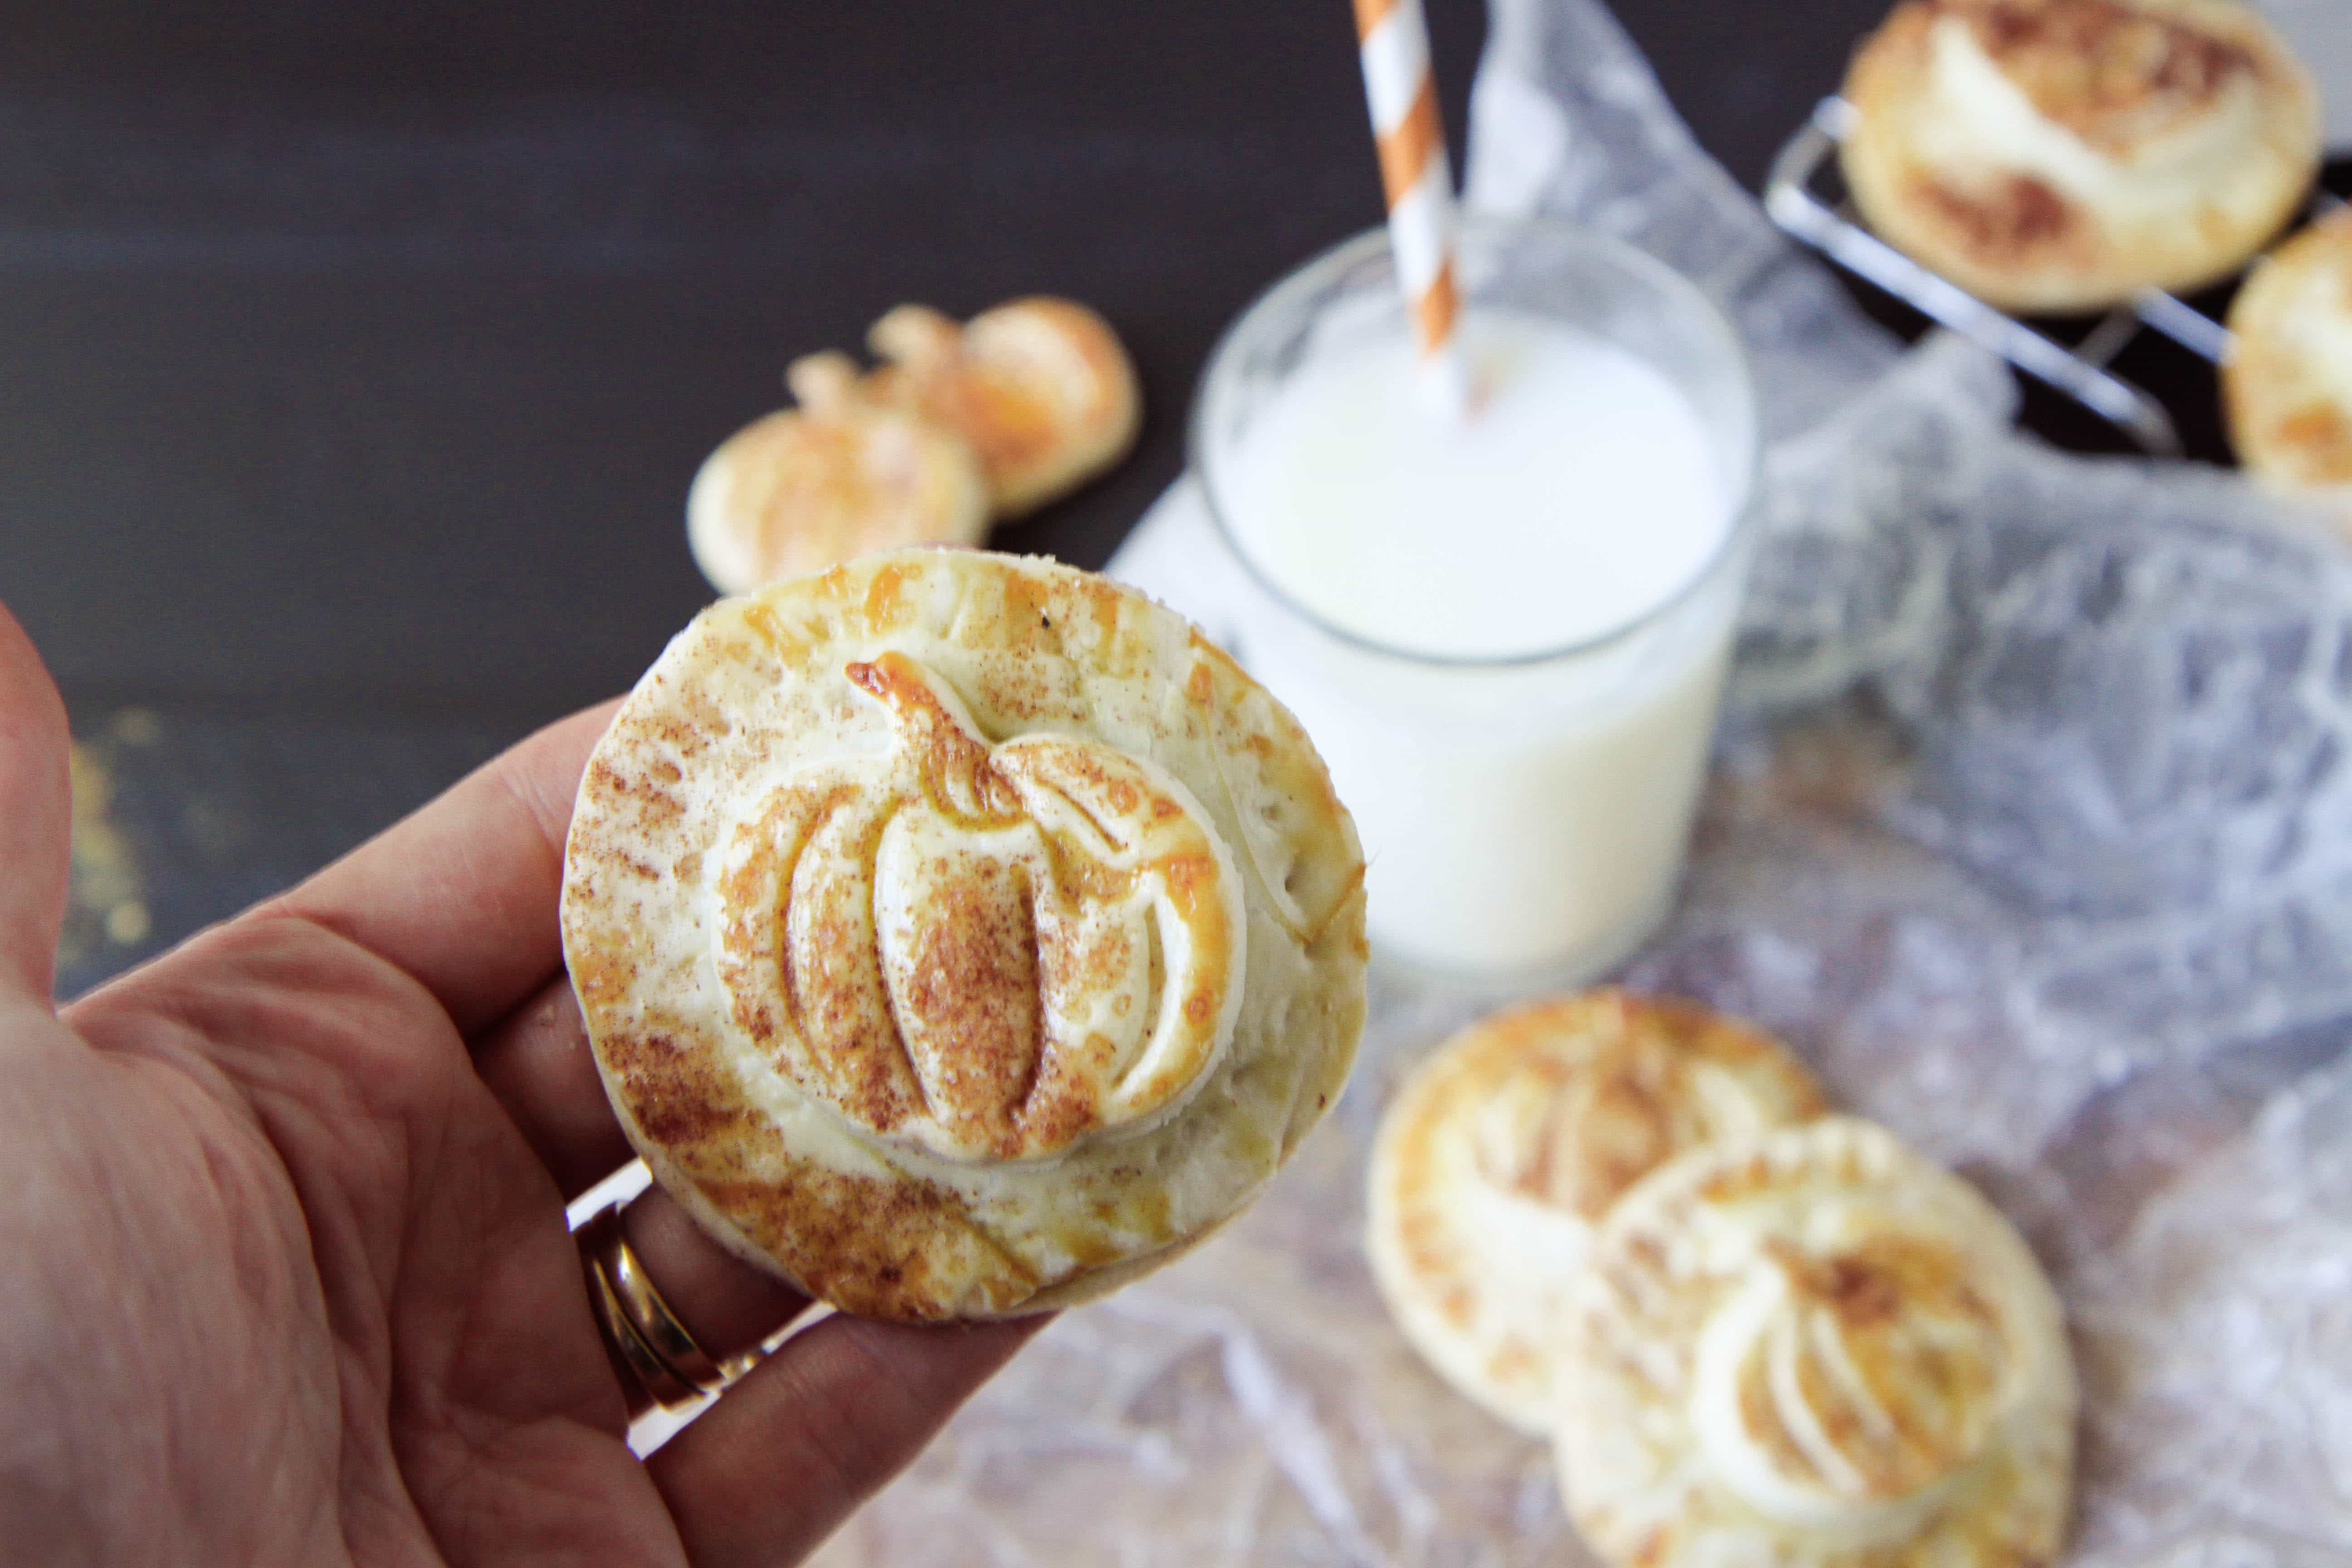
With a little pumpkin shape placed on top of each delicate pie and dusted with cinnamon and sugar, this treat looks impressive, but can be pulled together in a matter of minutes.
These would be just perfect for a fun Halloween lunchbox treat or to celebrate the season any other day of the week! Best of all, since the filling calls for just a cup of pumpkin puree, it is the perfect way to use up a leftover can that might be taking up space in your refrigerator.
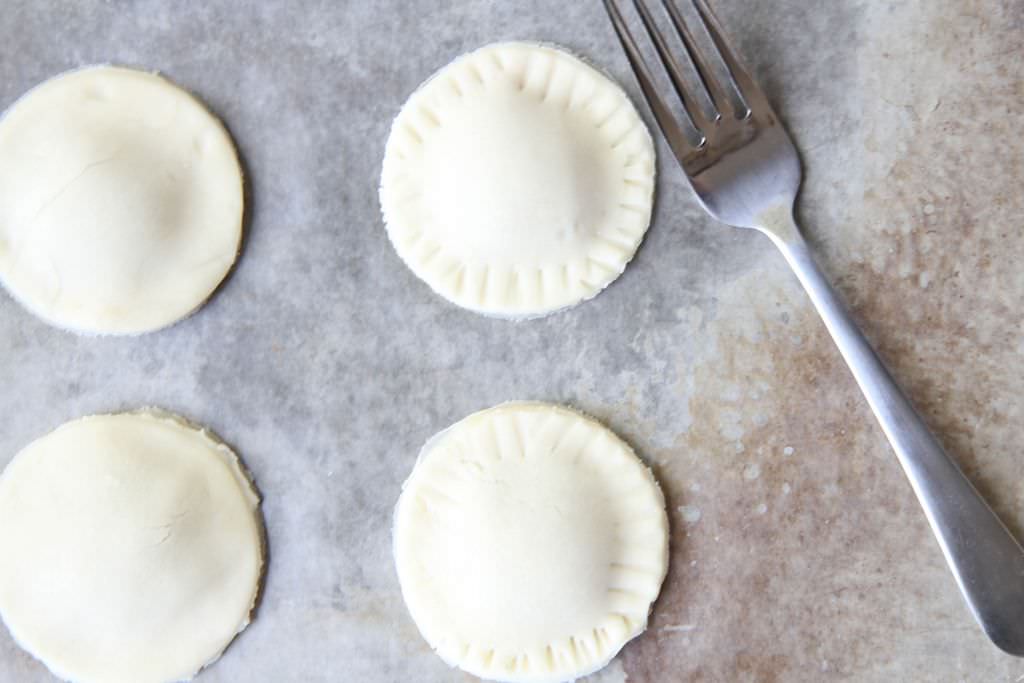
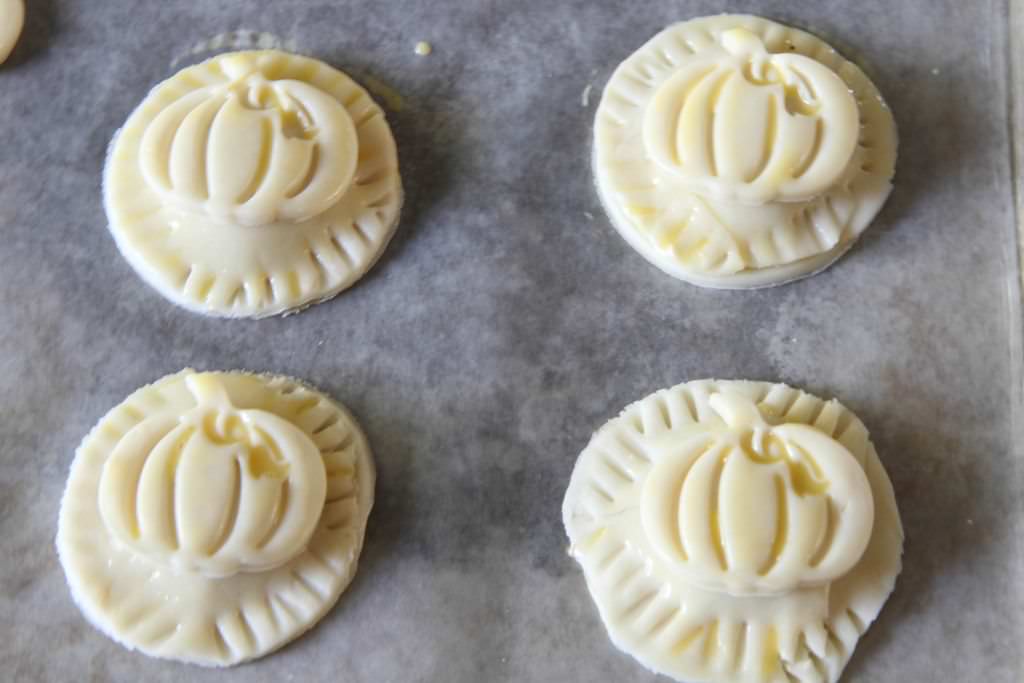
If you haven’t made a hand pie before, it couldn’t be easier. You can use a floured cup as a circle cutter or a biscuit cutter to cut out your circles. Add a tablespoon of your filling to the tops of each of your circles and then add an identical circle on top to pull the pie together. To make sure everything is secure, I seal and add pretty scores with a fork.
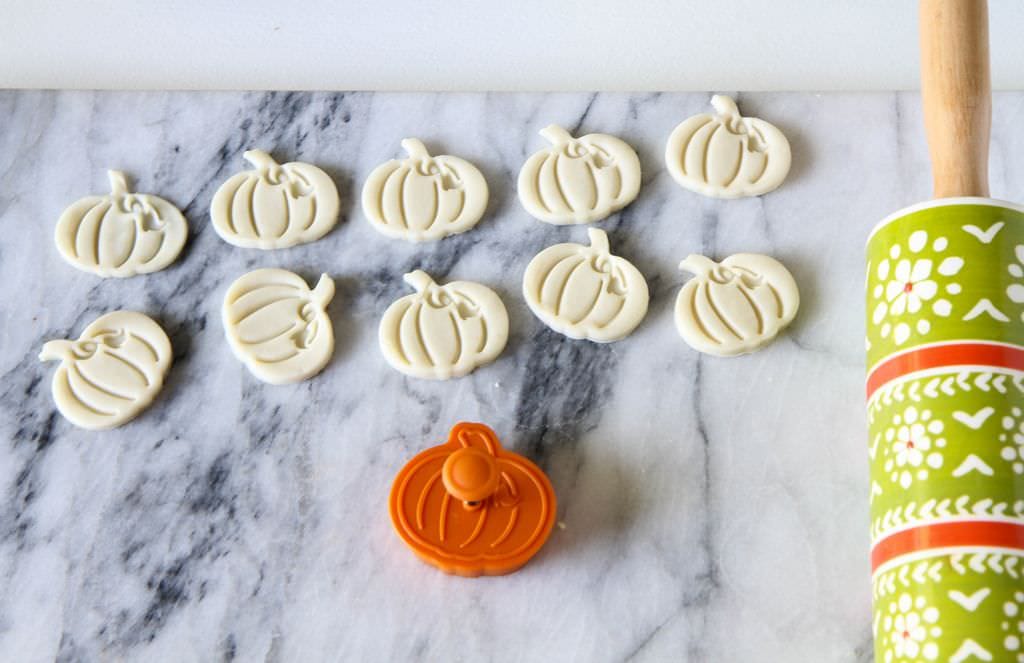
To add a little decoration, I love to buy seasonal decorative pie cutters that add a little detail to the edge of my pies, decorative edible touches to a dessert table for the holidays, and happen to add the perfect detail to these hand pies.
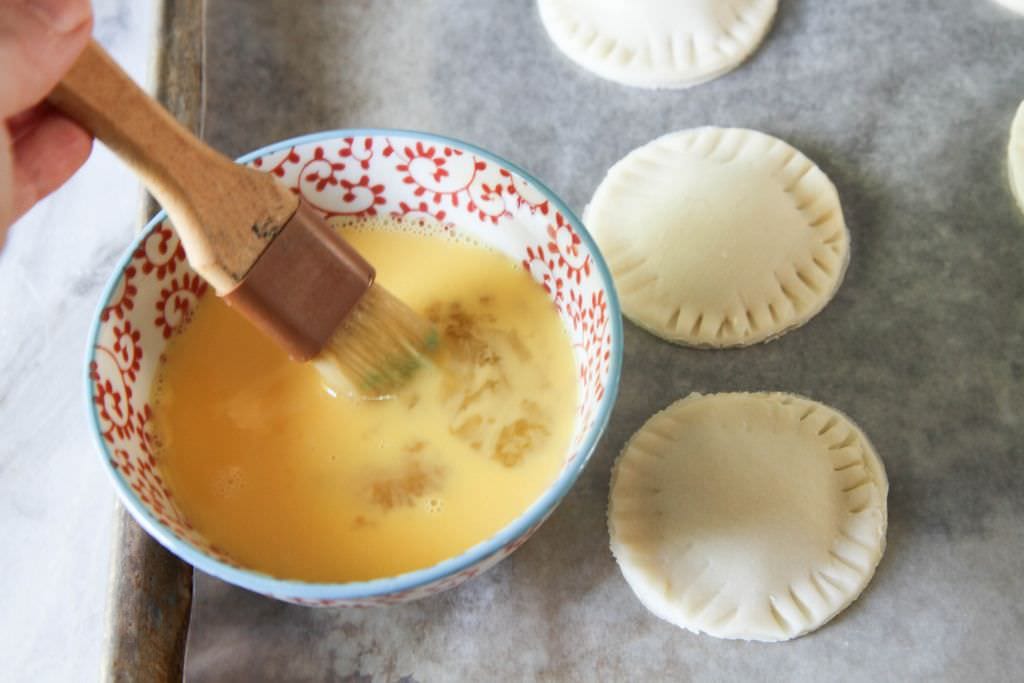
To secure these adorable pumpkins, I brushed the pies with an egg wash and then rested this on top, brushing again lightly with the egg wash.
It adds a beautiful touch and shine to the crust and makes these pretty pies into a little work of art.
I hope you can share these treats with someone you love this month and I look forward to sharing more fun fall ideas with you on the blog. Looking for a traditional pumpkin pie for the whole gang? I can’t recommend this tried-and-true recipe enough!
Speaking of more fun fall projects, scroll below the recipe for a few of my ABSOLUTE FAVES!!
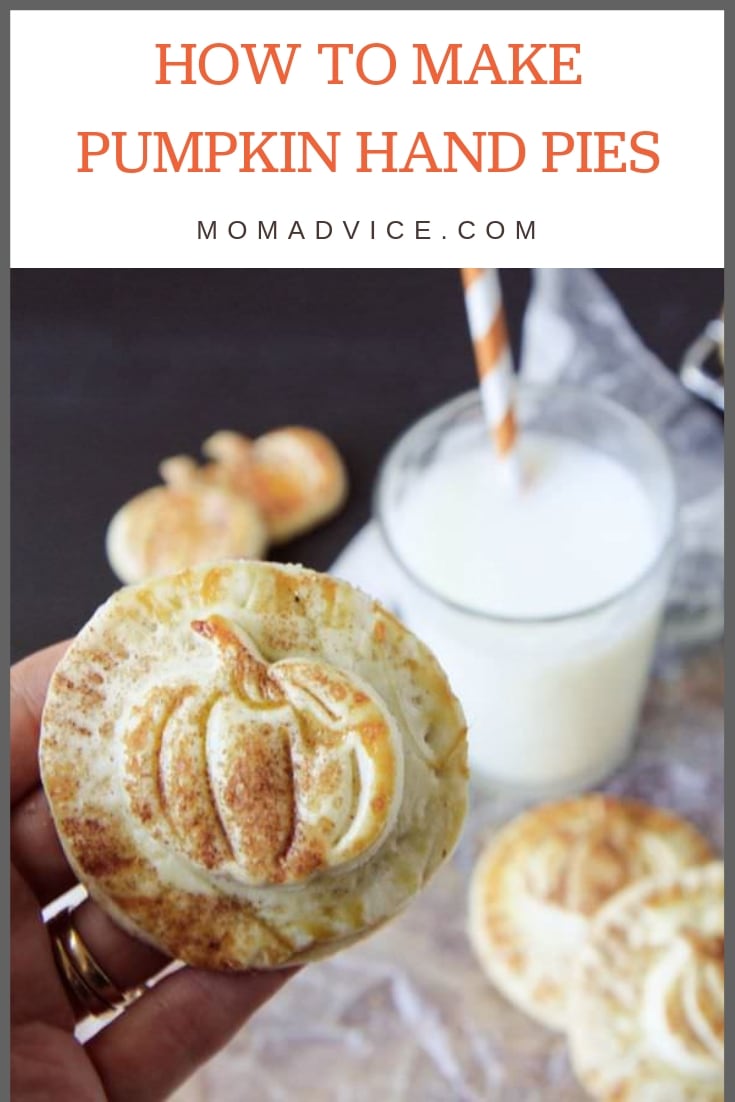
Pumpkin Hand Pies Recipe
Prep time:
Cook time:
Total time:
This fun semi-homemade treat has all of your favorite pumpkin pie flavors in a single size version. Be sure to snag [url href=”https://rstyle.me/n/c9yyh2wky6″ target=”_blank”]some fun pie cutters[/url] to really make these festive! Need to make these gluten-free? No problem! Simply switch your prepared pie crust to a gluten-free version!
Ingredients
1 cup pumpkin puree
3/8 cup brown sugar
1/2 teaspoon cinnamon
1/4 teaspoon nutmeg
1 tablespoon heavy cream
2 packages prepared pie crust (make sure to bring this to room temperature)
1 egg
Cinnamon and sugar to garnish
Optional: [url href=”https://amzn.to/2pOSbRj” target=”_blank”]This handy tool[/url] and [url href=”https://rstyle.me/n/c9yyh2wky6″ target=”_blank”]decorative pie cutters[/url]
Instructions
Preheat the oven to 350°F.
In a mixing bowl, mix together the pumpkin, brown sugar, spices and heavy cream. Set aside. Unroll your room temperature pie crusts. Using a 2 1/2 inch biscuit cutter or the opening of a drinking glass as your guide, cut out your circles. Remember, however many you can cut out of your first pie crust, you will want to try to do the same amount on the next pie crust to create your toppers. The amount you can get will depend on your circle size that you are punching out.
Place your first half of your circles on a parchment paper lined cookie sheet.
Add in about a tablespoon pie filling, then place a dough circle on top. Press together with your fingers to seal them. Then use your fork to seal and create a pretty edge to the pie.
Whisk one egg in a small bowl and then brush on top of the dough.
Finish with a sprinkle of cinnamon and sugar. Bake for about 20 minutes or until golden brown. Serve with a big glass of milk or a dollop of whipped cream for a sweet treat!
3.4.3177
here are a few of our most popular fall projects on the site right now!
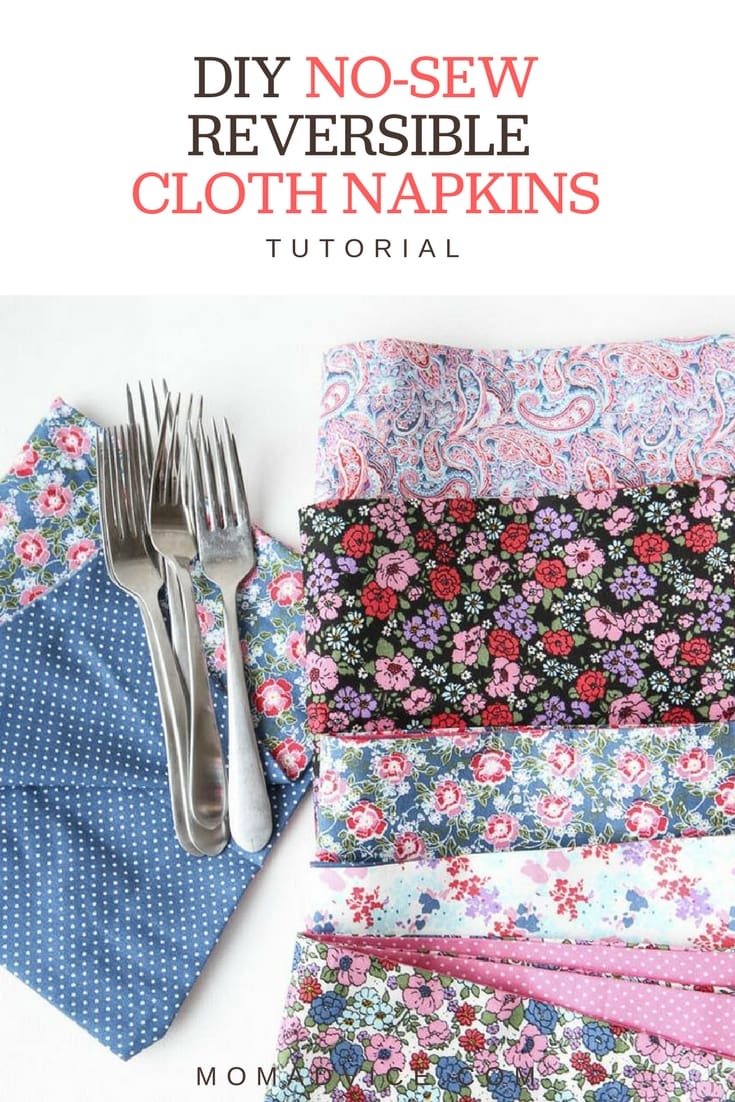
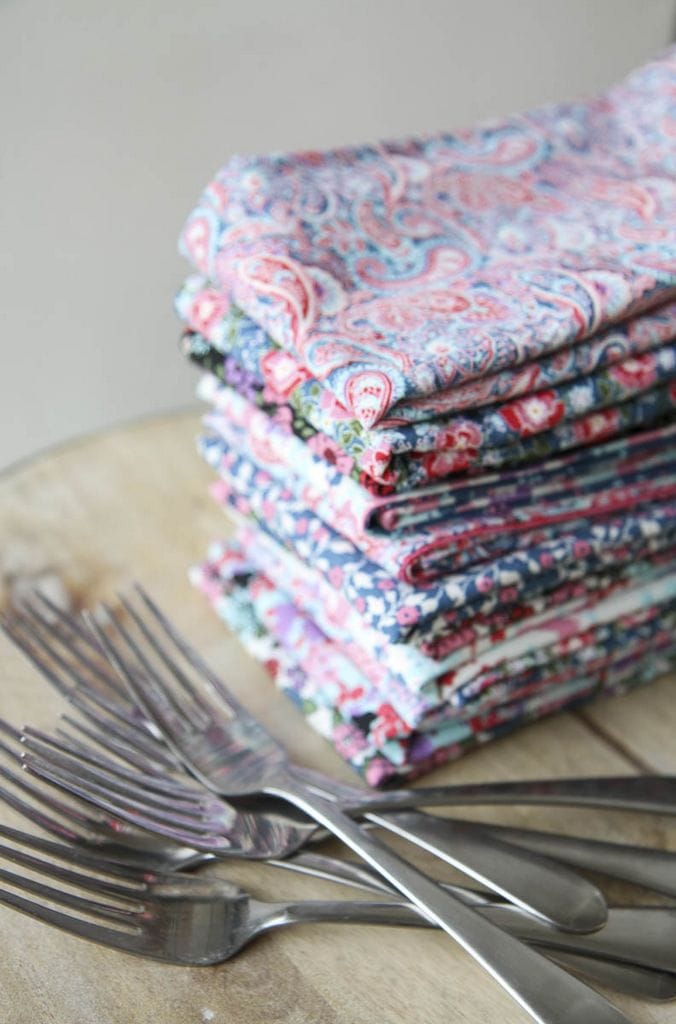
The queen of no-sew projects is back and I’m excited to share this EASY DIY No-Sew Reversible Cloth Napkin tutorial with you today.
That’s right, even if you can’t sew, it’s no biggie!
Can’t cut a straight line?
Me either!
No need to even have a skill in that!
Each diy no-sew napkin should take a mere ten minutes to make and can be used for many a dinner with your family and friends. Not to mention, these would make a gorgeous gift for a newlywed or the holidays.
I had a set of cloth napkins that got a lot of love in our house because of their easy-to-wash material and their perfect size. I was never a fan of the colors though and so I measured my current set and headed to the fabric store where I discovered (GLORY BE!) that the fabric bundles, at our local fabric shop, just so happened to be the EXACT same size.
What luck for someone who can’t cut a straight line.
I have always loved the beauty of these color-coordinating fabric bundles (just so perfect for quilters) and thanks to their prepackaged coordination, it makes creating a reversible set of napkins oh-so-easy for those of us born without the gift of pattern-matching.
Here’s my quick tutorial AND scroll down for my system for washing and storing these beauties!
DIY No-Sew Reversible Cloth Napkins Tutorial
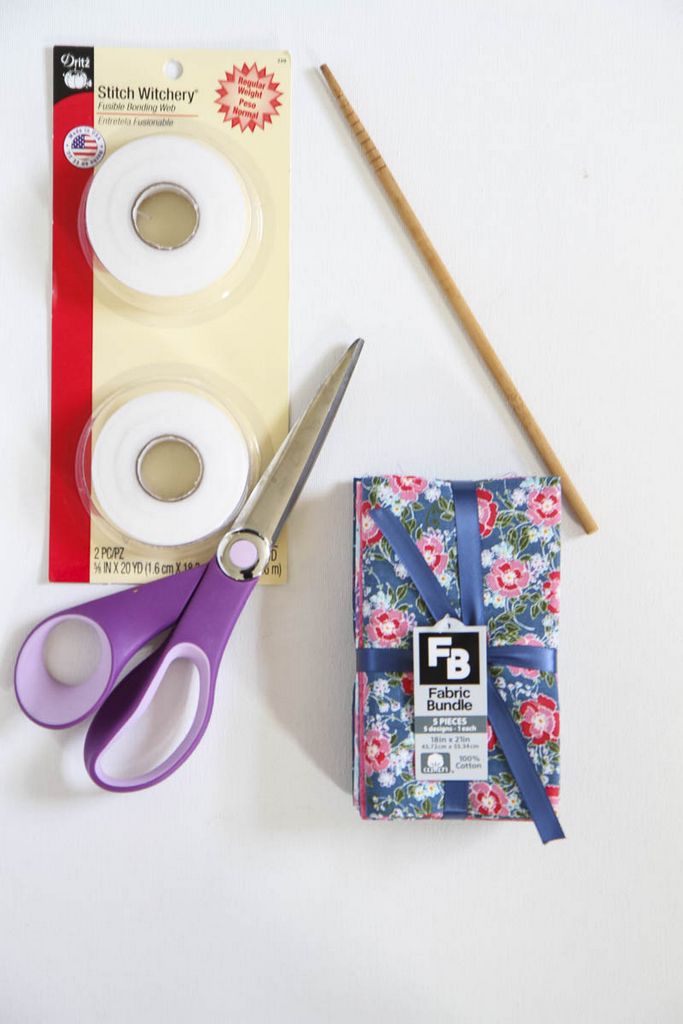
Supplies
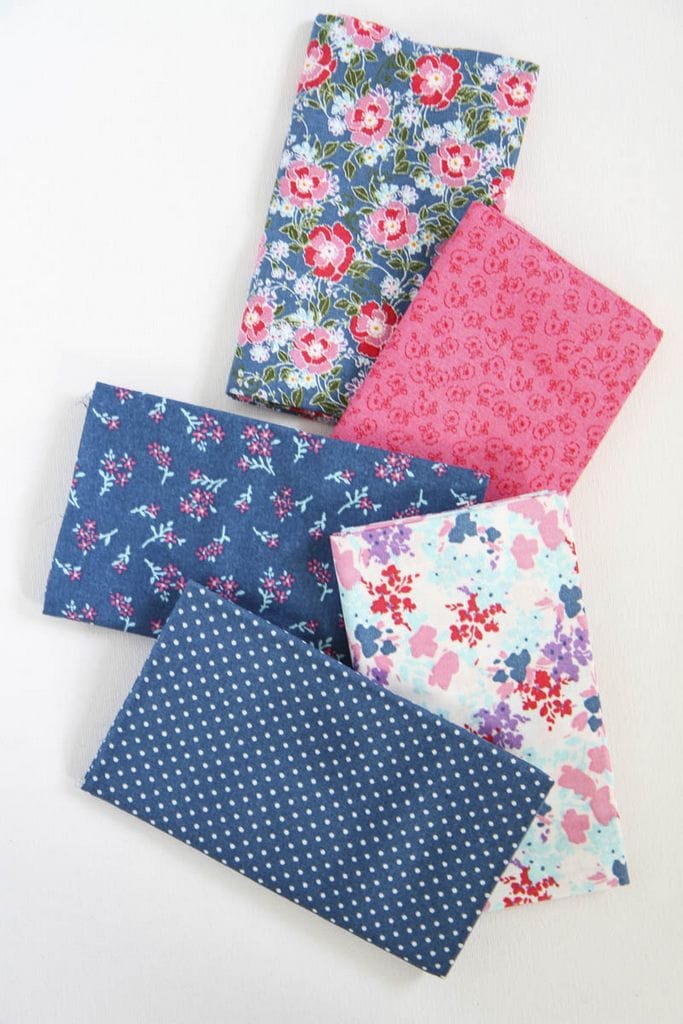
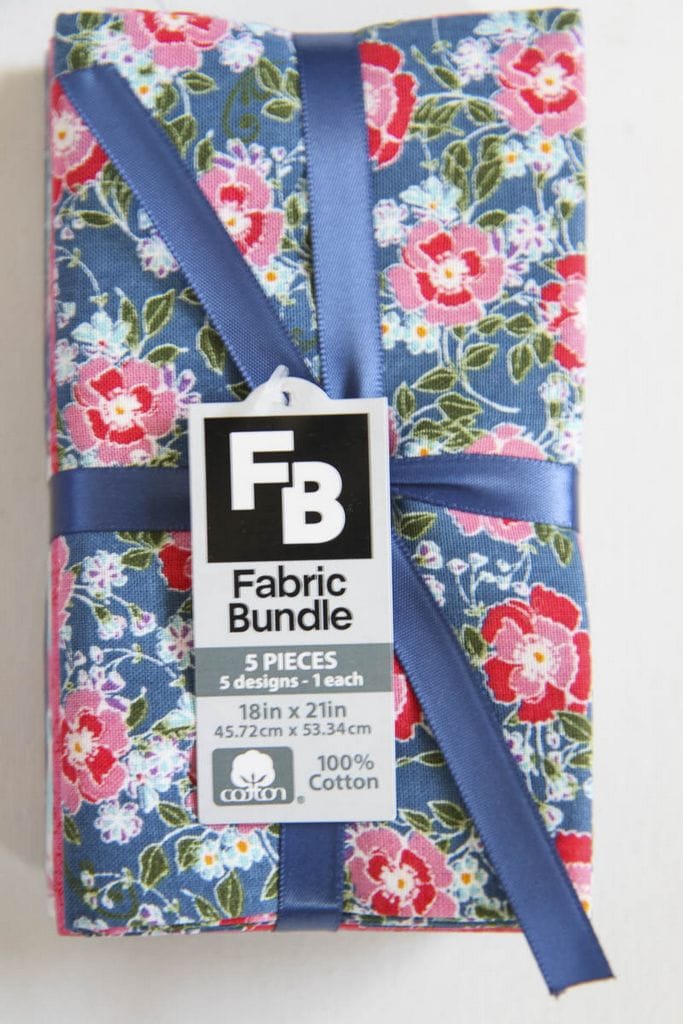
18×21 inch fabric bundle in coordinating colors- I LOVE these options or you can check here too for a more affordable option (the bundle I purchased had 5 pieces so to create an even number of cloth napkins you will need to purchase two bundles. You will need 2 pieces for each napkin you would like to make). I chose Cotton & Flannel materials for my napkins.
Stitch Witchery or similar fusible bonding web (I swear by Stitch Witchery for the majority of my no-sew projects- it really washes well!)
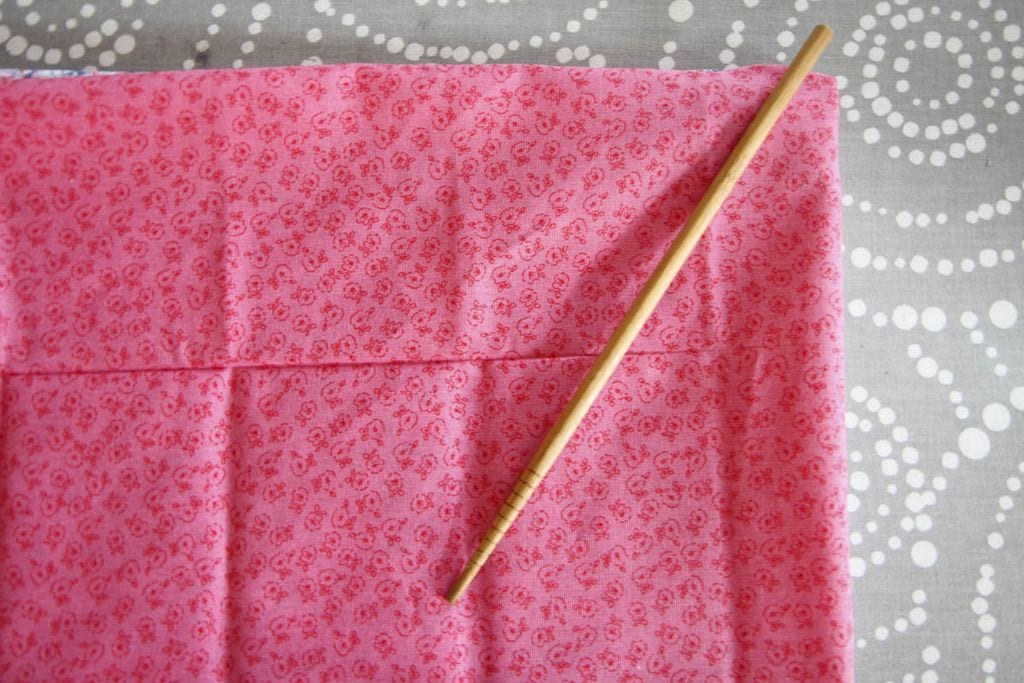
Chopstick or pointy object to push out your corners
Iron & ironing board
Scissors
Directions
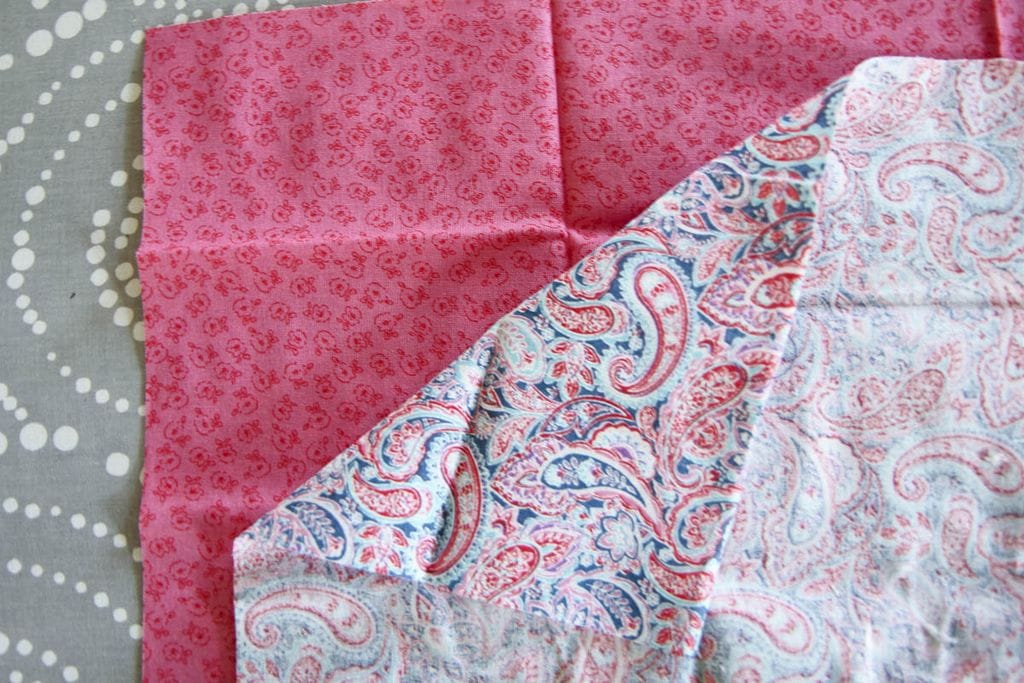
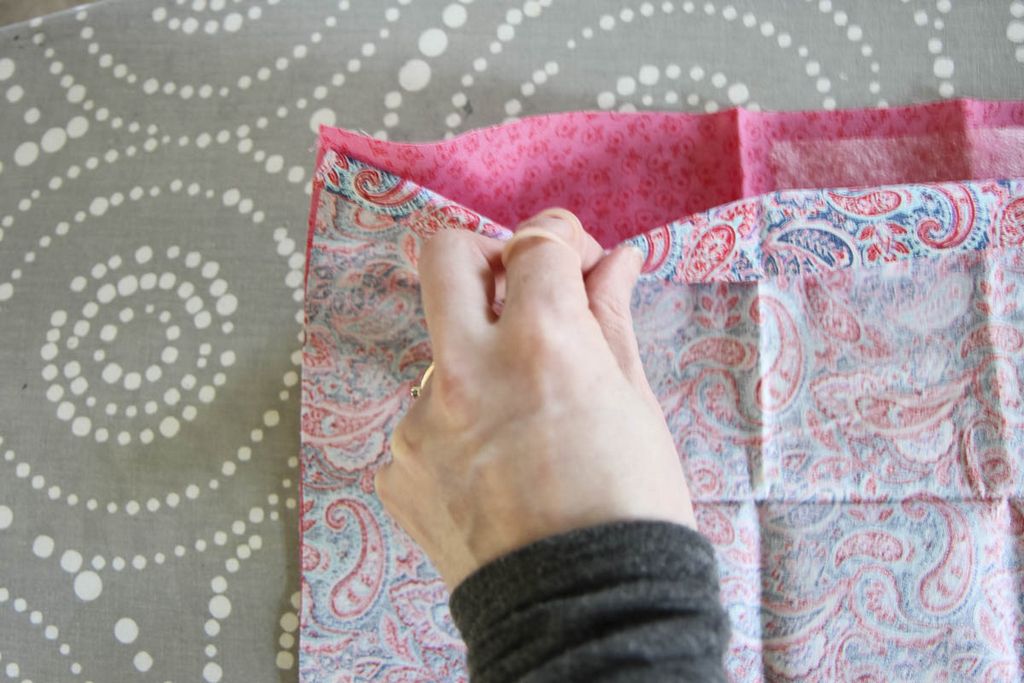
1. Select two coordinating colors and place the first one with the pattern up, facing you, and then flip the other one with the wrong side of the fabric out. Basically, you want the two patterns to be BFF’s and be facing each other.
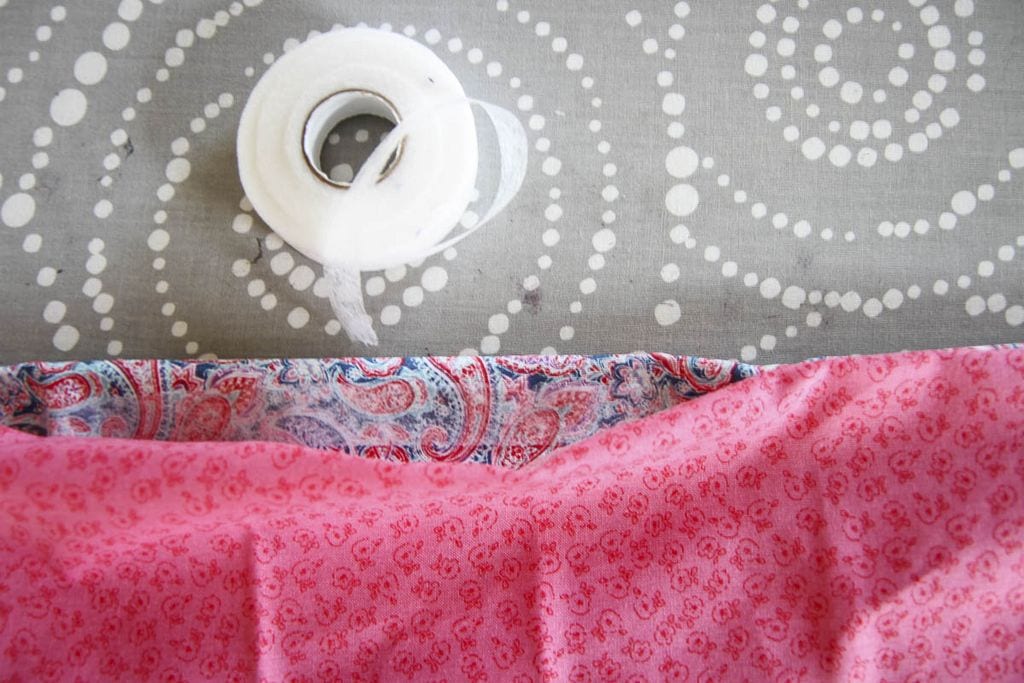
2. Going all the way across the fabric, lay down your Stitch Witchery all the way across, leaving a little room on each side of the edges, as pictured.
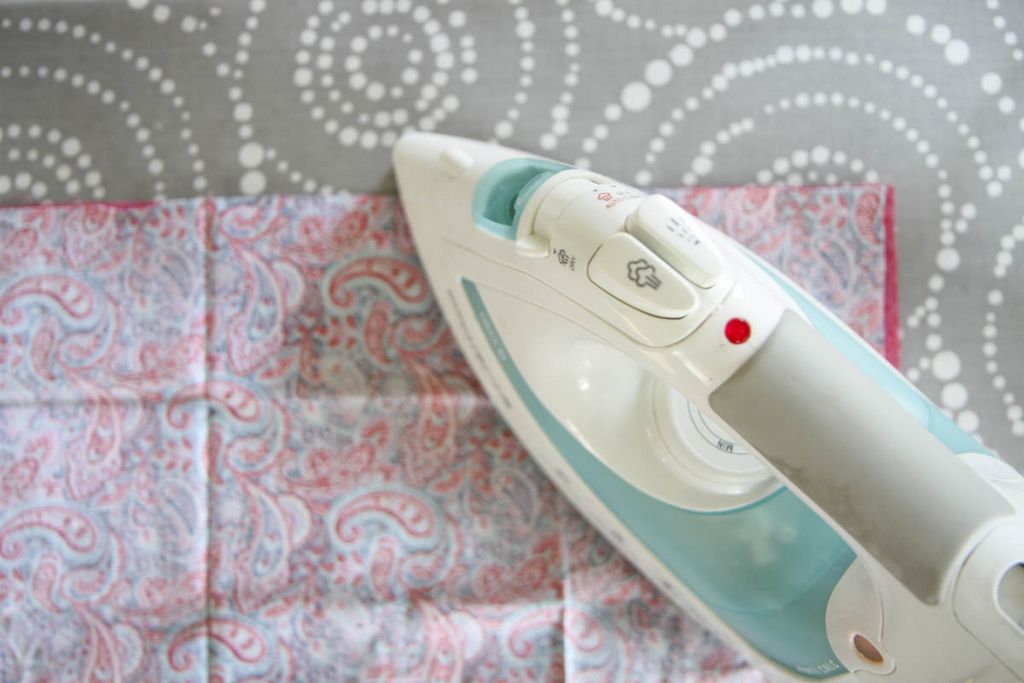
3. Grab you iron (I crank mine to the highest setting on that dial) and iron over the tape until the two fabrics are fused together. This will take several passes and you can additionally spray the fabric with a little water to produce steam and help the tape bond to each side of the fabric. Repeat this process on two more sides.
Leave one side without tape and follow the next steps to finish the cloth napkin.
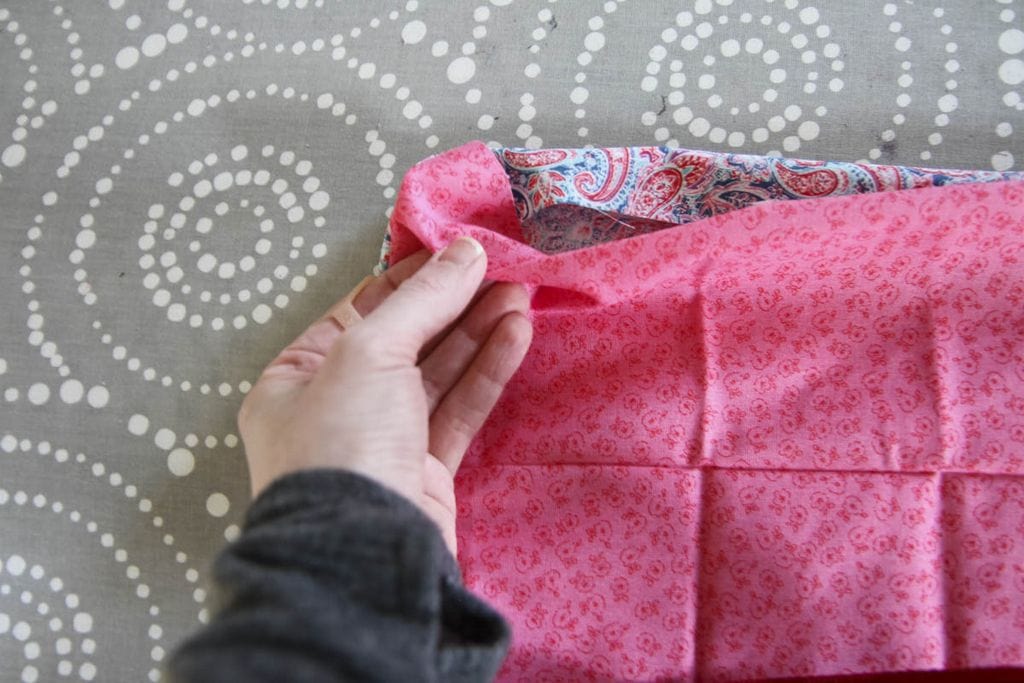
4. On the final side, we are going to run the tape along like the other sides, but stop to leave a pocket so we can turn this napkin right side out.
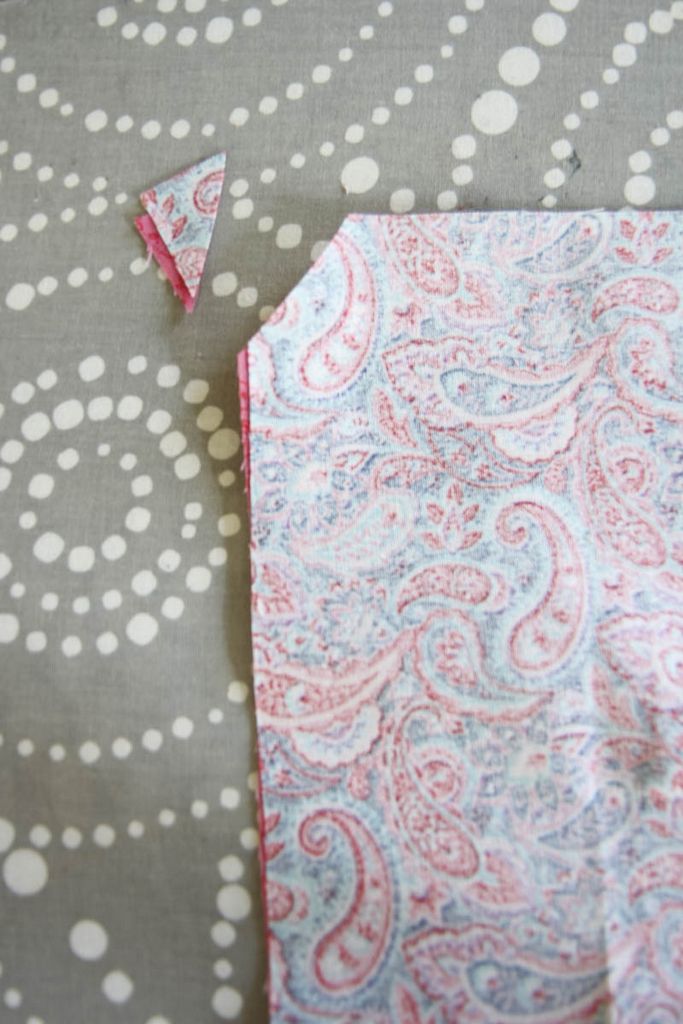
5. Using your scissors, cut all four corners so we don’t have excess fabric in the corners. CAREFULLY, turn the napkin right side out and use your chopstick to CAREFULLY poke out those corners. If the tape comes loose while turning this right side out, don’t worry! You can easily reseal that tape again when finishing that edge!
6. Tuck the last of the ends under, to match the rest of the side that has been fused. Finish with another round of Stitch Witchery and a final press. Once the ends are all sealed, finish with a spray of water to take out any final wrinkles and to give it a good press on all four sides to make sure they are secure.
TA-DA! That’s it, folks!
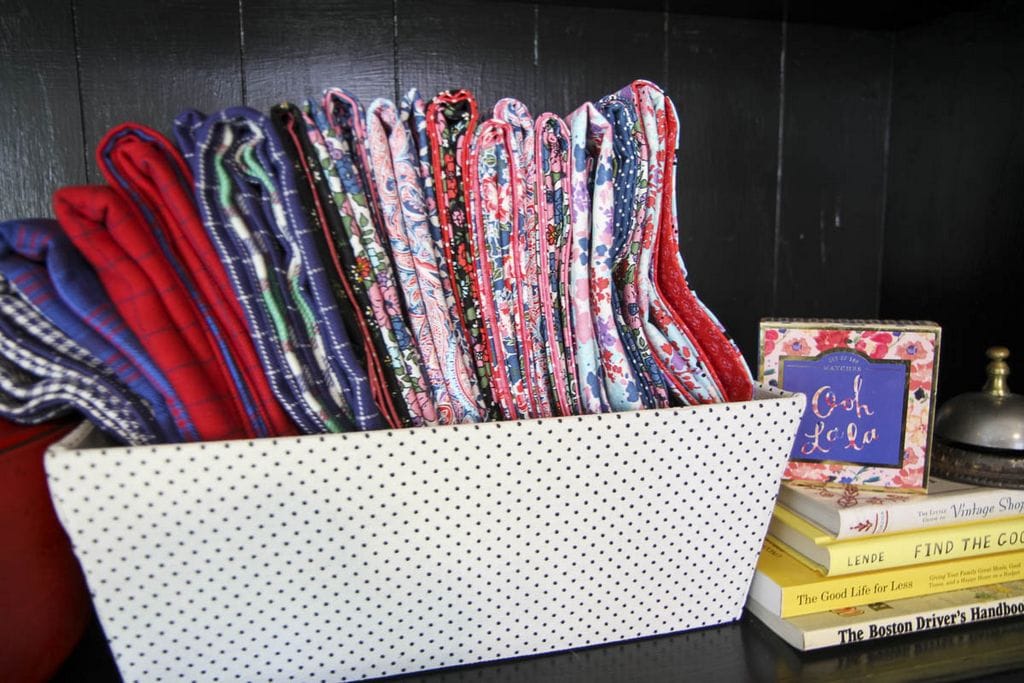
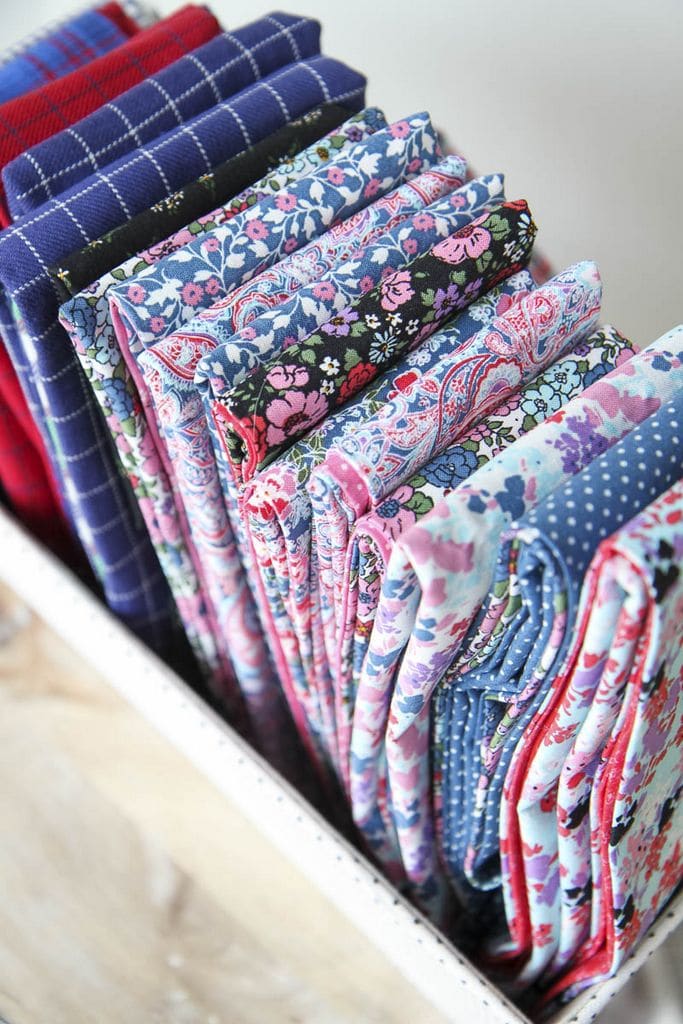
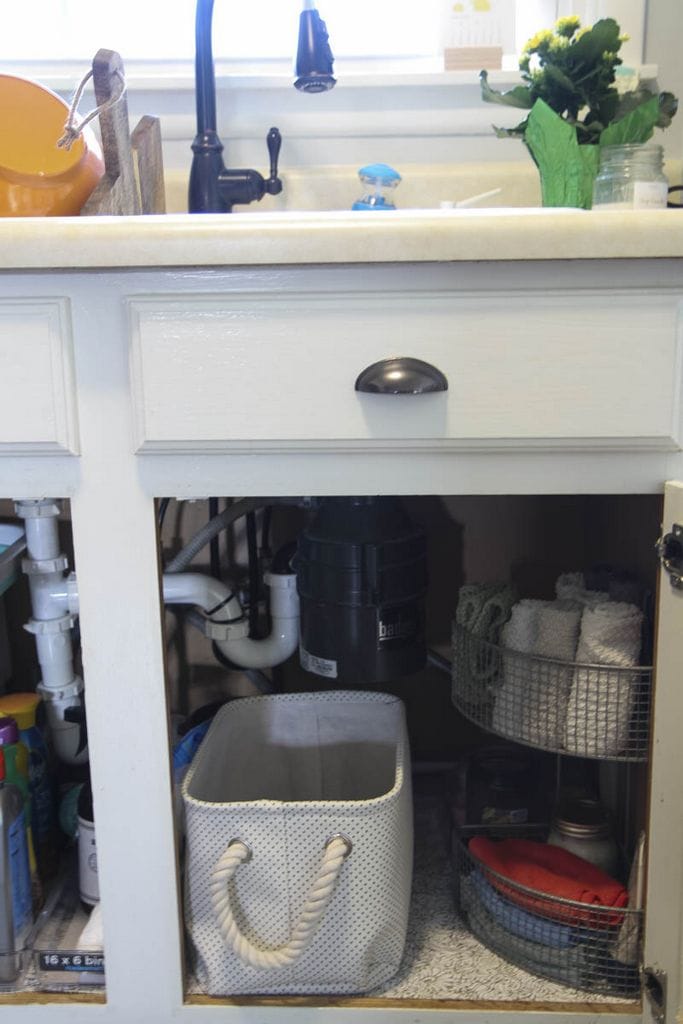
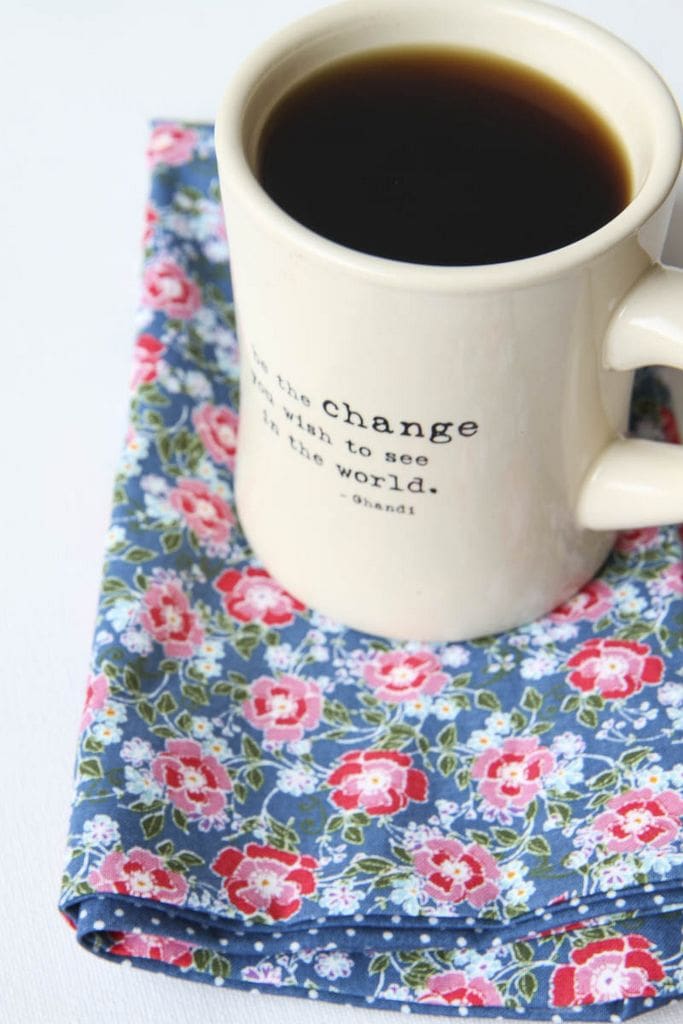
I had already received some questions, when I posted these beauties on IG, on how I planned to implement these in our home. I got a container for these and have them on our hutch, next to our silverware. Underneath the sink is a container for tossing the dirty napkins.
I got a small napkin holder that perfectly holds four of these (something like this) for the tabletop and each person gets one napkin per day.
I did request darker colors for messier meals and lighter colors for meals that less messy.
Each person is responsible for tossing their napkin in at the end of the day.
All of this feels REALLY doable to me.
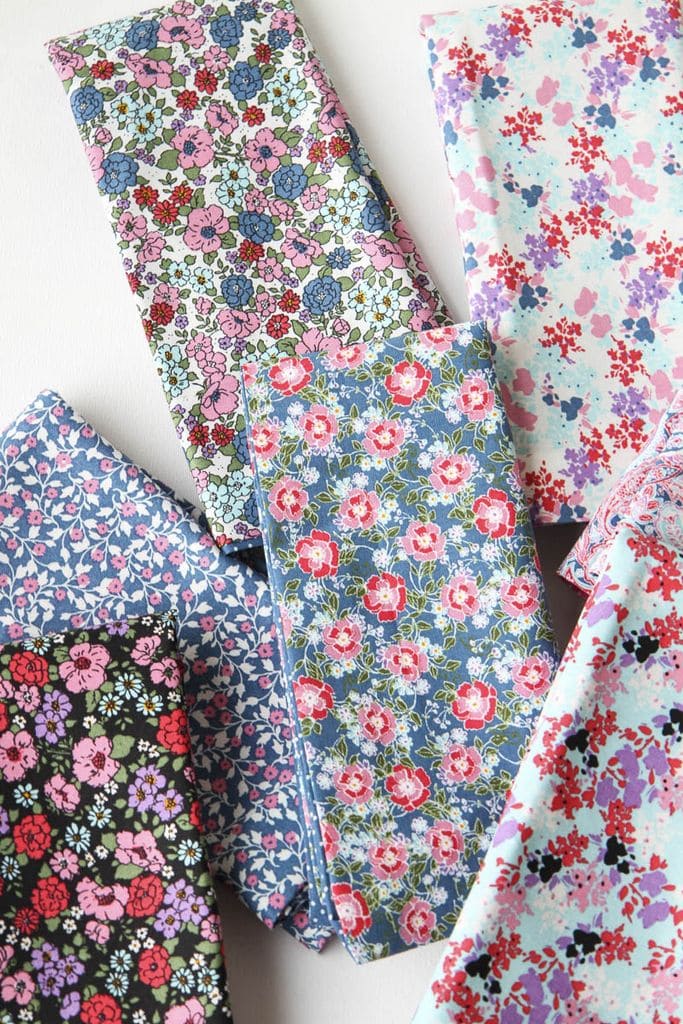
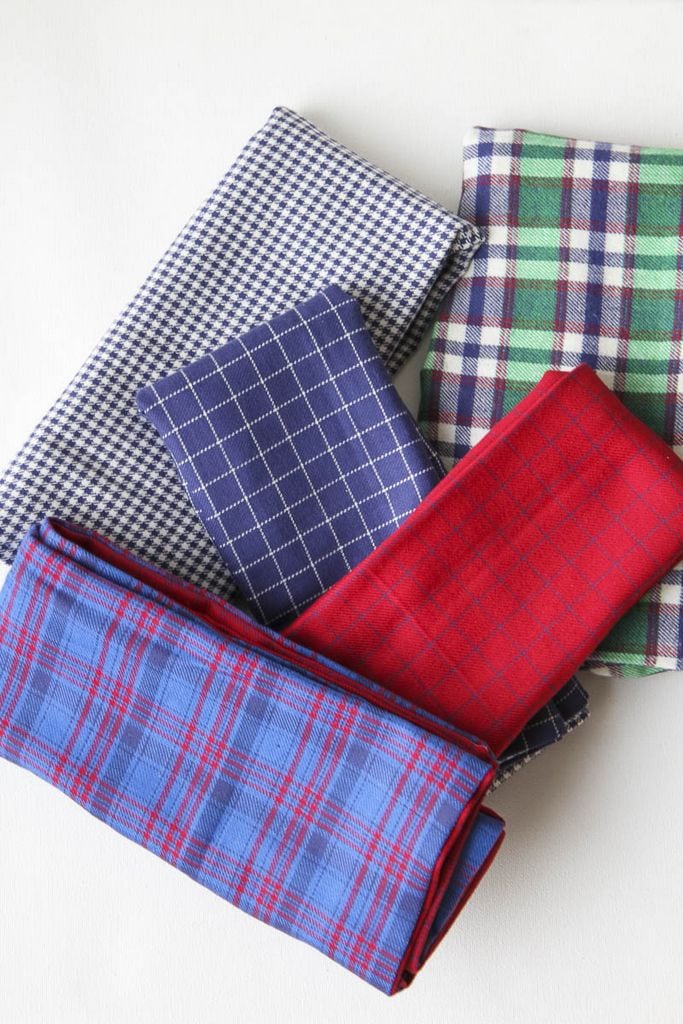
Obviously, I am IN LOVE with these feminine patterns, but I wanted to make some that were more masculine too.
I found some flannel and did some of our napkins in this fabric too.
The best part was that the print was on both sides so the warmer side of the flannel would be perfect for the winter months while the flipside of the flannel was perfect for all seasons (and, honestly, I had less worries about lint issues). I can picture just how beautiful these would be to dress up the table for the holidays.
The best part?
You can’t buy this at Target. You get to be totally unique.
Go ahead and gloat!
Do you love NO-SEW projects? You hit the lottery over here! Check out a few of my favorite no-sew tutorials!


